Frequentlyasked questions.
Configure Integration Provider
Unlock the full potential of your Zendesk experience with our latest innovation - Extended Data and Advanced Integration powered by Elastic Path Composer, Zendesk Custom Objects - or using our latest integration via Make.com. This groundbreaking solution empowers retailers to extend agnoStack's Customer Insights, Order Insights, and Advanced Timelines with your own data from internal systems or additional platforms not natively integrated by agnoStack.
The following guide covers the end-to-end process to developing your own Extended Data integration using Elastic Path Composer - including how to deploy and publish your custom Integration Flow. If you are looking to utilize Zendesk Custom Objects instead, please visit our guide to Configure & Set Up Zendesk Custom Objects Data Provider.
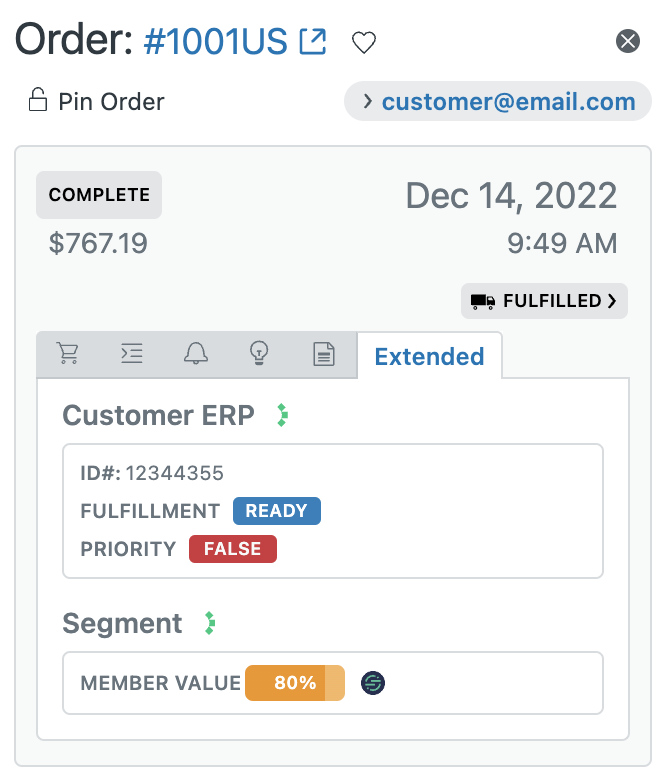
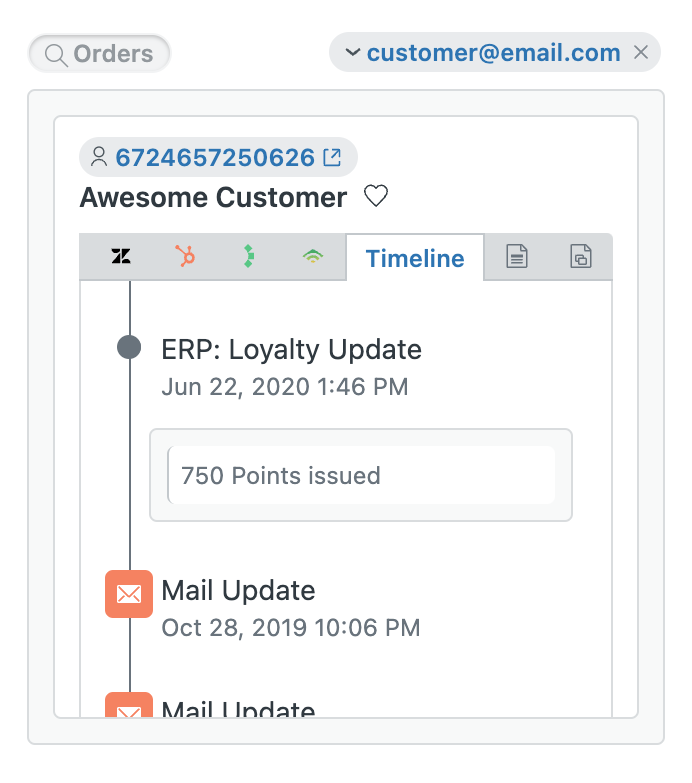
Within the agnoStack platform, we have introduced a new category of Add-On Providers called "Integration Provider". This is an exciting new addition allowing retailers to display Extended Data and Advanced Customizations for both Orders as well as Customers. It adds the ability to bring your own data via external or internal systems directly into the hands of your agents.
For general questions related to customizing and extending agnoStack via the Integration Provider, please contact support@agnostack.com any time!
Initializing your Integration Provider Instance
The initial setup begins with initializing your free instance of Composer. This is a simple process at the click of a button - as we handle the environment provisioning and setup on your behalf (as well as securing connectivity and providing a scalable cloud-based, secure runtime via Elastic Path).
This process is handled within the Add-On Providers step of the agnoStack configuration process, by selecting "Integration Providers" > "Elastic Path".

Clicking "Initialize" will kick off the provisioning process and set up your free account with Elastic Path. Once initialized, proceed through the rest of the configuration screens and select "Activate".
Once your account is provisioned, you will receive an email containing a link to create a password to login and access your new agnoStack specific Elastic Path Composer iPaaS setup.
Before developing your first custom extended data, we strongly suggest contacting agnoStack support to schedule a demo. We will gladly assist you to walkthrough the process together of how to get started!
Customizing your Integration Flows
Upon logging into your Composer account, there will be an "agnoStack" Integration that has already been pre-created on your behalf. This will contain all necessary "Flows" and core "Components" needed to integrate securely with agnoStack and provide the foundation for your own custom development to bring in data.
The agnoStack Integration will have 4 flows:
- Events: This Flow is used to bring data into your agnoStack plugin in the form of custom events for both the Order and Customer Timelines.
- Metadata: This Flow is used to bring data into your agnoStack plugin in the form of Extended Metadata for both the Order and Customer data tabs.
- Insights: This Flow will be used in the future to bring your own Custom Insights data into the agnoStack plugin.
- Flow Delegator: This Flow is required for the agnoStack connection to route requests. NOTE: it should be left untouched in order for the app to work properly.
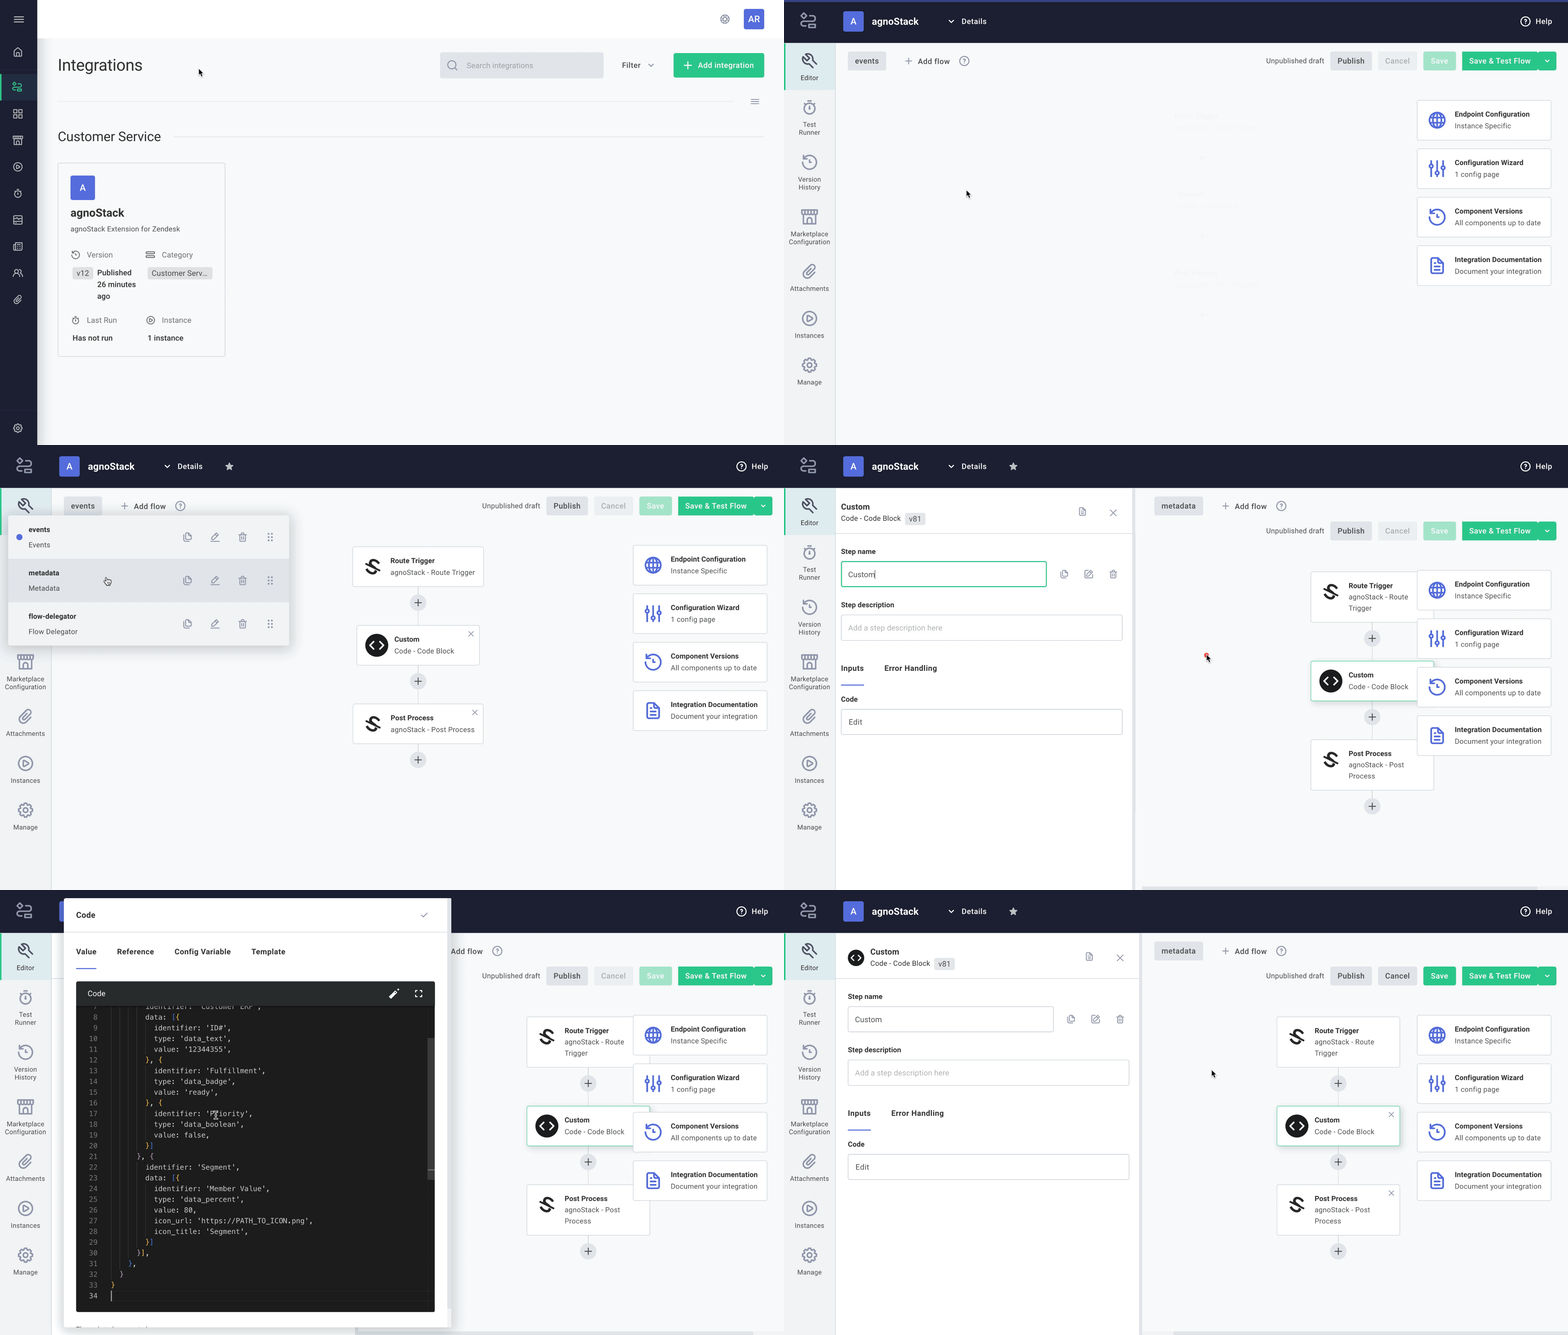
Each Flow is already pre-configured with the necessary components required for your agnoStack plugin in Zendesk to connect to your Composer instance.
The "Route Trigger" and the "Post Process" components should be left untouched. Between these two components, you can Integrate Anything You can Imagine! You can edit the existing Code Component to access your own internal or external system - and/or leverage the vast library of existing Connector Components included with the Elastic Path Composer solution.
Using the Custom Code Component
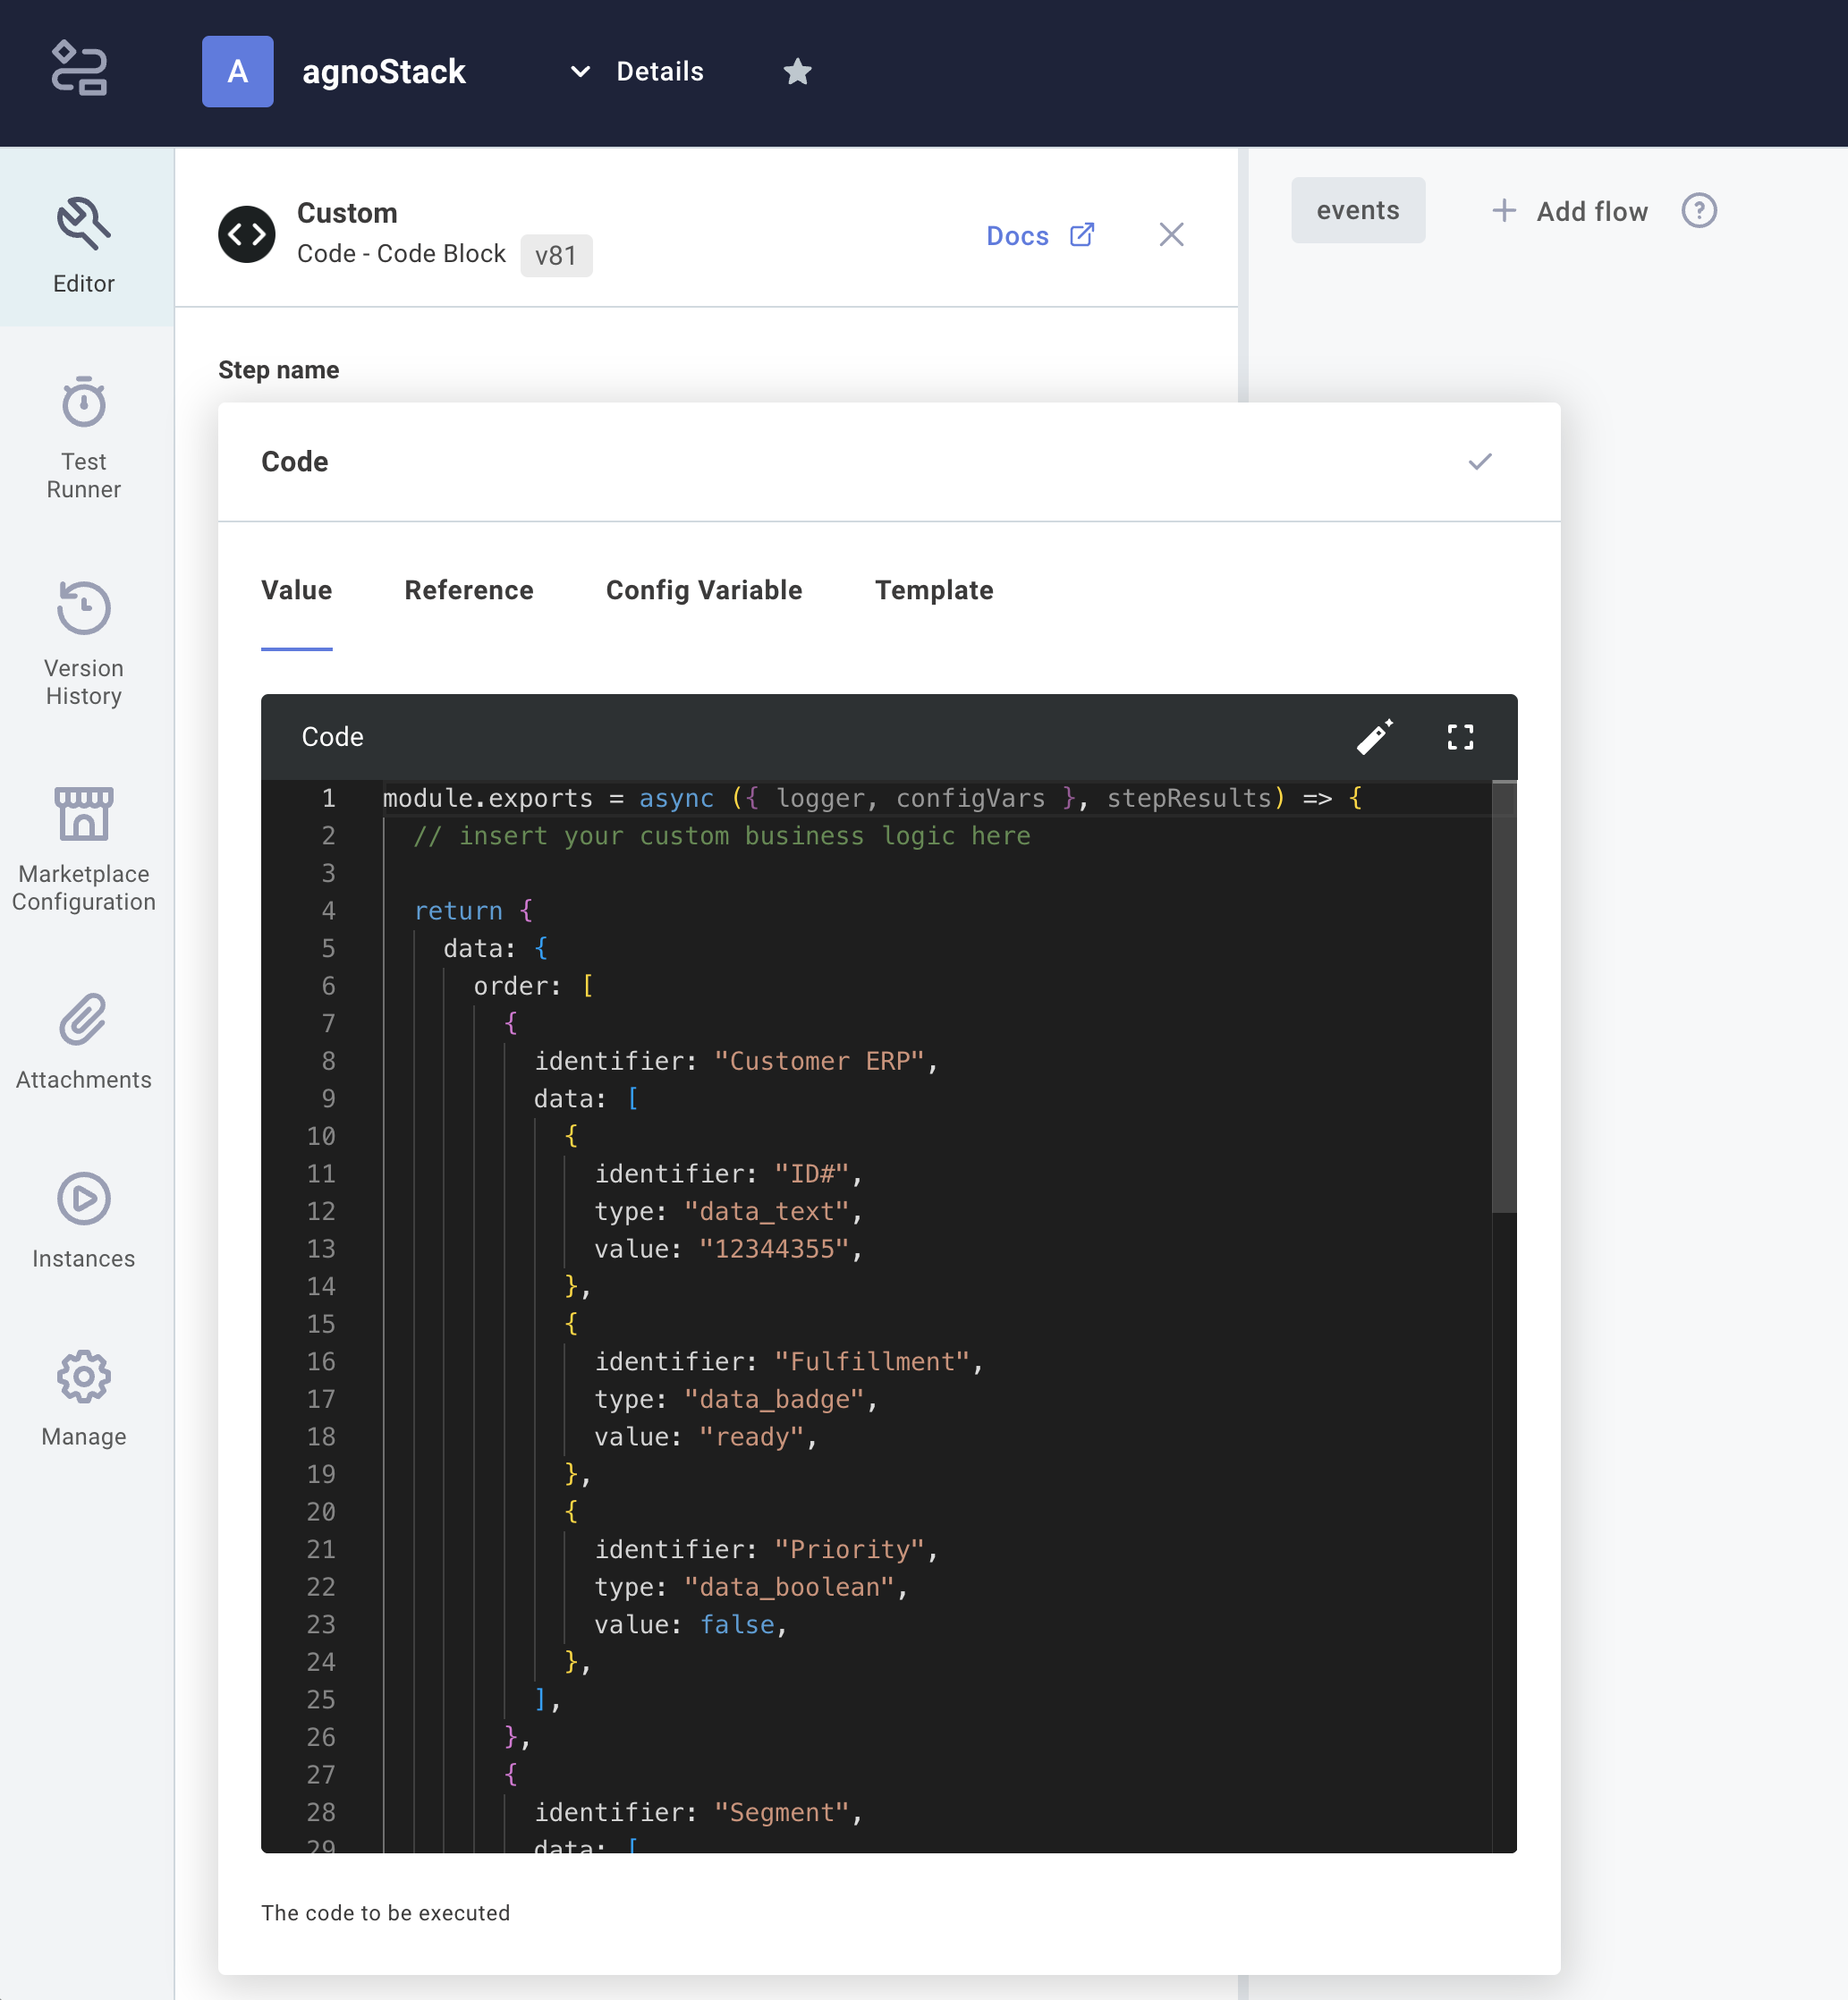
To use custom code (written in JavaScript and executed within a scalable sandboxed Node runtime environment) in your Integration Flow, click on the Code Block component to reveal the inline code editor. Here you can execute any custom business logic and access your own platforms - as long as you return the data in the correct format as dictated by our agnoStack JSON schema.
For example - you could use a custom Code Block to access the DoorDash API to bring in last-mile delivery data, or to access data from a proprietary internal ERP system and display this in your agnoStack plugin directly within Zendesk.
Leveraging Existing Composer Connectors
You may also want to leverage the vast library of prebuilt Connector Components offered by Composer as part of your Flow. These can be used on their own along with a simple custom Code Block to transform the data output and/or in conjunction with custom Code Blocks to access your own systems.
For example - you could use an existing AirTable connector to read a record from AirTable, or use the PipeDrive connector to bring in data from your sales pipeline - and easily display this right in your agnoStack plugin for related Customers and/or Orders.
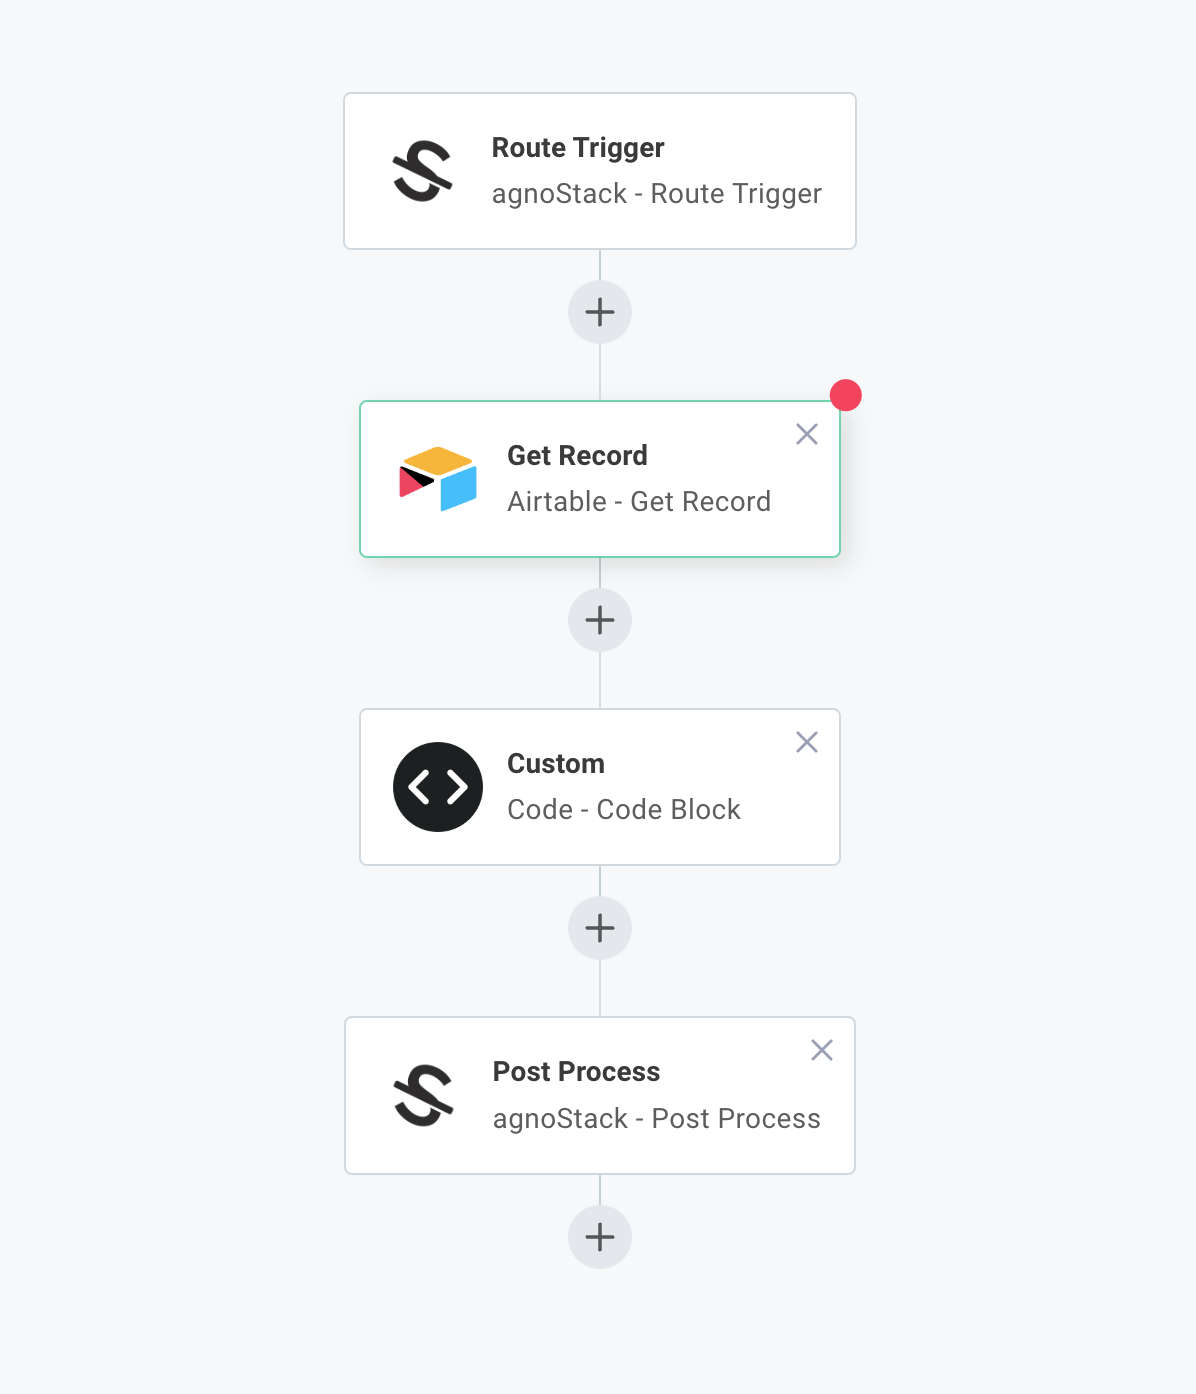
NOTE: You will also need to have a Custom Code block at the end of your Flow in order to transform your data to match the agnoStack predefined JSON schema for the Flow endpoint being used.
JSON Data Schema
For your Integration Flow to be consumed via the agnoStack Zendesk plugins, the final output of your flows must strictly conform to our generic JSON data model. It has been designed to be extremely flexible to allow you to bring back many forms of complex data and supports grouping "Data Items" to enhance the agent display.
The final output from your components needs to match a data format/schema that the agnoStack plugin will understand. Failure to provide valid JSON will result in your data not being displayed in the agnoStack plugin in Zendesk.
The required data schema for the Integration Flows can be accessed here: OpenAPI3 data schema
The following example illustrates a sample of some valid JSON - along with how it would be displayed inside of the agnoStack plugin.
{{
data: {
  order: [{
    identifier: 'Customer ERP',
    data: [{
      identifier: 'ID#',
      type: 'data_text',
      value: '12344355',
    }, {
      identifier: 'Fulfillment',
      type: 'data_badge',
      value: 'ready',
    }, {
      identifier: 'Priority',
      type: 'data_boolean',
      value: false,
    }]
  }, {
    identifier: 'Segment',
    data: [{
      identifier: 'Member Value',
      type: 'data_percent',
      value: 80,
      icon_url: 'https://PATH_TO_ICON.png',
      icon_title: 'Segment',
    }]
  }],
  customer: [...],
},
}}

NOTE: Responses will be validated against the agnoStack schema before being made available to agents to ensure malformed data is not rendered.
Available Custom Data Types
The following core Data Types are valid to be displayed in the agnoStack UI as returned by your Extended Data integration. We will continue to add additional data types to the schema as we further enhance the agent experience:
data_iddata_textdata_tagsdata_jsondata_linkdata_pilldata_factdata_agentdata_badgedata_gaugedata_phonedata_pricedata_scaledata_buttondata_toggledata_groupsdata_nesteddata_ratingdata_returndata_creditsdata_relateddata_percentdata_booleandata_calloutsdata_discountdata_productsdata_dropdowndata_highlightdata_datestampdata_timestampdata_textblockdata_orderabledata_identifierdata_subscription
If you have any additional Data Types that you'd like to see added to our schema and UI, please let us know any time. We tremendously value customer input and feedback toward the future of our product roadmap!
Publishing & Deploying Your Extended Data
After you have completed the development of your Composer Integration Flow you must first "Save" and "Publish" the Integration (as well as update the current Instance of your Flow) to point to the latest saved version.
Inside of your Integration Builder, click on Publish > Save & Publish to submit the new version for publishing. Then within the Instances icon in the left nav, click on "Update All" to ensure your Integration Instance is now updated to use the most recent published version of your Integration.
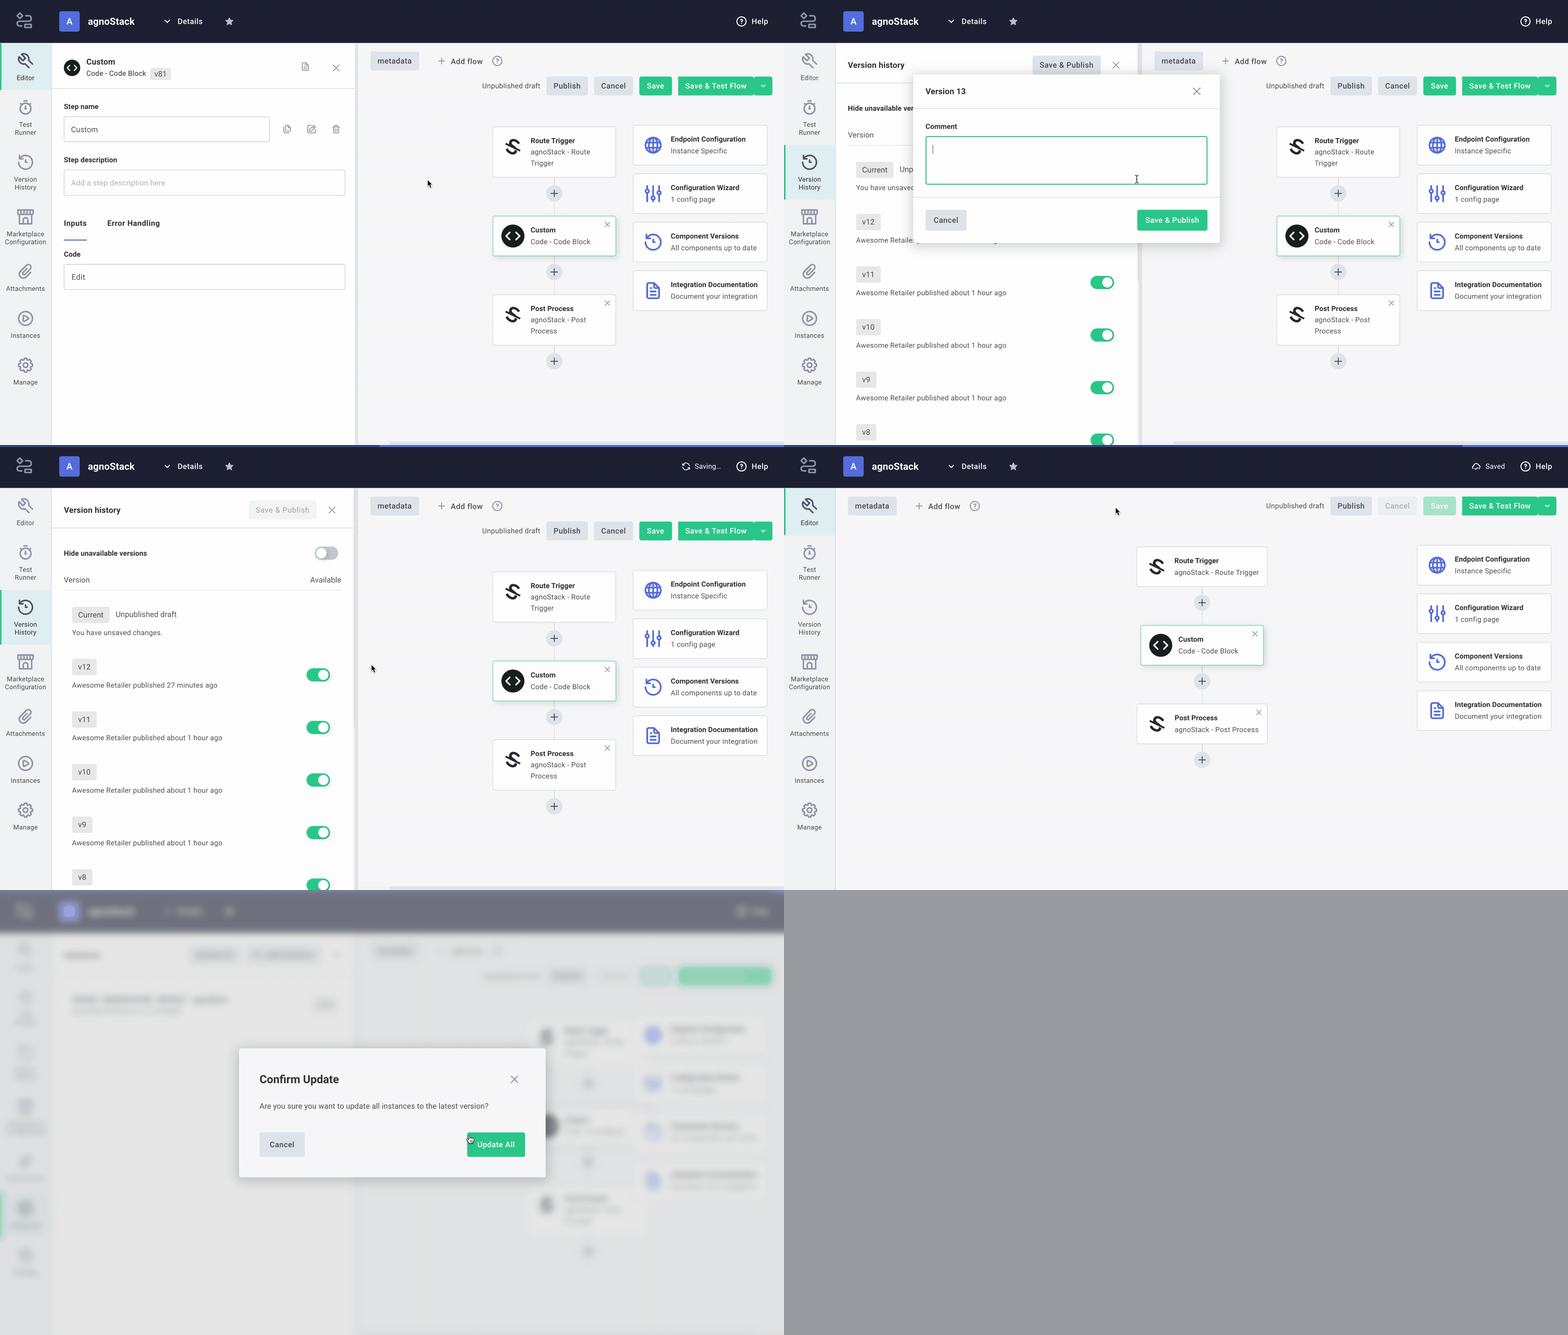
At this point, the agnoStack plugin should be able to successfully connect to your Extended Data Flow and securely bring your new custom data directly into the hands of your Zendesk support agents! Depending on which Flow(s) you have set up, data will be displayed within the Customer or Order Extended Data tabs and/or within the Customer or Order Timeline Panel.
Support & Troubleshooting
If you have questions or are having issues with the Integration provider setup or developing within Elastic Path Composer, please contact us at support@agnostack.com any time!
To learn more about overall Elastic Path Composer capabilities, feel free to watch the self paced pre-recorded Webinar or visit https://www.elasticpath.com/products/composer/hub or https://elasticpath.dev/docs/composer for additional details.
We're always happy to help walk through and troubleshoot together with you - or even to help you develop your first Extended Data customization! We try to make ourselves available across time zones, but if you don't see a timeslot available that works for you please contact us via email and we'll do our best to accommodate.