Frequentlyasked questions.
Okendo / Zendesk Configuration
NOTE: In addition to the Okendo Add-On Provider setup, we also provide an optional example of an advanced Reviews Approval/Moderation Workflow for retailers who are looking to get the most out of their Okendo integration!
Okendo API Credentials
The initial step requires logging in to the Okendo Admin screens to generate API credentials. First, make sure the Okendo app is installed inside of your Shopify store.
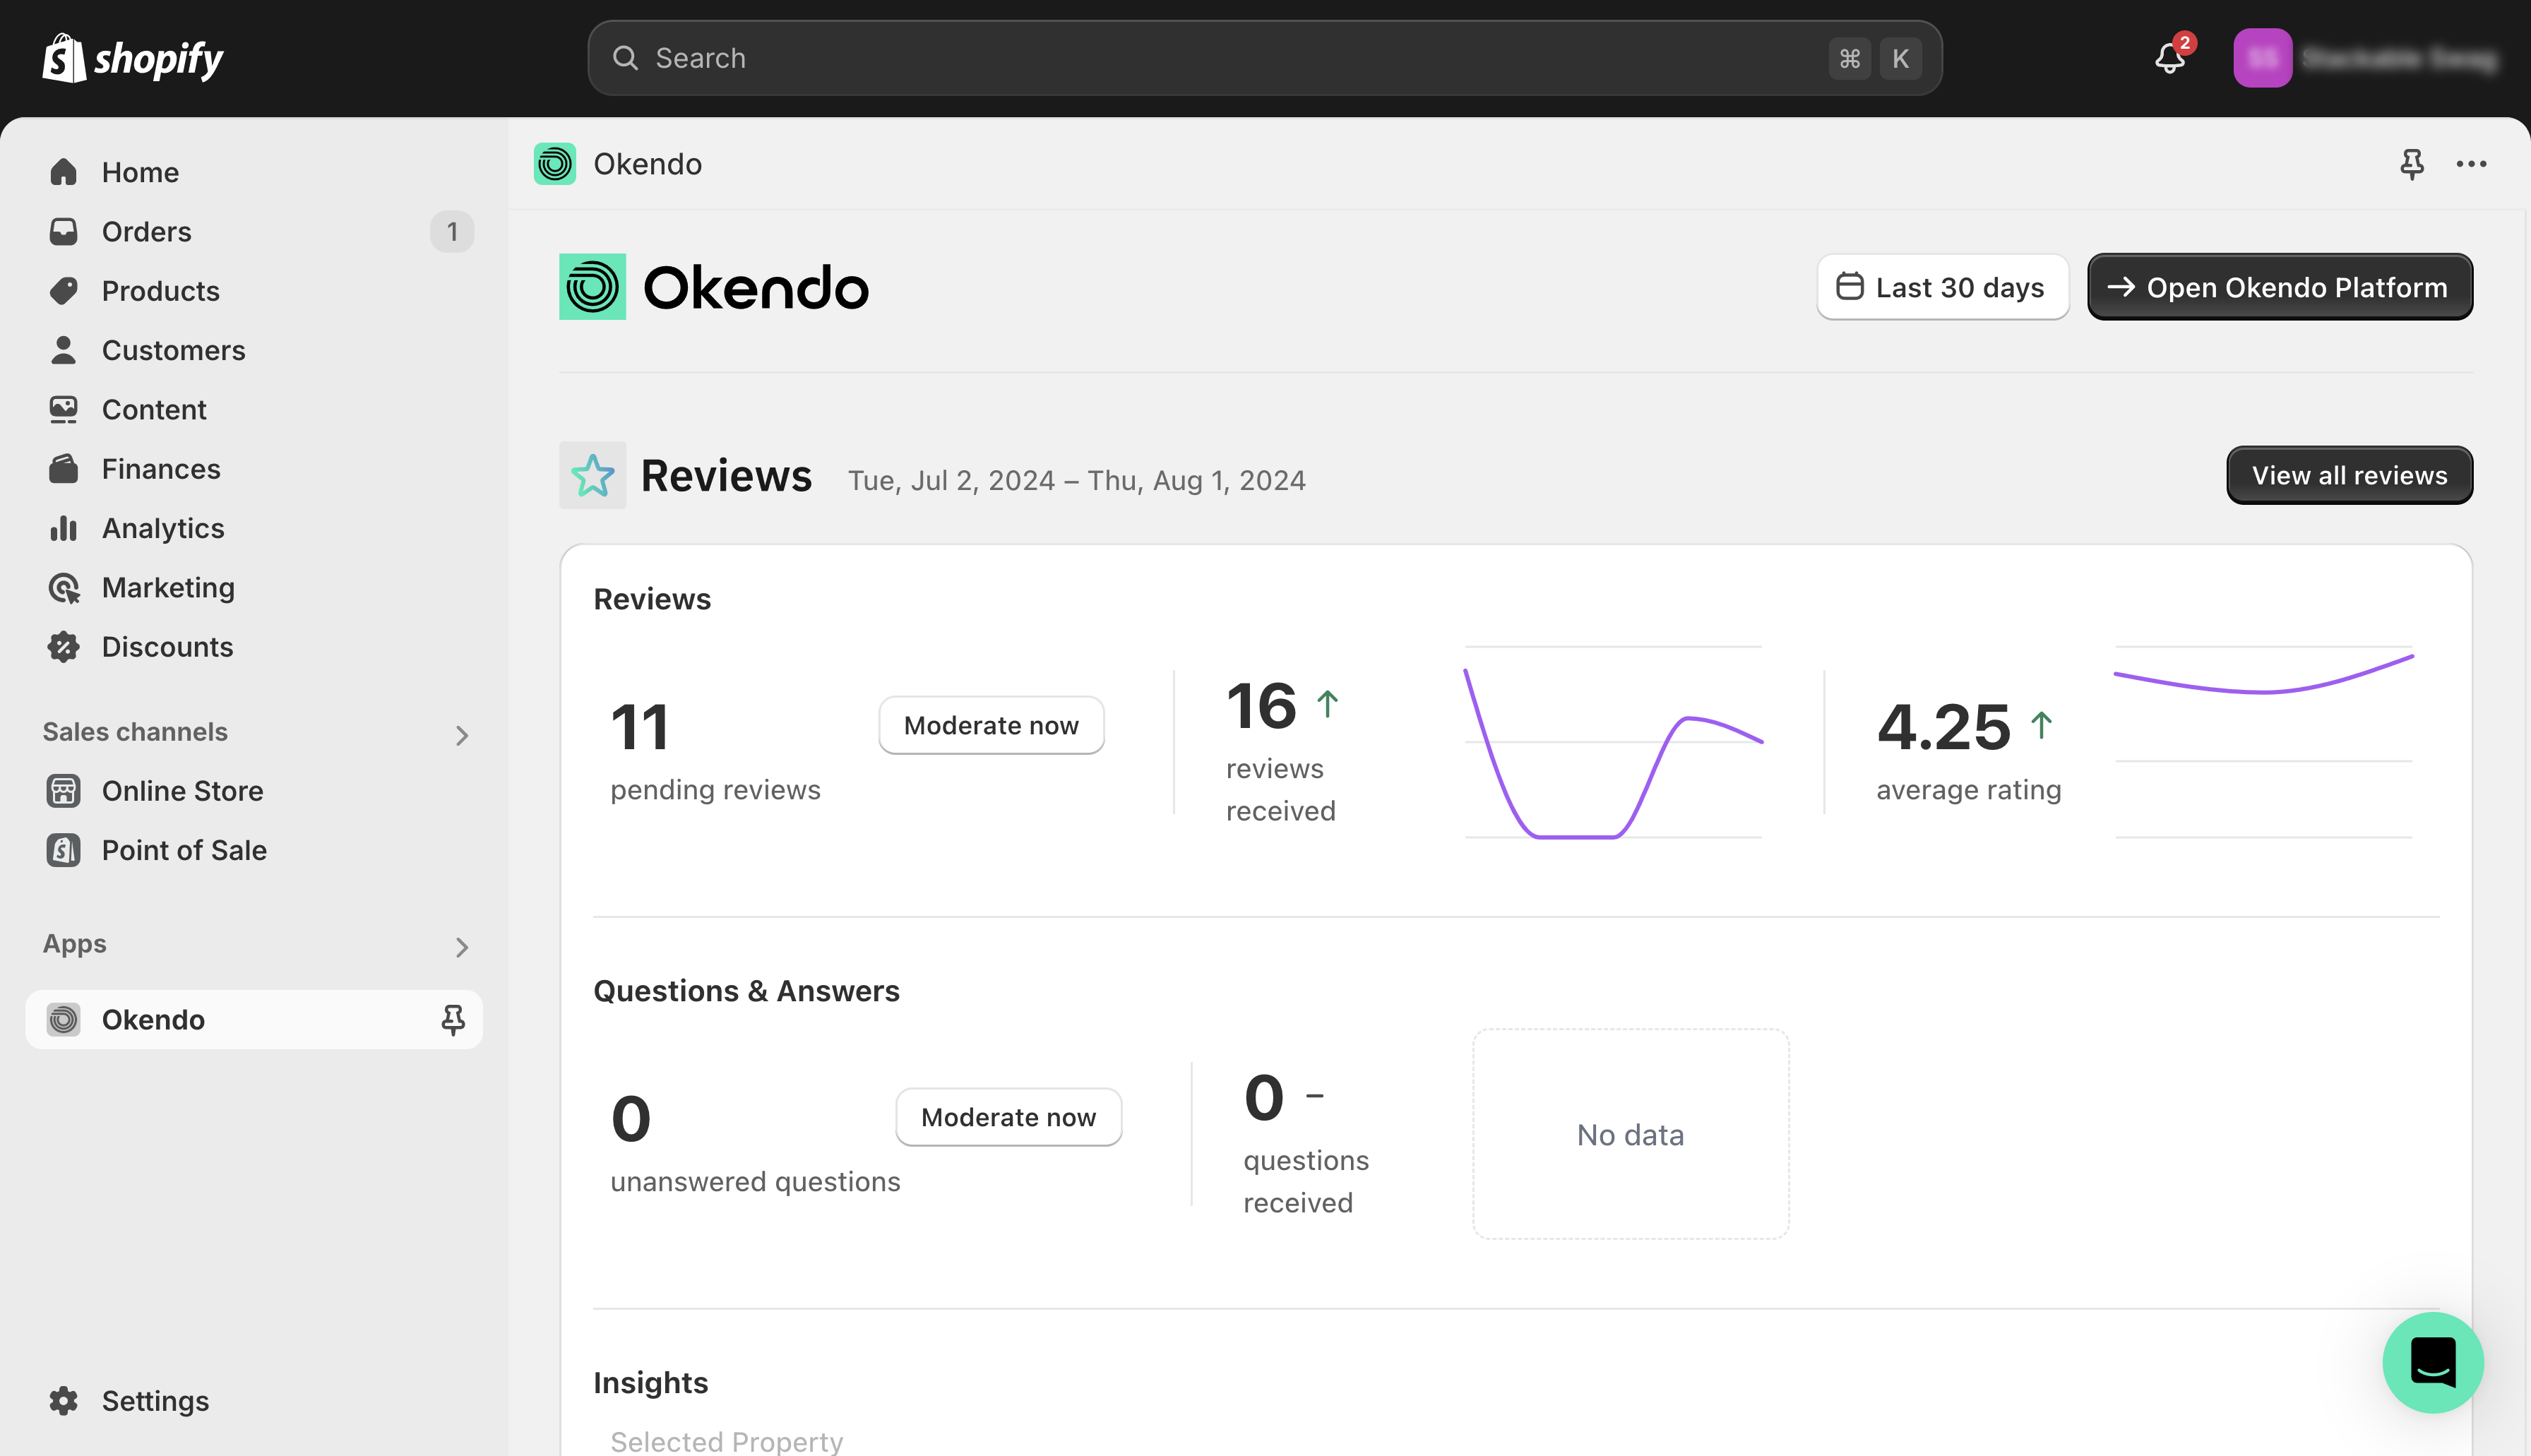
From the Okendo app in Shopify, click the "Open Okendo Platform" button to login into the Okendo Admin interface.
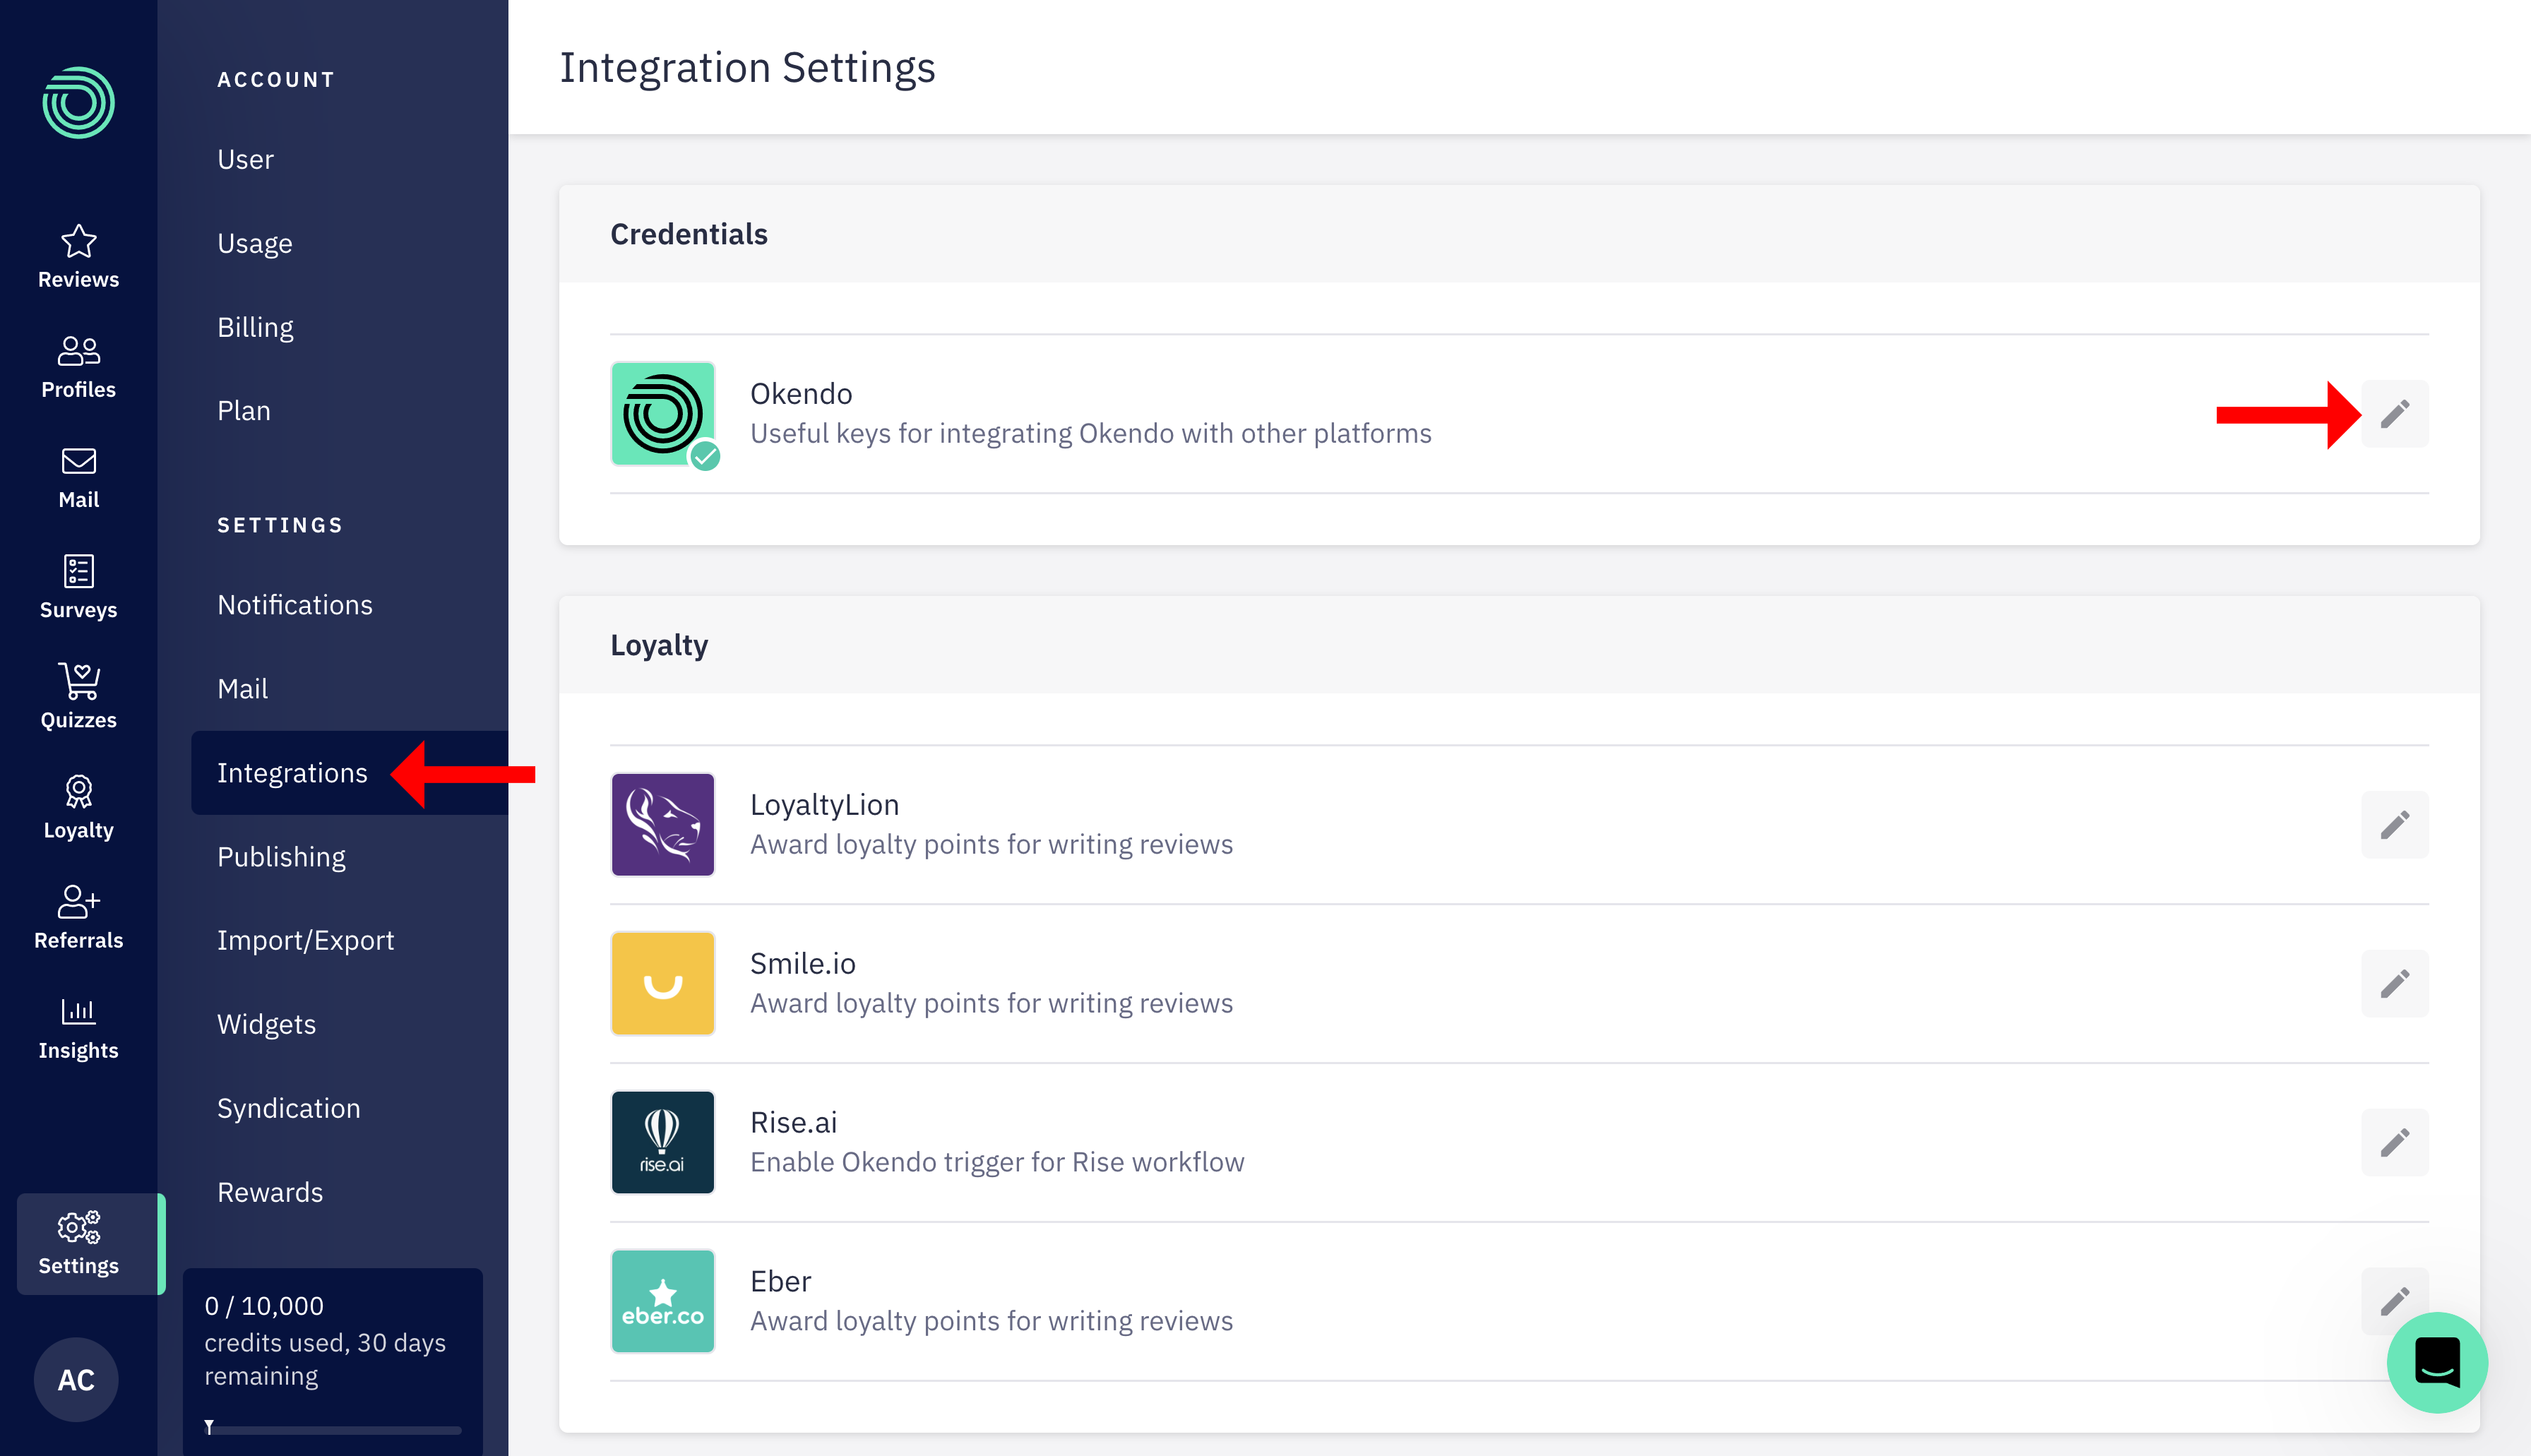
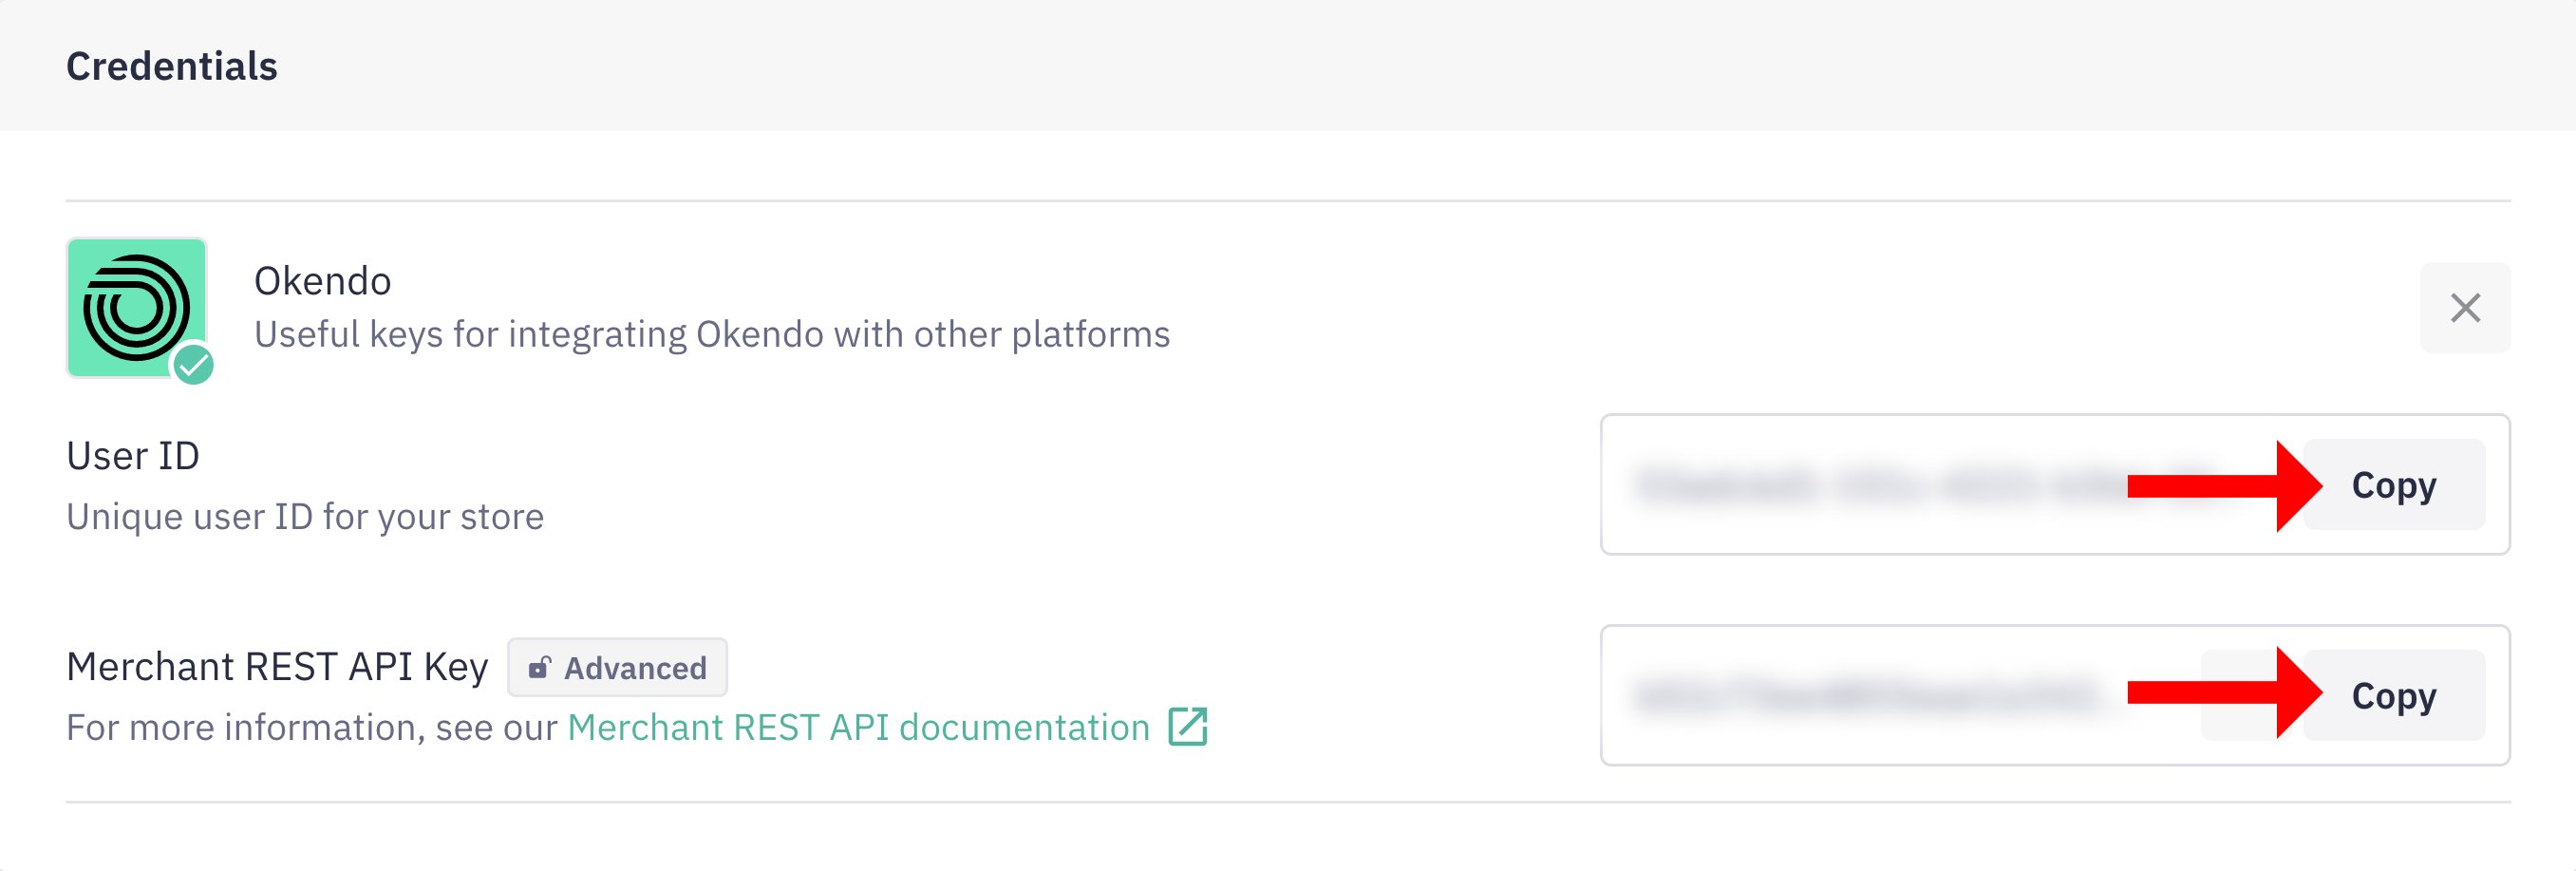
Once inside of the Okendo platform, from the left-hand navigation click on "Settings > Integrations". In the Integrations list, click the edit icon. Then click "Generate" (or "Show") to reveal your API credentials. Make note of both the "User ID" and "Merchant REST API Key", as these will be needed later in the setup process.
agnoStack Activation
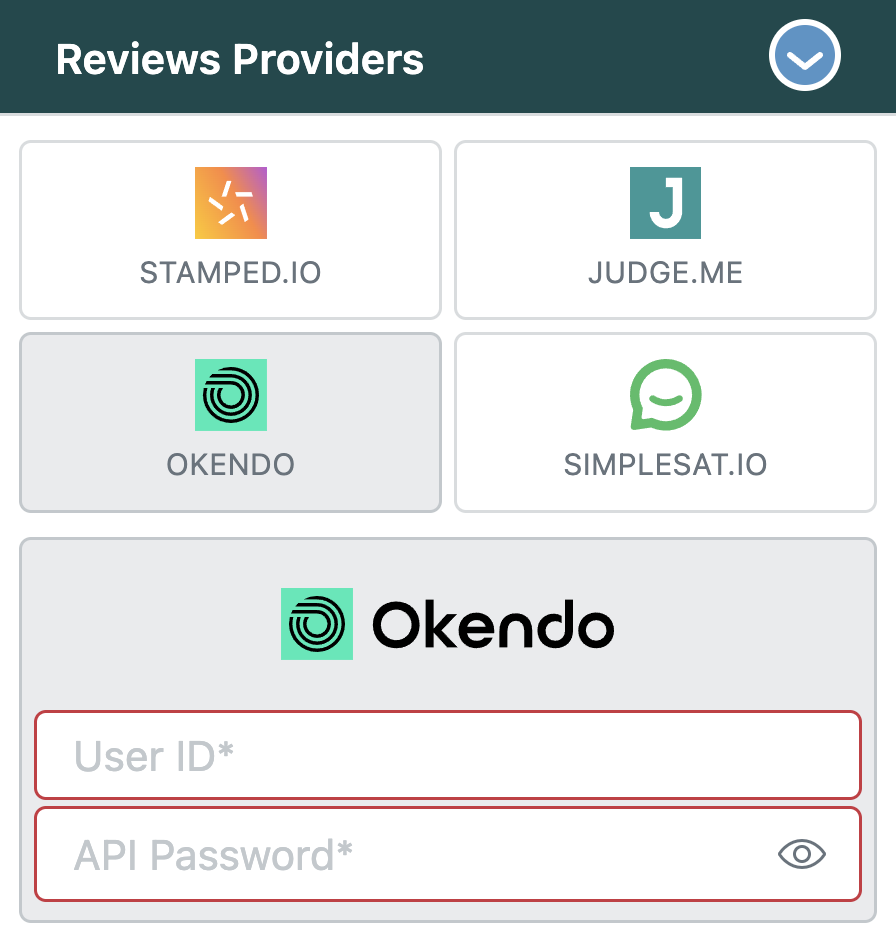
The final step to complete the setup is activating the Okendo Reviews provider inside of the agnoStack platform in Zendesk.
You can navigate inside of Zendesk back into the agnoStack configuration screen (via the "Manage Your Account" link or using the icon in the left sidebar) and enter the API key obtained above. Be sure to continue through the remainder of the configuration screens and click "Activate" to save your new Add-On configuration data.
If you run into any trouble or need additional assistance, please contact us any time at support@agnostack.com.
Advanced Reviews Approval/Moderation (OPTIONAL)
Unlock the full potential of agnoStack Customer Insights by enabling a seamless review moderation workflow with Okendo, Shopify and Zendesk. This powerful integration allows retailers to streamline their processes within Zendesk, significantly boosting agent efficiency and customer satisfaction.
- Automatically convert Okendo reviews into Zendesk tickets for easy management
- Respond to reviews directly, choosing to make responses public or keep them private
- Approve or reject storefront reviews directly from the Order Timeline
Follow this step-by-step guide to build a comprehensive Okendo review moderation pipeline using Shopify Flows, advanced Zendesk configuration and agnoStack Customer Insights.
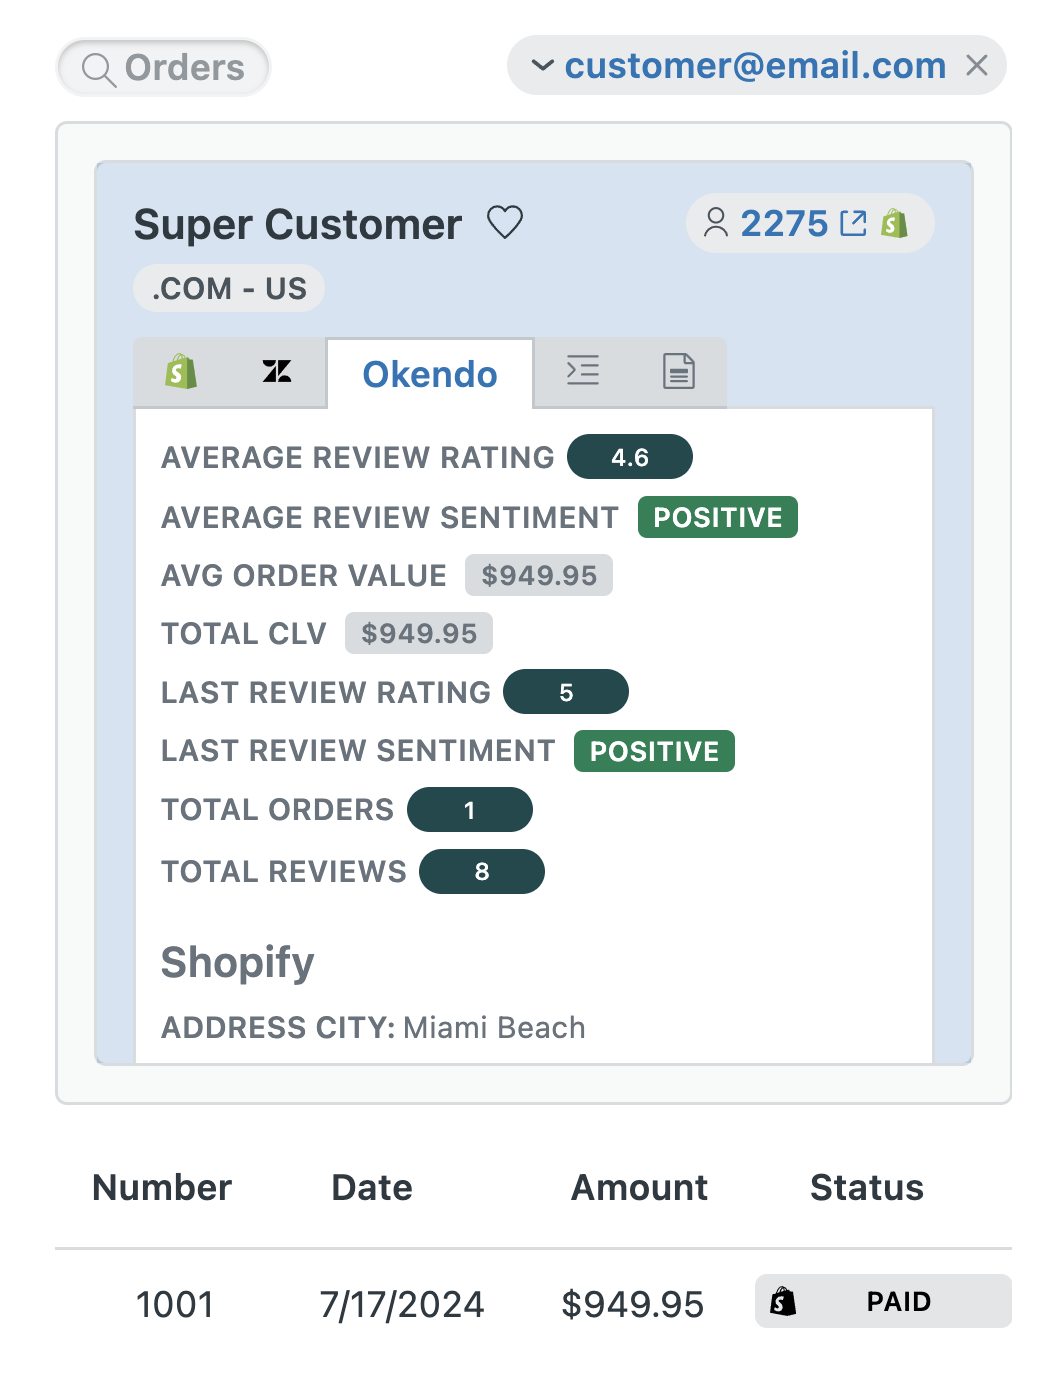
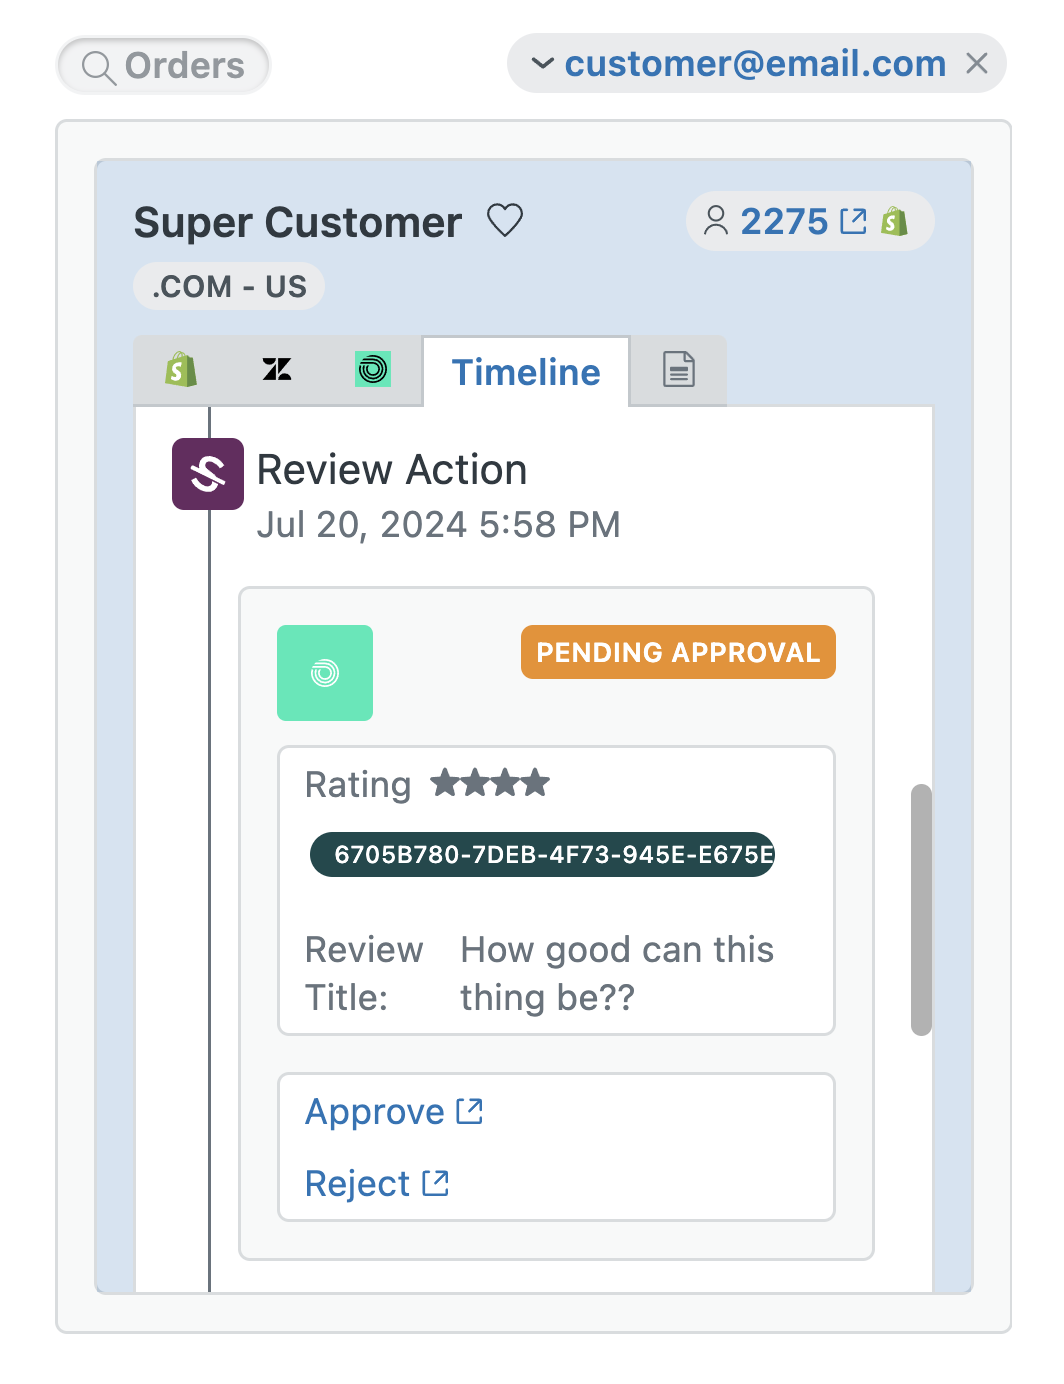
This step by step guide covers the end-to-end process for developing a full pipeline for Shopify Review Moderation using Okendo, Zendesk and agnoStack.
Create Zendesk API Token
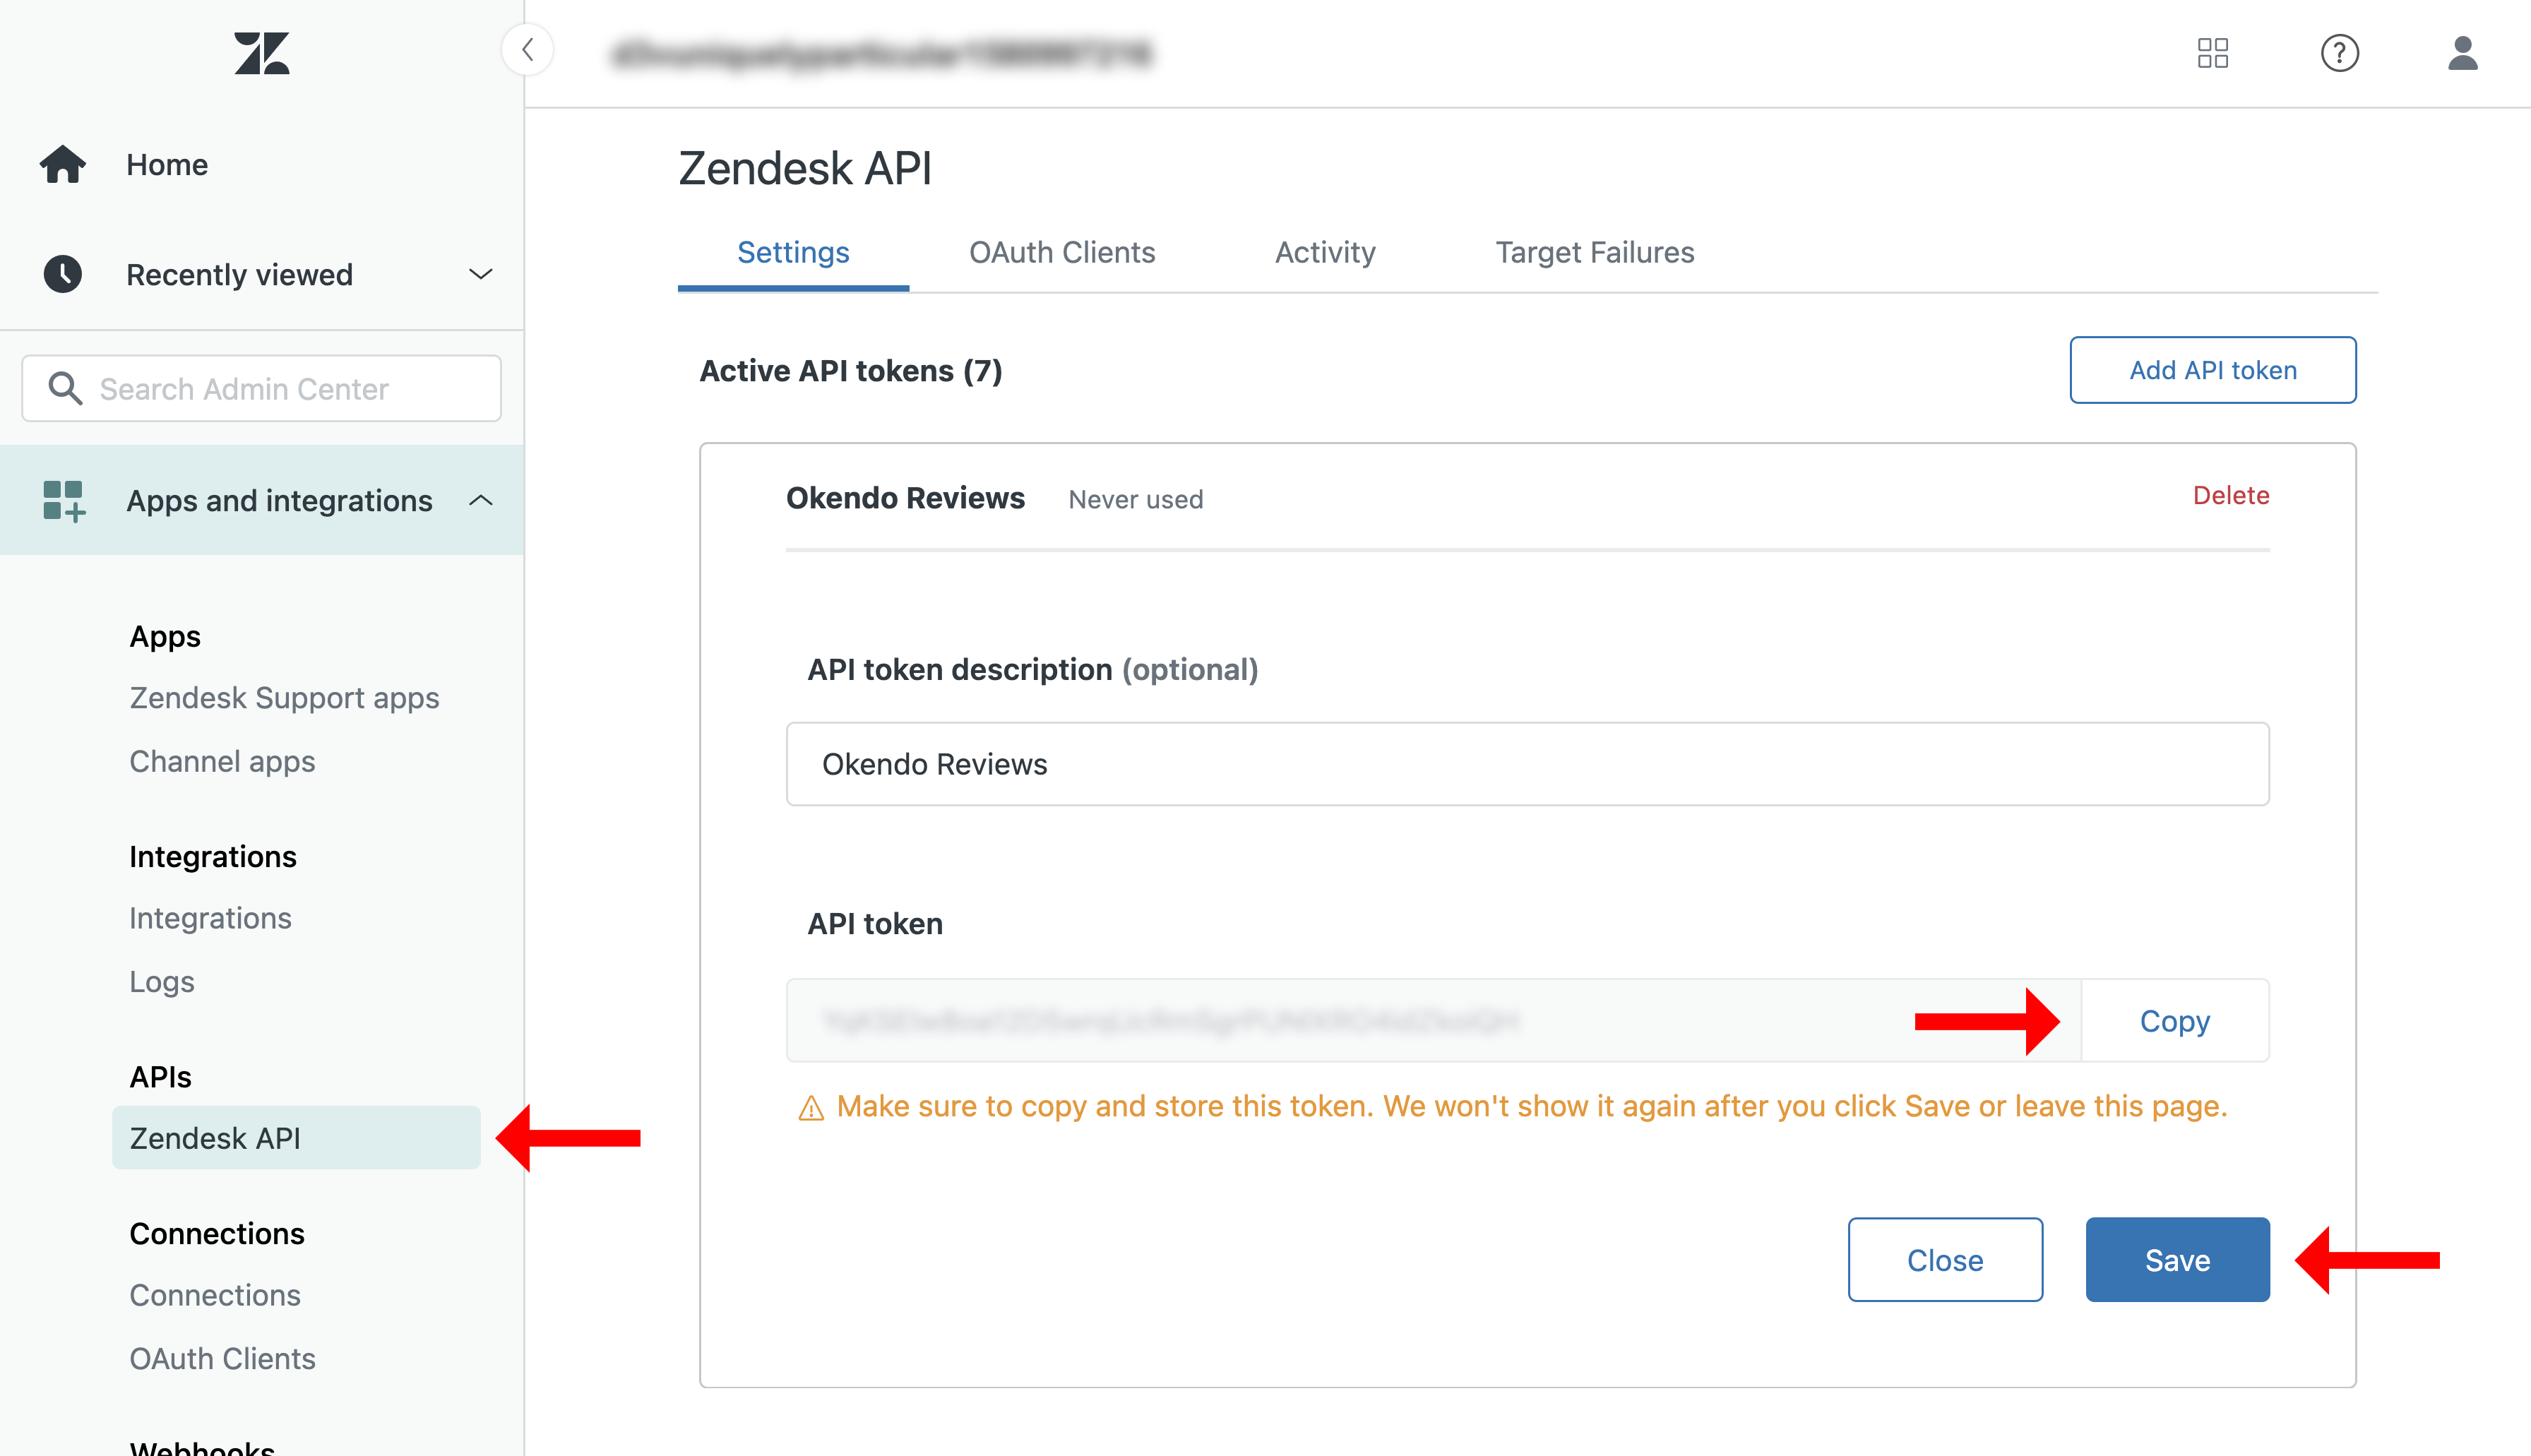
The next step is to login into the Zendesk Admin Center and setup a new API Token to be used in Shopify. Once logged into the Admin Center, click on "Apps and Integrations > APIs > Zendesk API". Click on "Add API Token and name this "Okendo Reviews". Make note of the "API Token" for use later in the setup process.
Encode Zendesk Credentials
Your Zendesk API token created in the previous step will be used within a new Shopify Flow. In order to use the API Token, you will first need to encode this token into a format that will be usable by Shopify.
You will need to "Base64 Encode" a string containing your Zendesk Username (ie your email address) and the Zendesk API token from earlier. Replace YOUR_ZENDESK_LOGIN_EMAIL and YOUR_ZENDESK_API_TOKEN in the example below with your actual information before encoding. The string which needs to be encoded is constructed as follows:
"YOUR_ZENDESK_LOGIN_EMAIL/token:YOUR_ZENDESK_API_TOKEN".NOTE: There are tools available for encoding strings via Node/JavaScript in a terminal window or in your browser console.
Once you have the encoded value, copy the string to save for use later in the setup process.
Setup custom Zendesk Ticket Fields
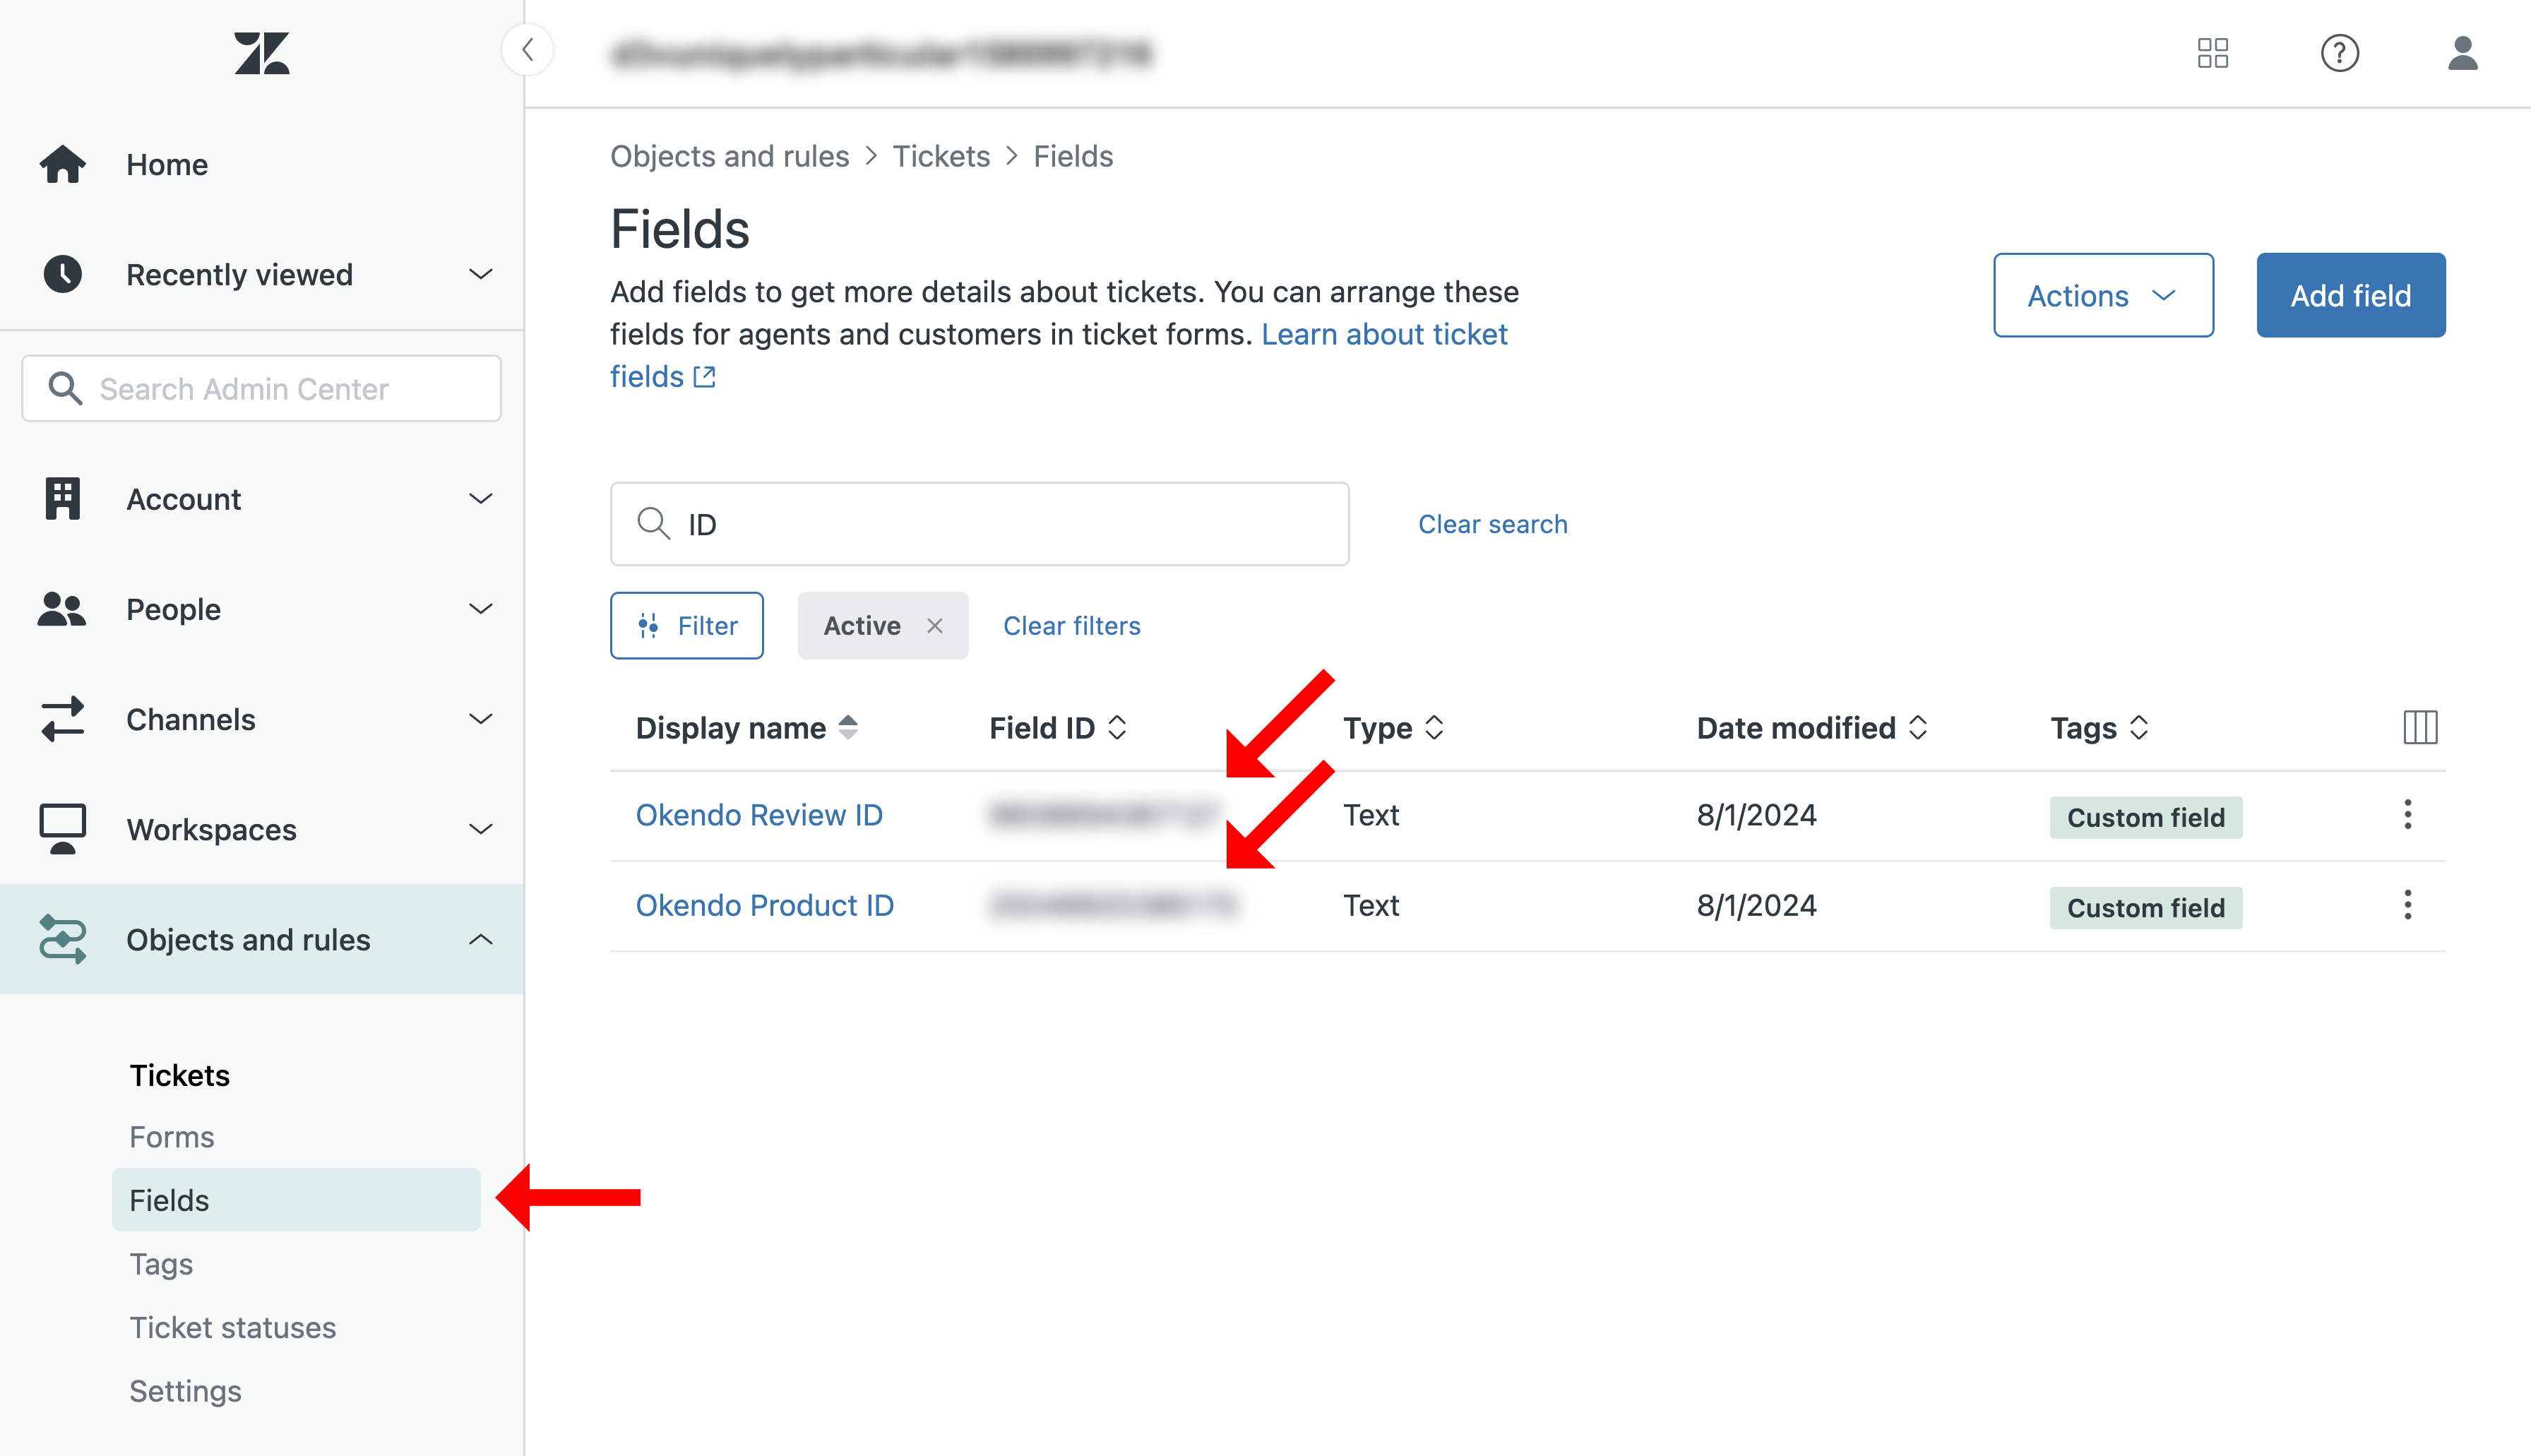
You will also need to setup two Customer Ticket fields in Zendesk which be used for the Review Moderation workflow. In your Zendesk Admin Center, click on "Objects and rules > Tickets > Fields". Create two new fields using the "Text".
Name the first field as "Okendo Review ID and make note of the ticket field ID.
Name the second field as "Okendo Product ID' and make note of the ticket field ID.
Create custom Metafields in Shopify
Our Okendo Review workflow will leverage Shopify Metafields and you will need to set these up within Shopify. To create these "Metafield Definitions" and "Metafield Values", you will need to leverage the Shopify GraphQL API. To use the Shopify API, you need to obtain a Shopify Access Token with scopes for writing metafields enabled.
Creating Metafield Definitions
Use the following mutation to create the Metaifld definition
mutation metafieldDefinitionCreate($definition: MetafieldDefinitionInput!) {
  metafieldDefinitionCreate(definition: $definition) {
    createdDefinition {
      key
      name
      namespace
    }
    userErrors {
      field
      message
    }
  }
}
Create three Metafield definitions for "Zendesk Field Review ID", "Zendesk Field Product ID" and "Zendesk Subdomain".
// Example mutation payload for Zendesk Field Review ID
{
  "definition": {
    "ownerType": "SHOP",
    "key": "zendesk-field-review-id",
    "type": "single_line_text_field",
    "name": "Zendesk Field Review ID",
    "namespace": "agnoStack-metadata"
  }
}

// Example mutation payload for Zendesk Field Product ID
{
  "definition": {
    "ownerType": "SHOP",
    "key": "zendesk-field-product-id",
    "type": "single_line_text_field",
    "name": "Zendesk Field Product ID",
    "namespace": "agnoStack-metadata"
  }
}

// Example mutation payload for Zendesk Subdomain
{
  "definition": {
    "ownerType": "SHOP",
    "key": "zendesk-subdomain",
    "type": "single_line_text_field",
    "name": "Zendesk Subdomain",
    "namespace": "agnoStack-metadata"
  }
}
Configuring Metafield Values
Once the metafield definitions are created above. Use the following mutation to create three Metafield values.
mutation metafieldsSet($metafields: [MetafieldsSetInput!]!) {
  metafieldsSet(metafields: $metafields) {
    metafields {
      key
      type
      value
      namespace
    }
    userErrors {
      field
      message
    }
  }
}
Populate the Metafield values for "Zendesk Field Review ID", "Zendesk Field Product ID" and "Zendesk Subdomain". You will need to replace the necessary values in the API payloads below. For the "Review ID" and "Product ID", you can use the IDs that you obtained in the Setup custom Zendesk Ticket Fields section above. You will also need to obtain your Shopify "Shop ID" which can also be obtained via the Shopify API.
// Example mutation payload for Zendesk Fields Review ID, Product ID and Subdomain
{
  "metafields": [{
    "namespace": "agnoStack-metadata",
    "ownerId": "gid://shopify/Shop/YOUR_SHOPIFY_SHOP_ID",
    "type": "single_line_text_field",
    "key": "zendesk-field-review-id",
    "value": "YOUR_REVIEW_ID_TICKET_FIELD_ID"
  }, {
    "namespace": "agnoStack-metadata",
    "ownerId": "gid://shopify/Shop/YOUR_SHOPIFY_SHOP_ID",
    "type": "single_line_text_field",
    "key": "zendesk-field-product-id",
    "value": "YOUR_PRODUCT_ID_TICKET_FIELD_ID"
  }, {
    "namespace": "agnoStack-metadata",
    "ownerId": "gid://shopify/Shop/YOUR_SHOPIFY_SHOP_ID",
    "type": "single_line_text_field",
    "key": "zendesk-subdomain",
    "value": "YOUR_ZENDESK_SUBDOMAIN"
  }]
}
Setup Shopify Flow
The next step will be to leverage the Shopify "Flow" app to create a workflow which will handle the creation of Zendesk tickets once an Okendo Review is created. First make sure that the Flow app is installed in your Shopify store.
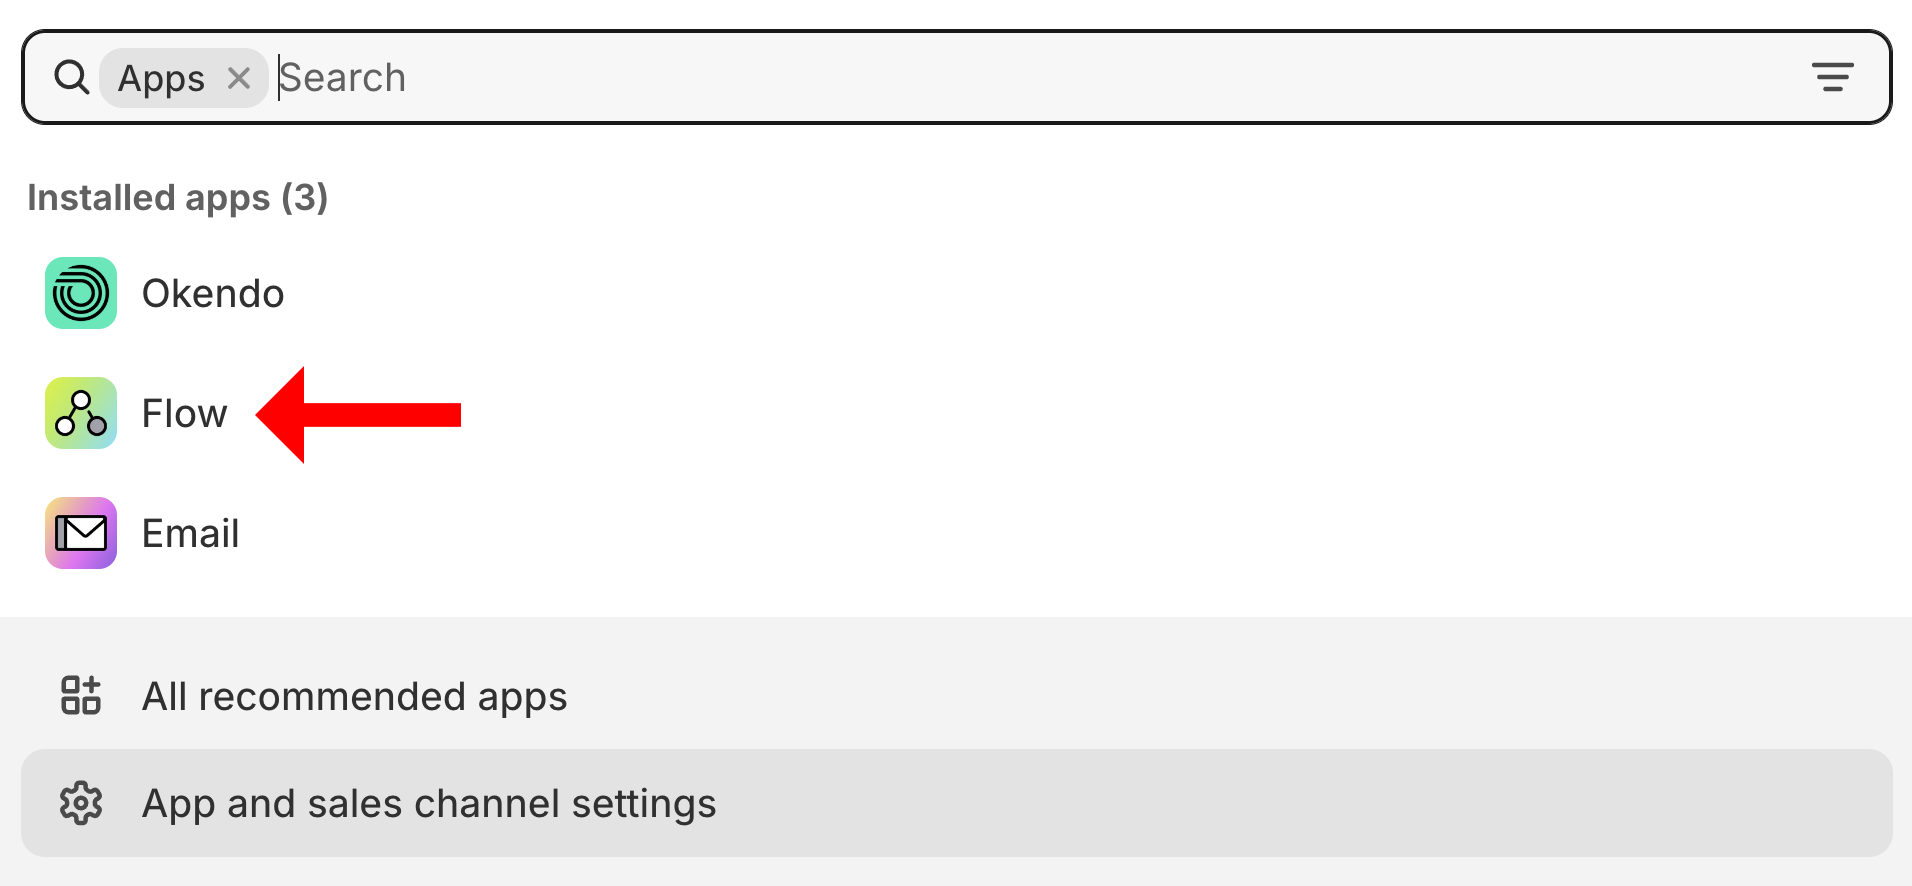
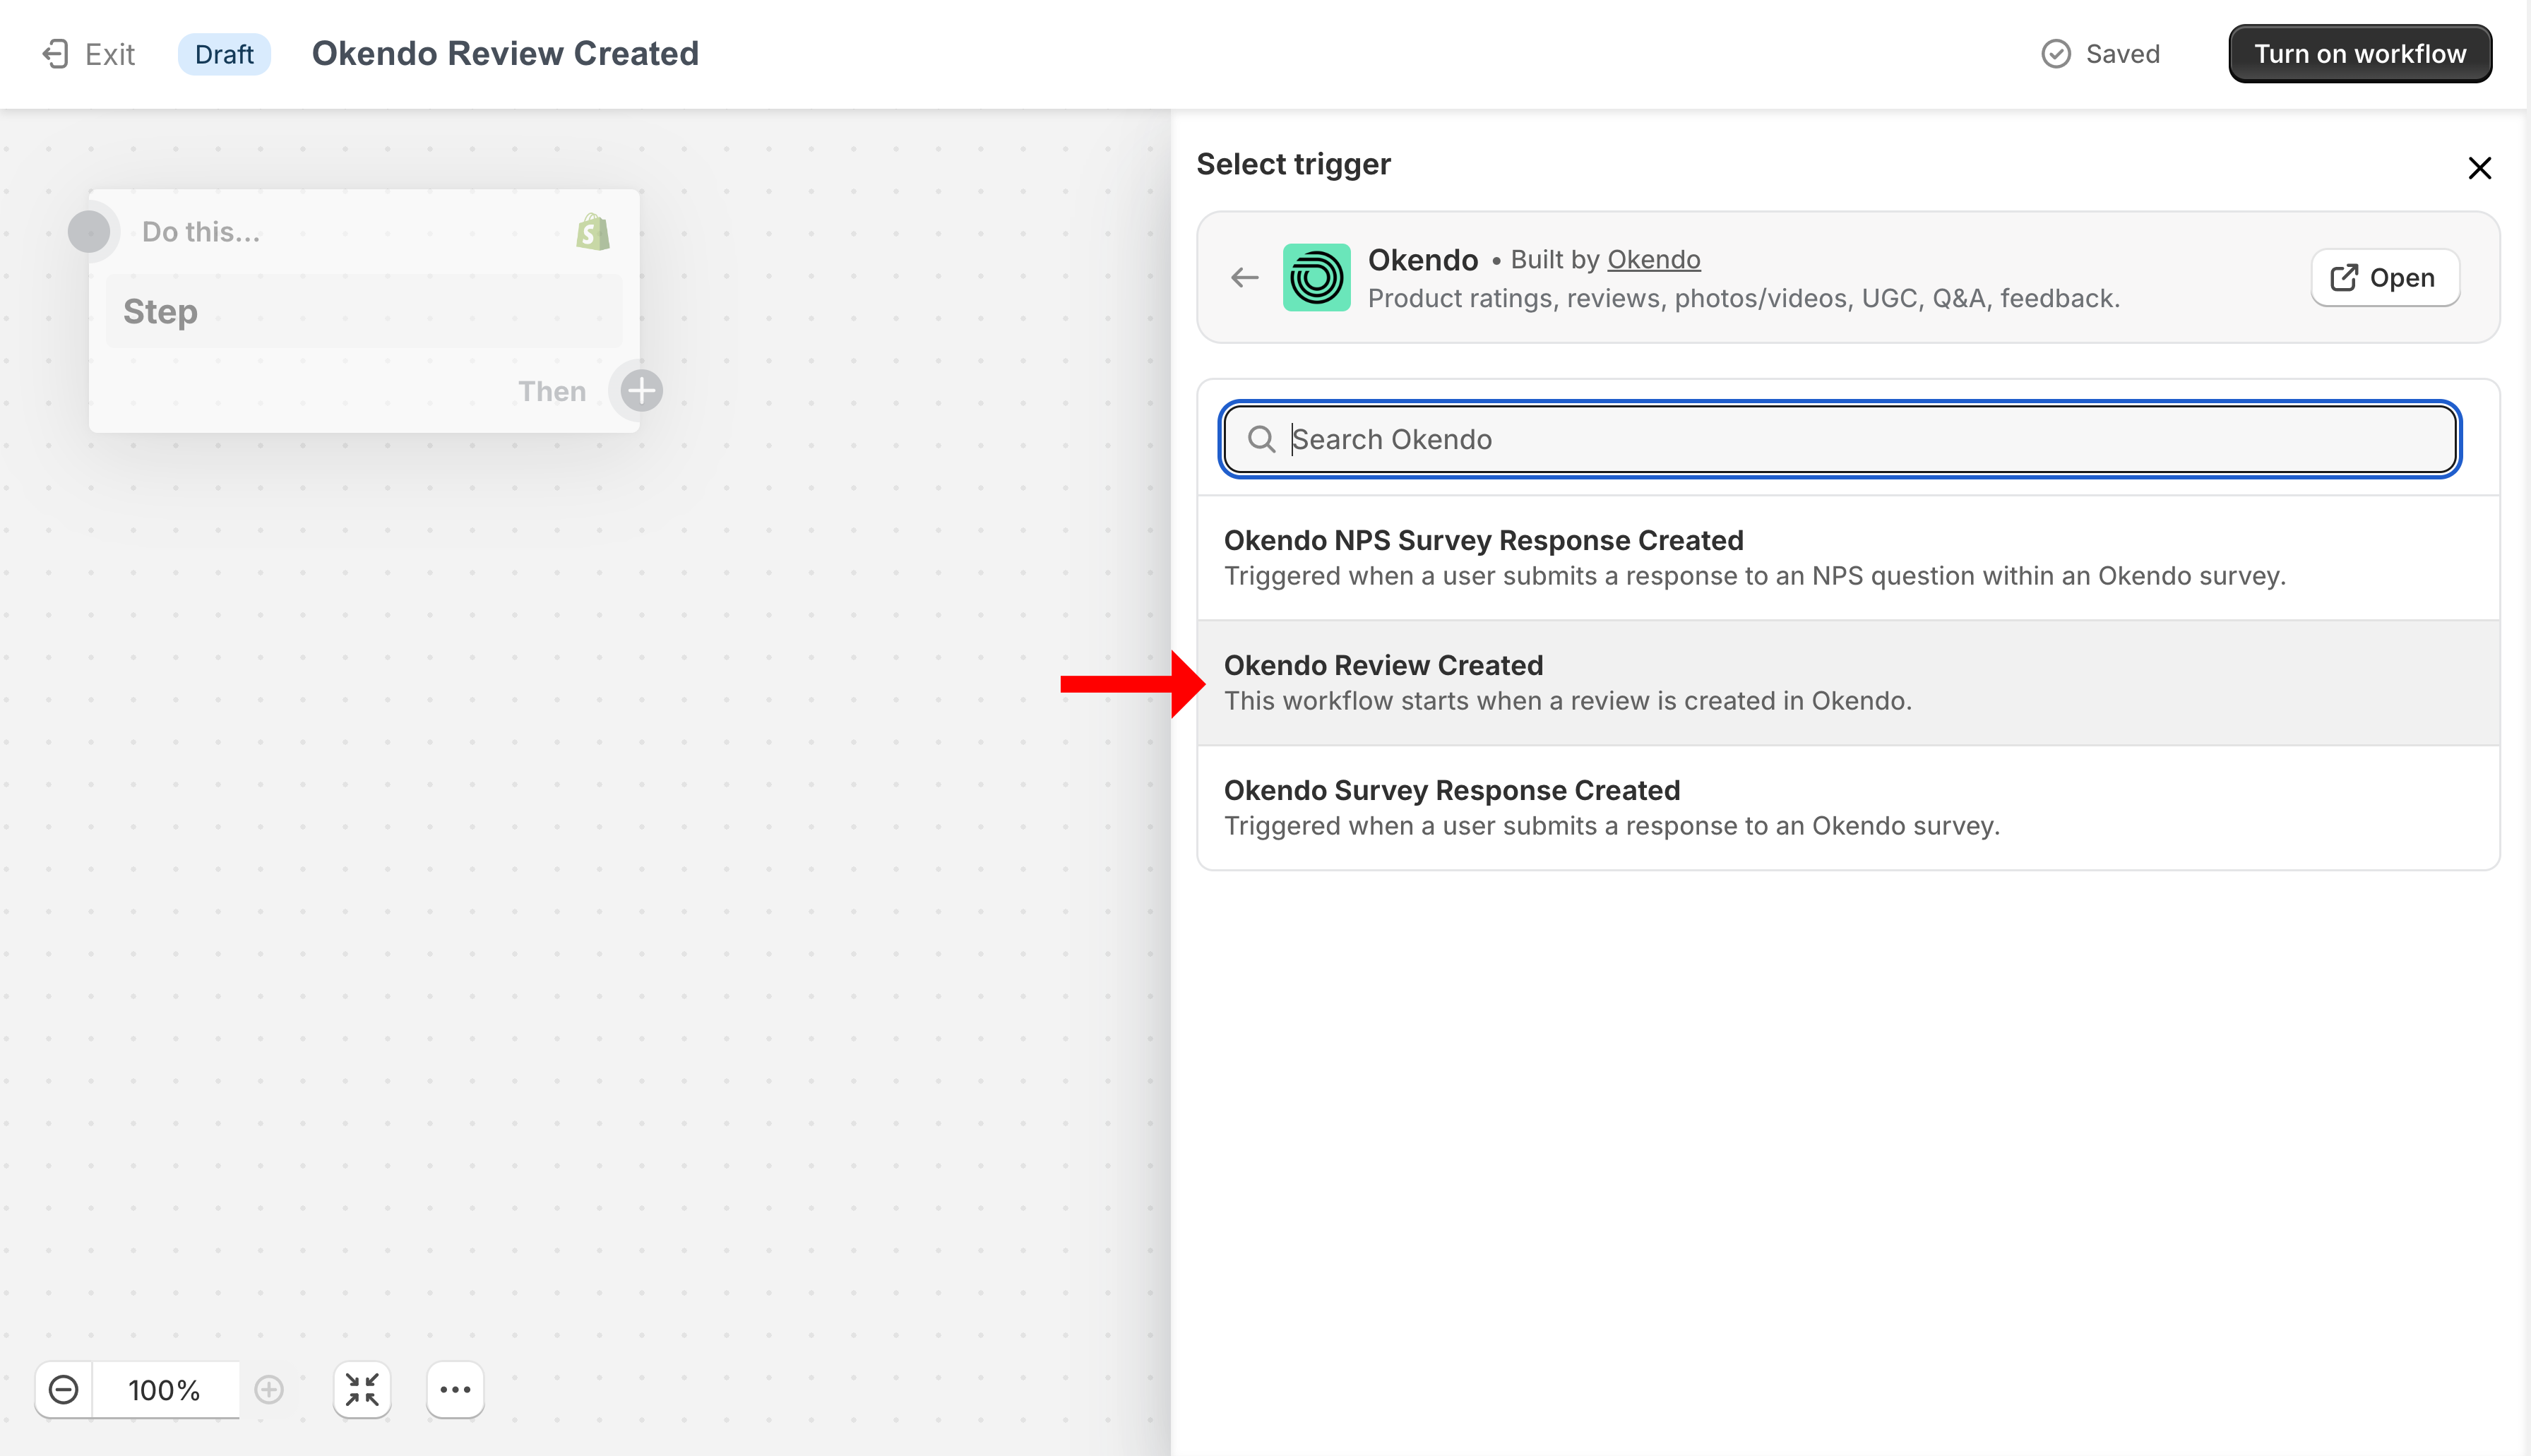
In Flow, click on "Create workflow > Select a Trigger > Okendo Review Created > Okendo Review Created".
Give your new Flow a name at the top of the screen, calling it "Okendo Review Created".
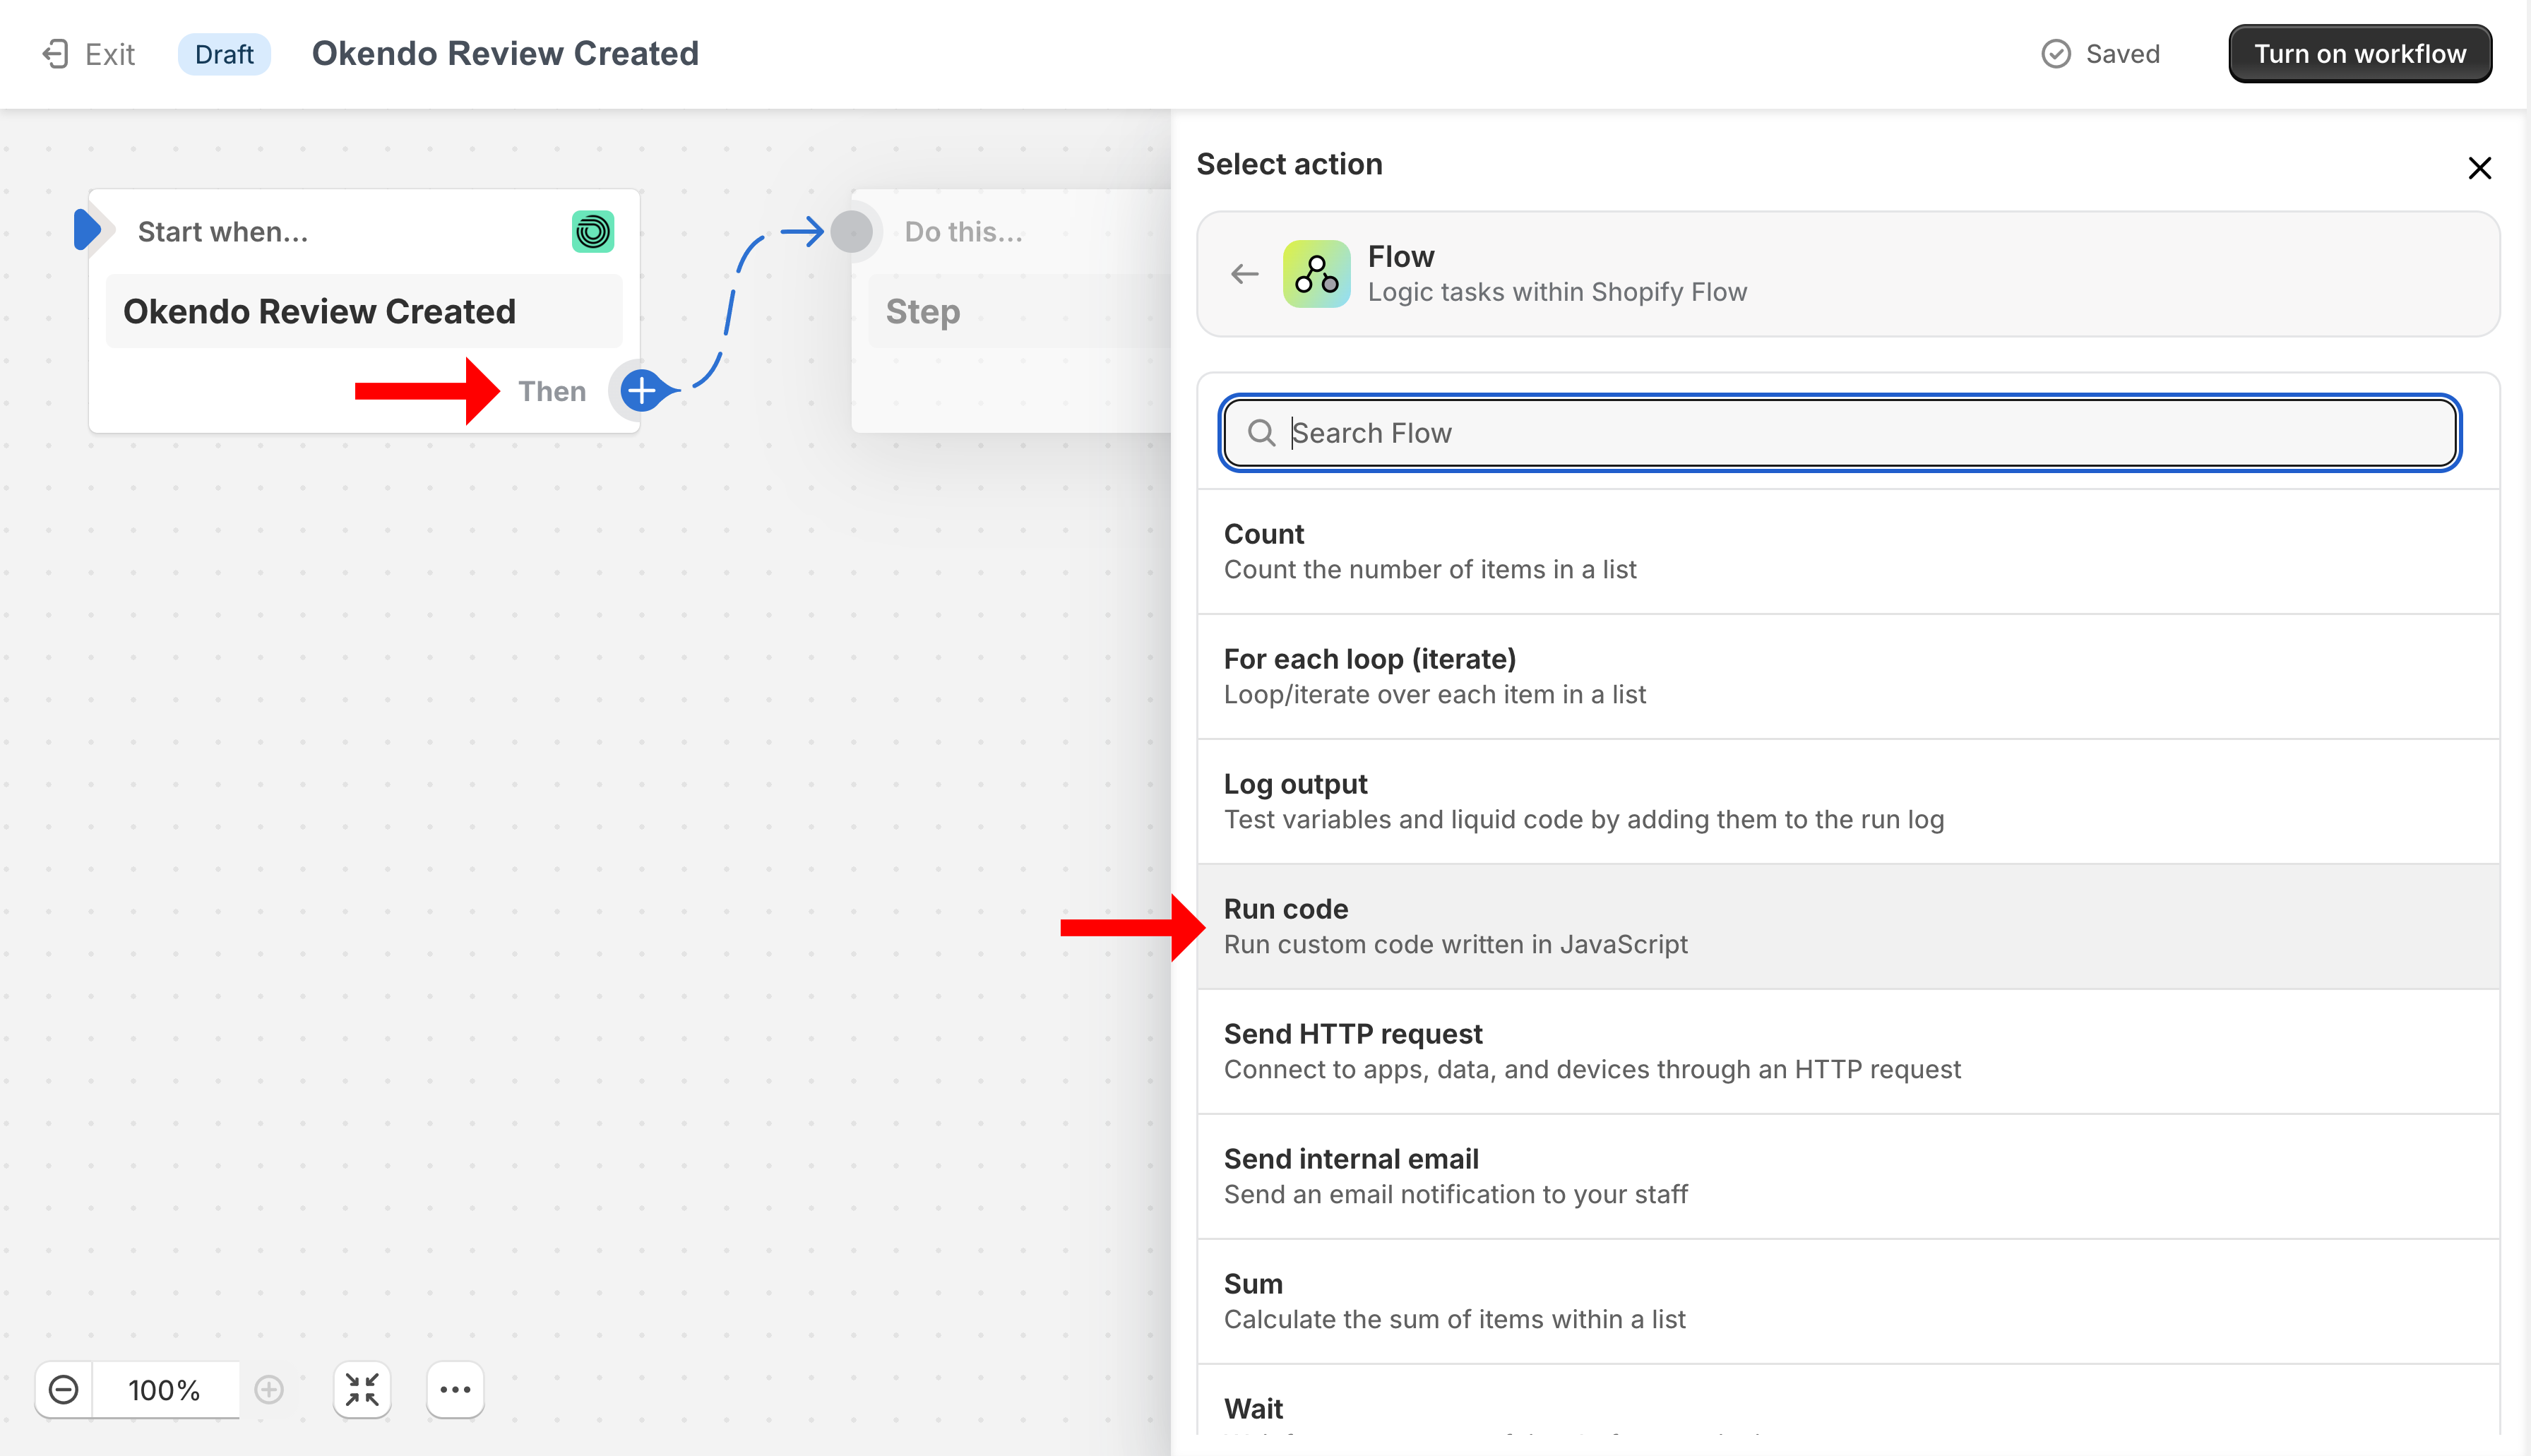
Once the "Okendo Review Created" step is added to your Flow, click the Plus(+) icon and choose "Action". In the menu, choose "Flow > Run Code".
This will bring up the "Run Code" dialog editor, where you can enter in a custom code block as well as both input and output parameters.
Paste in the code for "Input", "Output" and "Code".
In the code window, add in the encoded Zendesk token from above in place of the word "Redacted". Close the Run Code step.
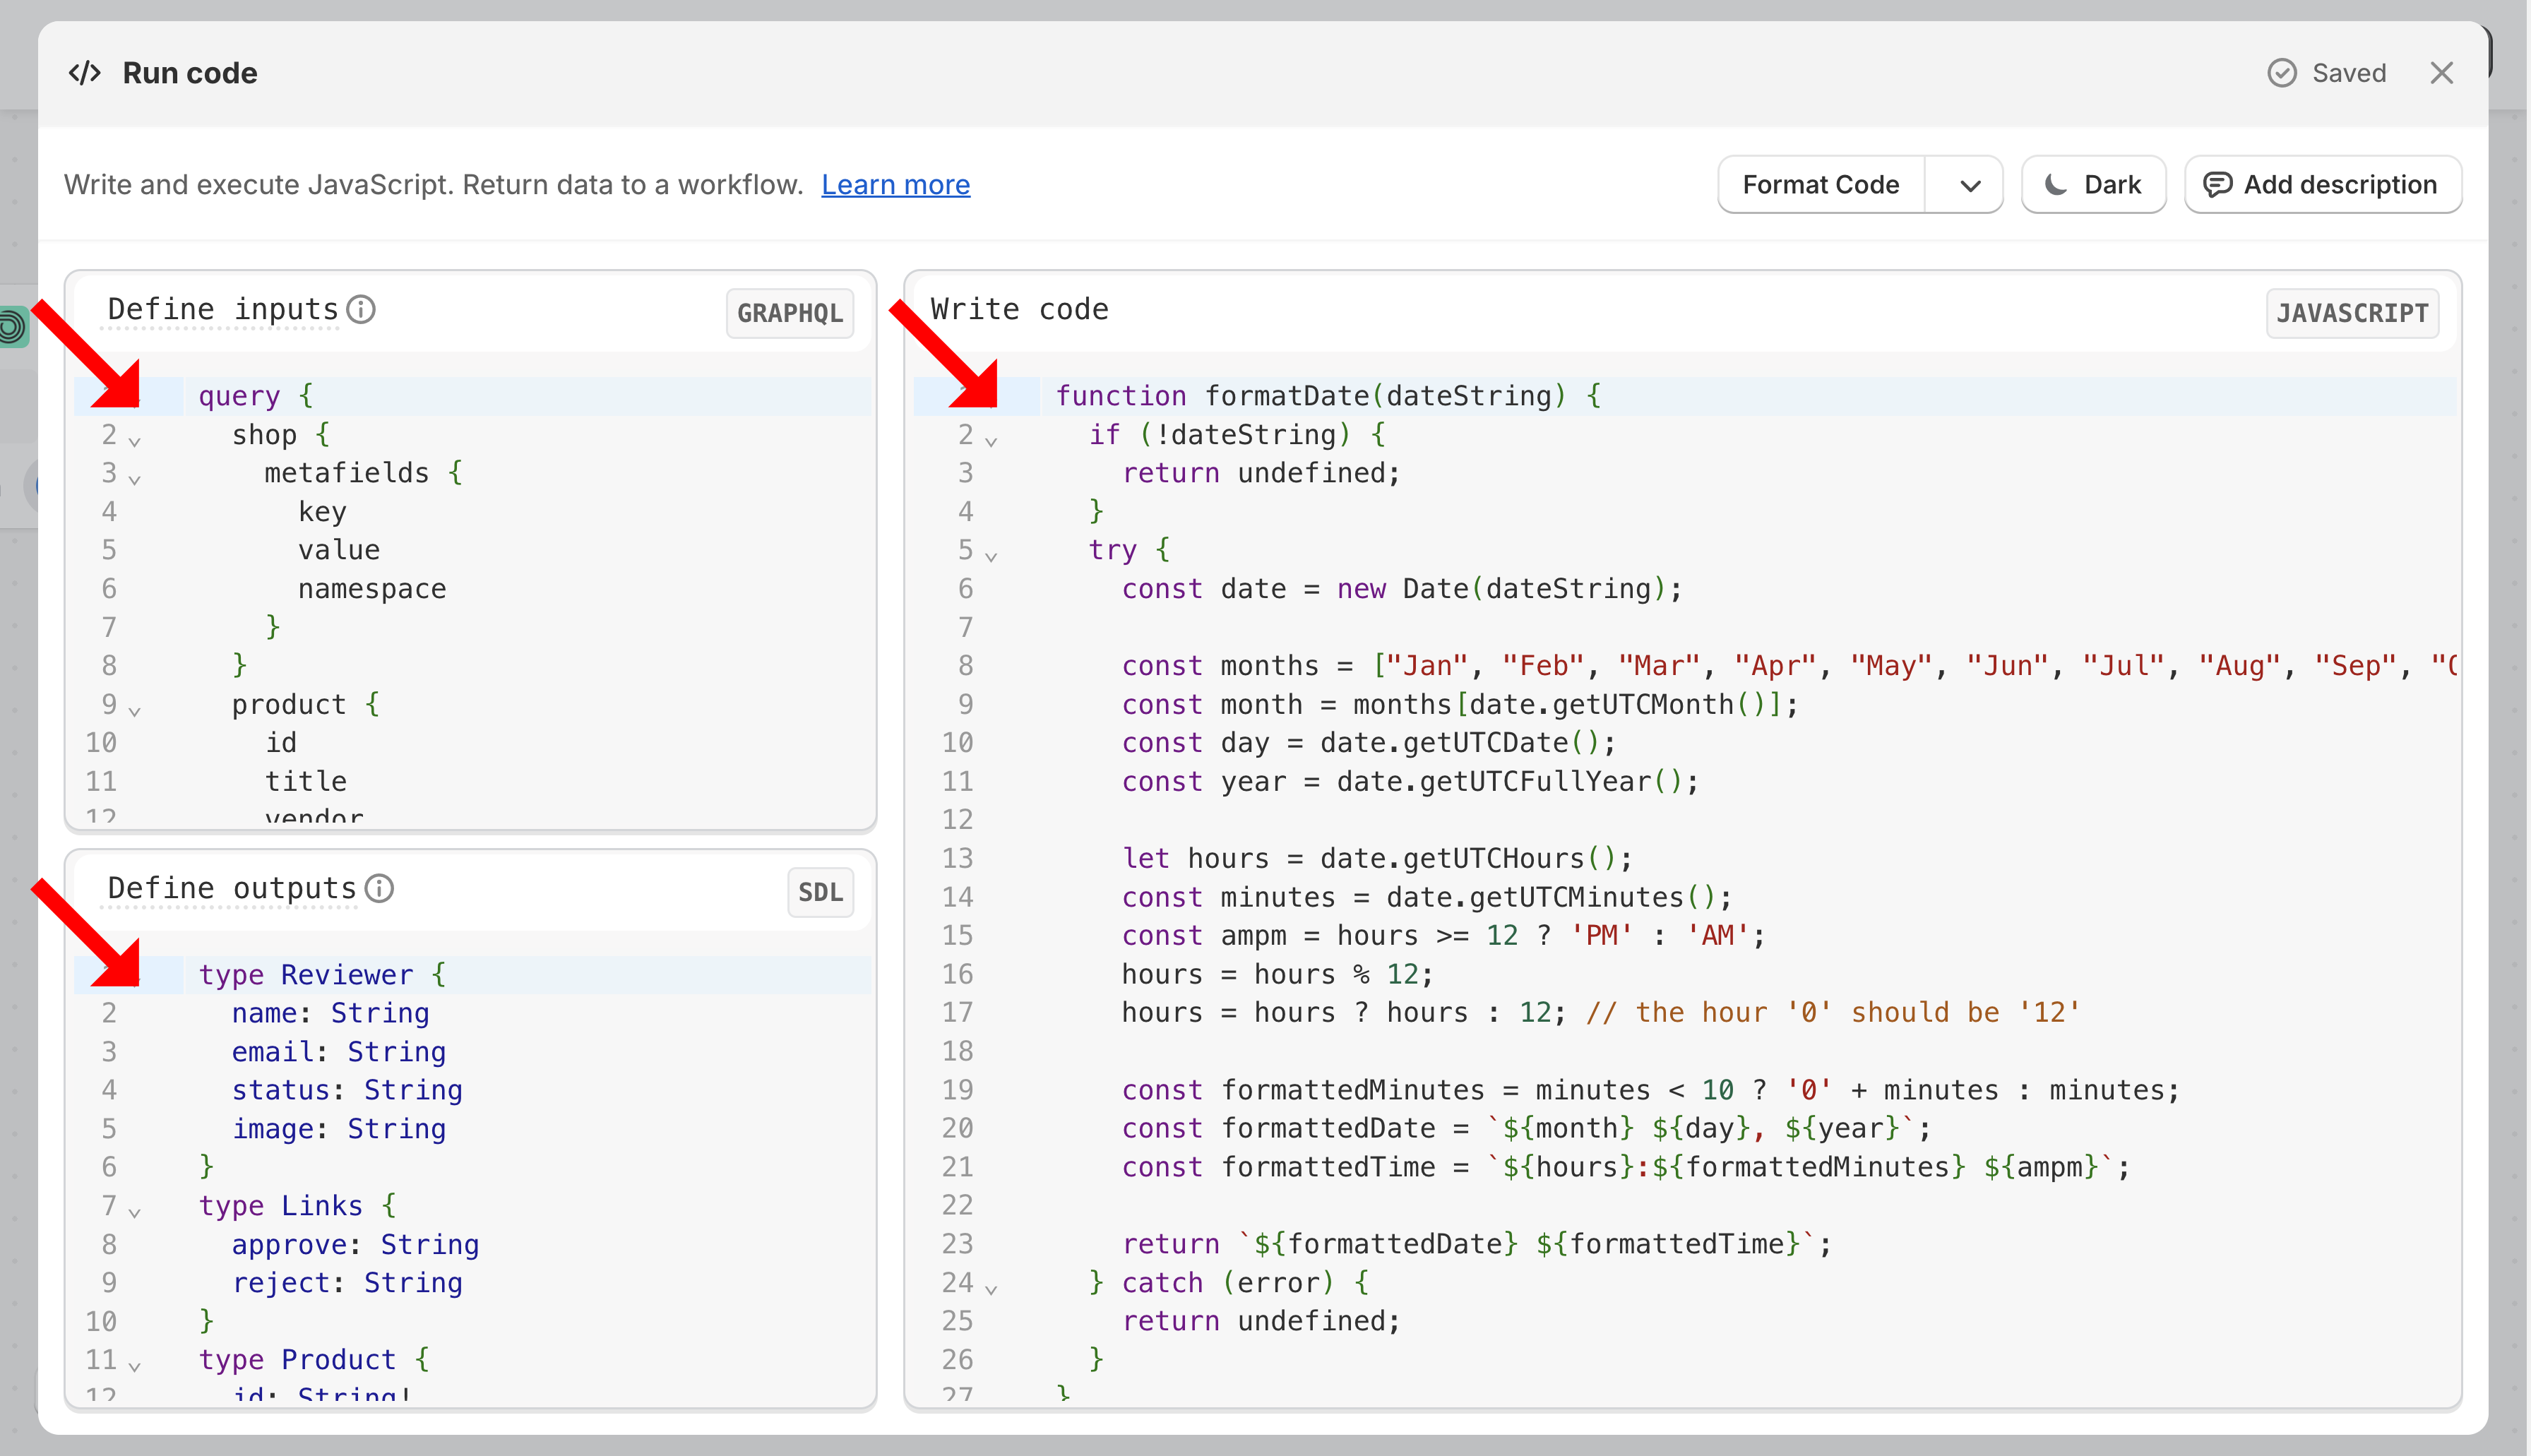
NOTE: To obtain the example/sample code for all sections of this workflow, please reach out to support@agnostack.com for assistance.
Once the "Run Code" step is added to your Flow, click the Plus(+) icon and choose "Action". In the menu, choose "Flow > Send HTTP request".
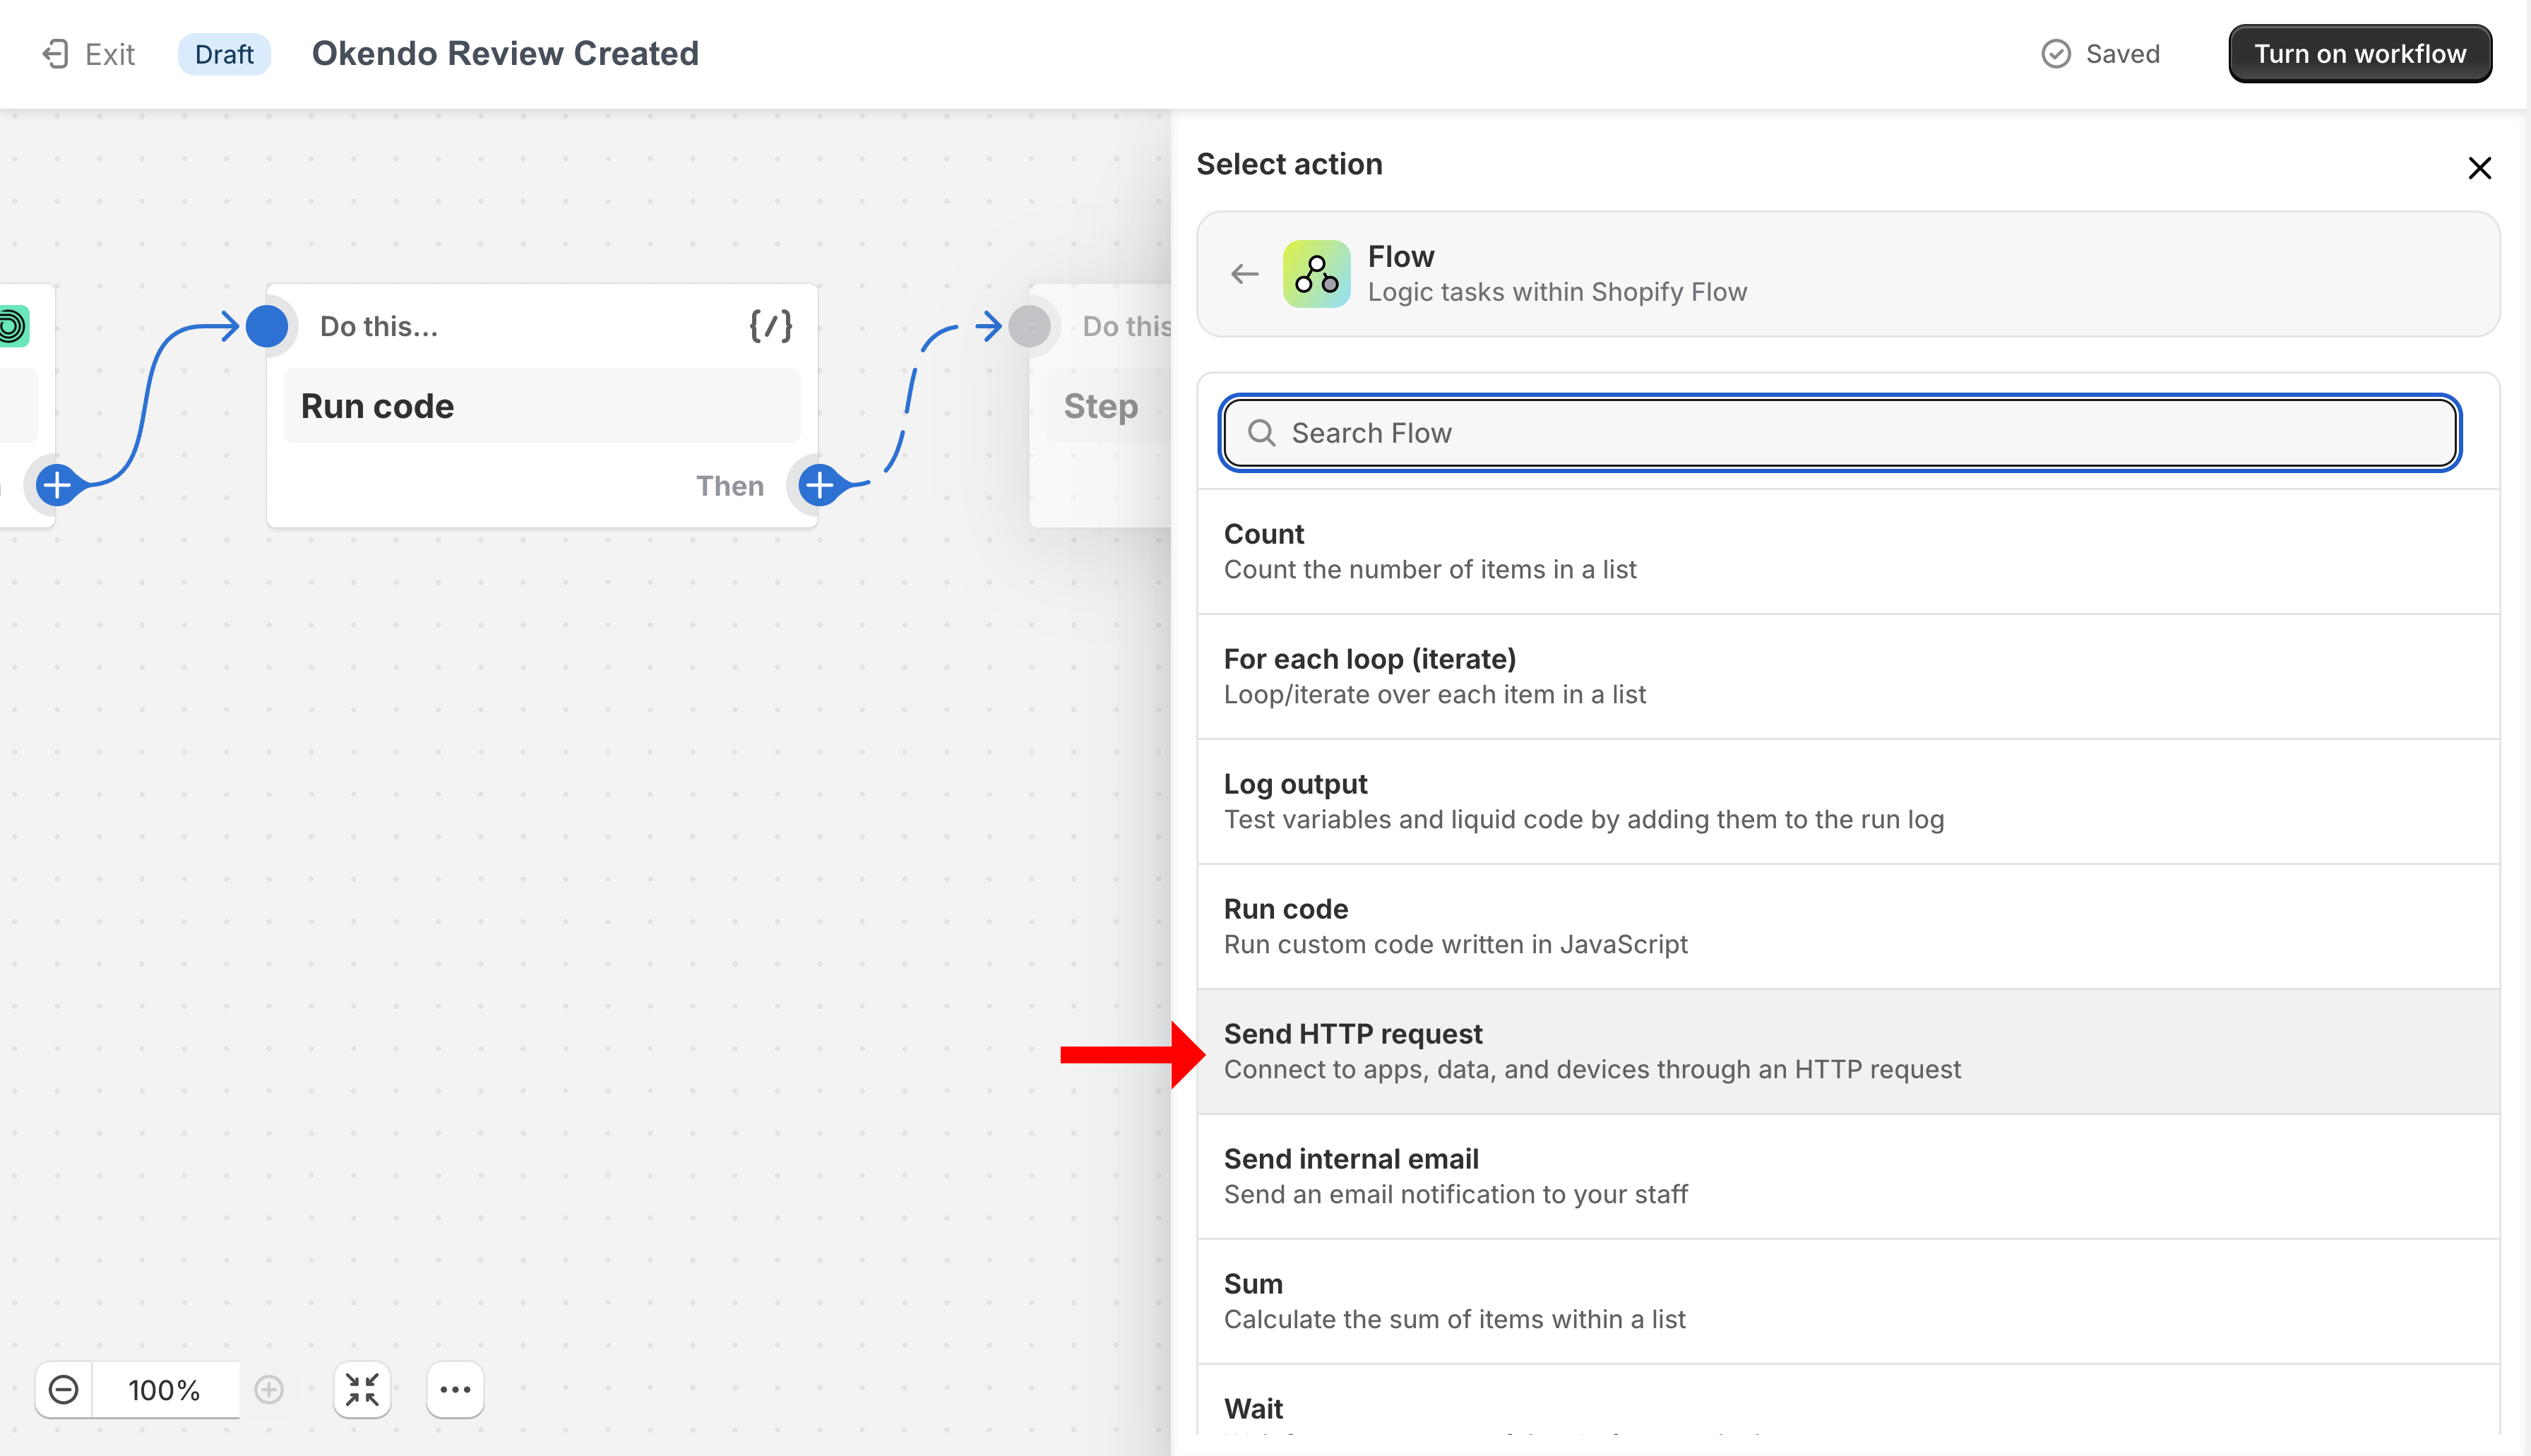
Fill in all details and close this step.
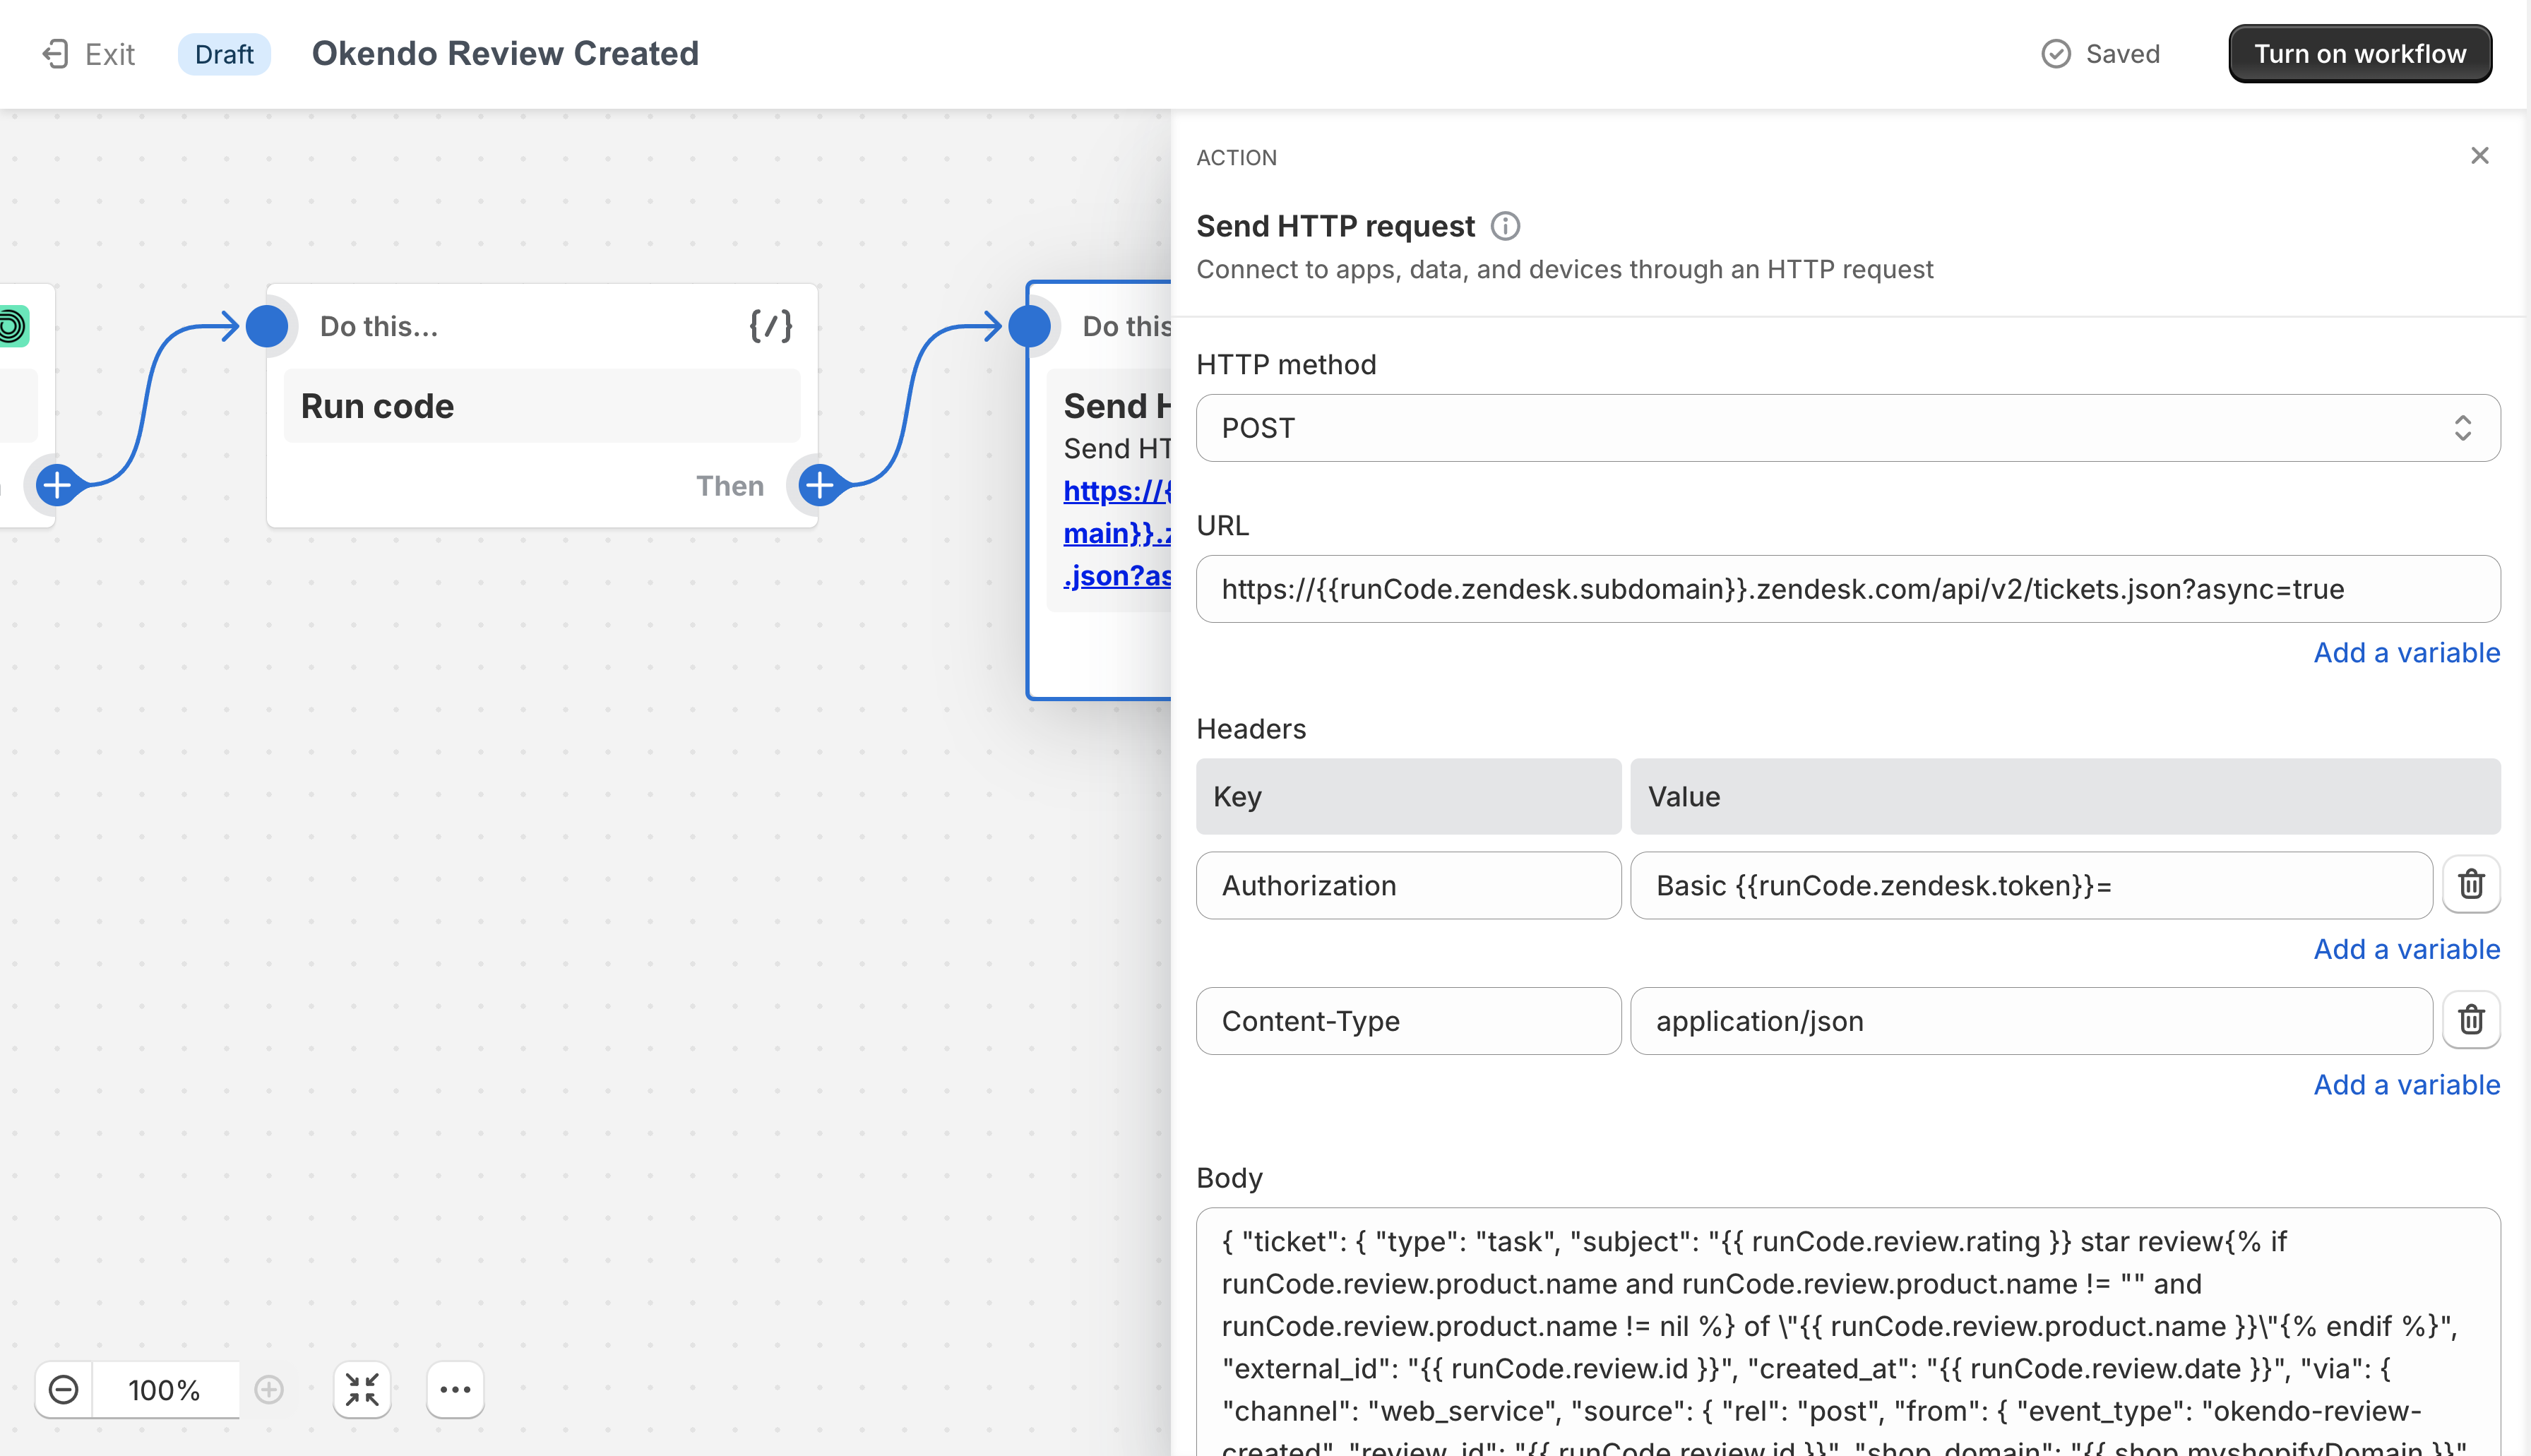
NOTE: To obtain the example/sample code for all sections of this workflow, please reach out to support@agnostack.com for assistance.
Once the previous step is added to your Flow, repeat this process once more by clicking the Plus(+) icon on the "Run Code" step and choose "Action". In the menu, choose "Flow > Send HTTP request". Fill in all details and close this step.
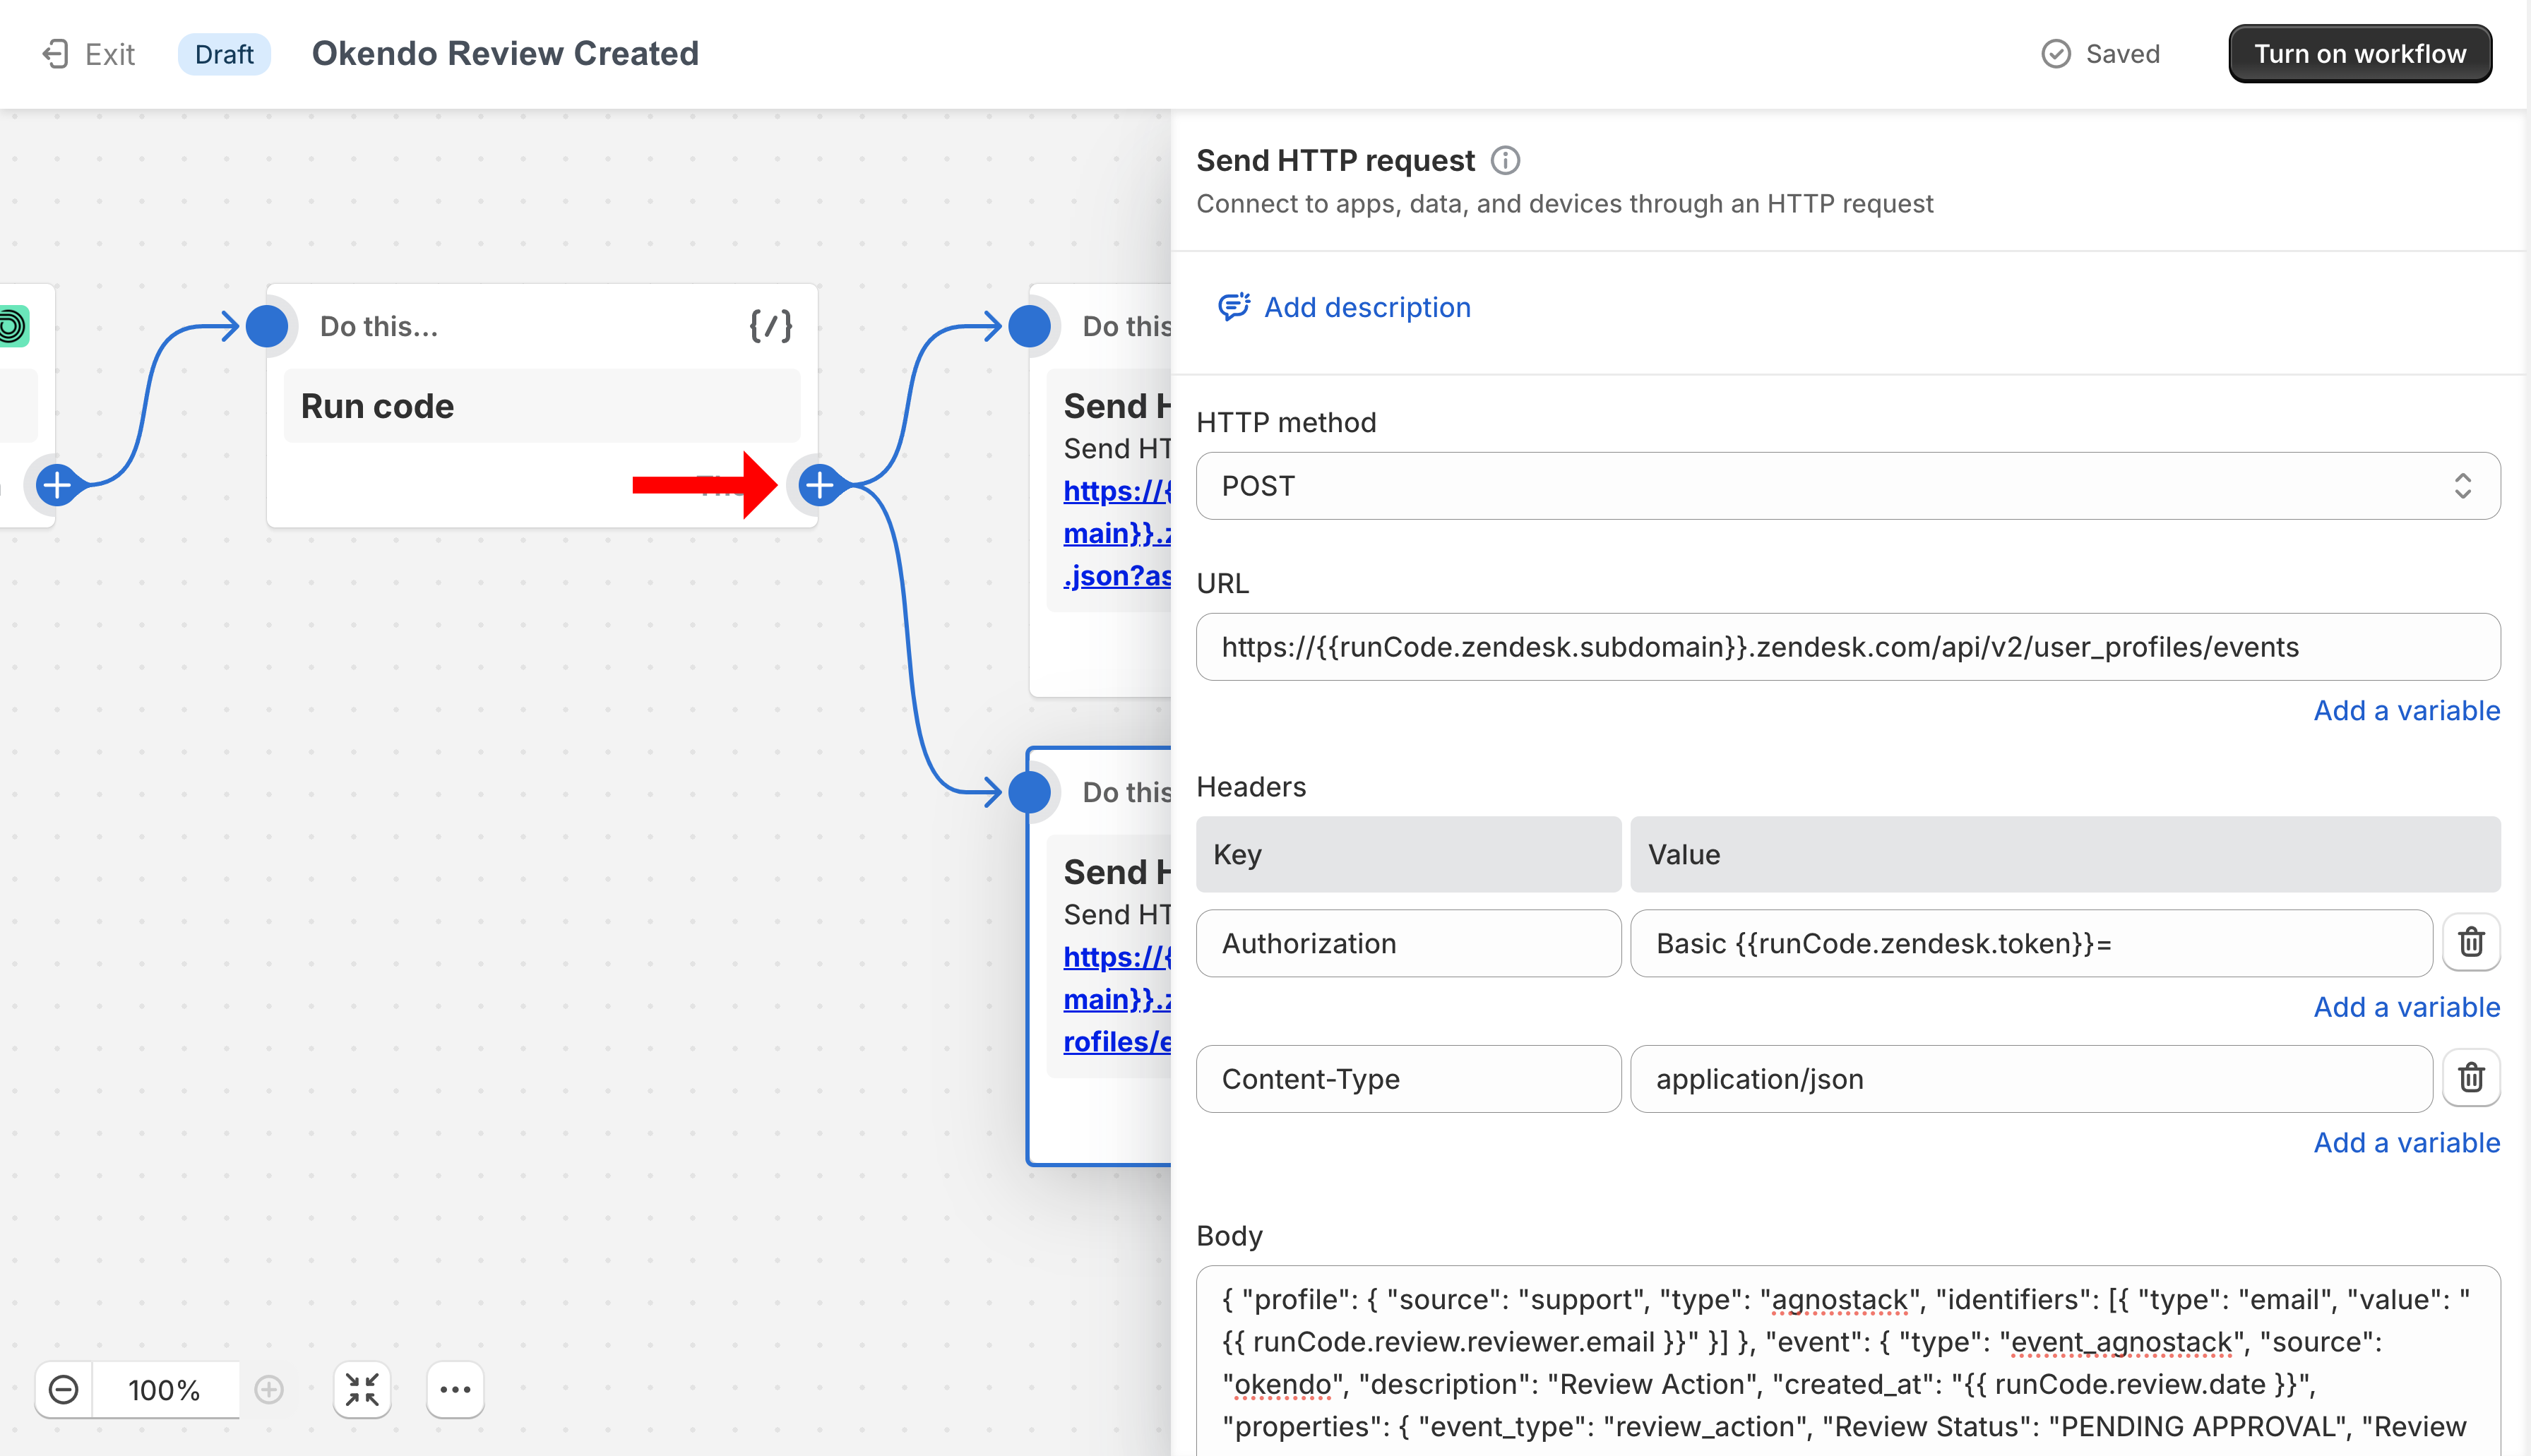
NOTE: To obtain the example/sample code for all sections of this workflow, please reach out to support@agnostack.com for assistance.
Finally, click Apply Changes to save this Flow.
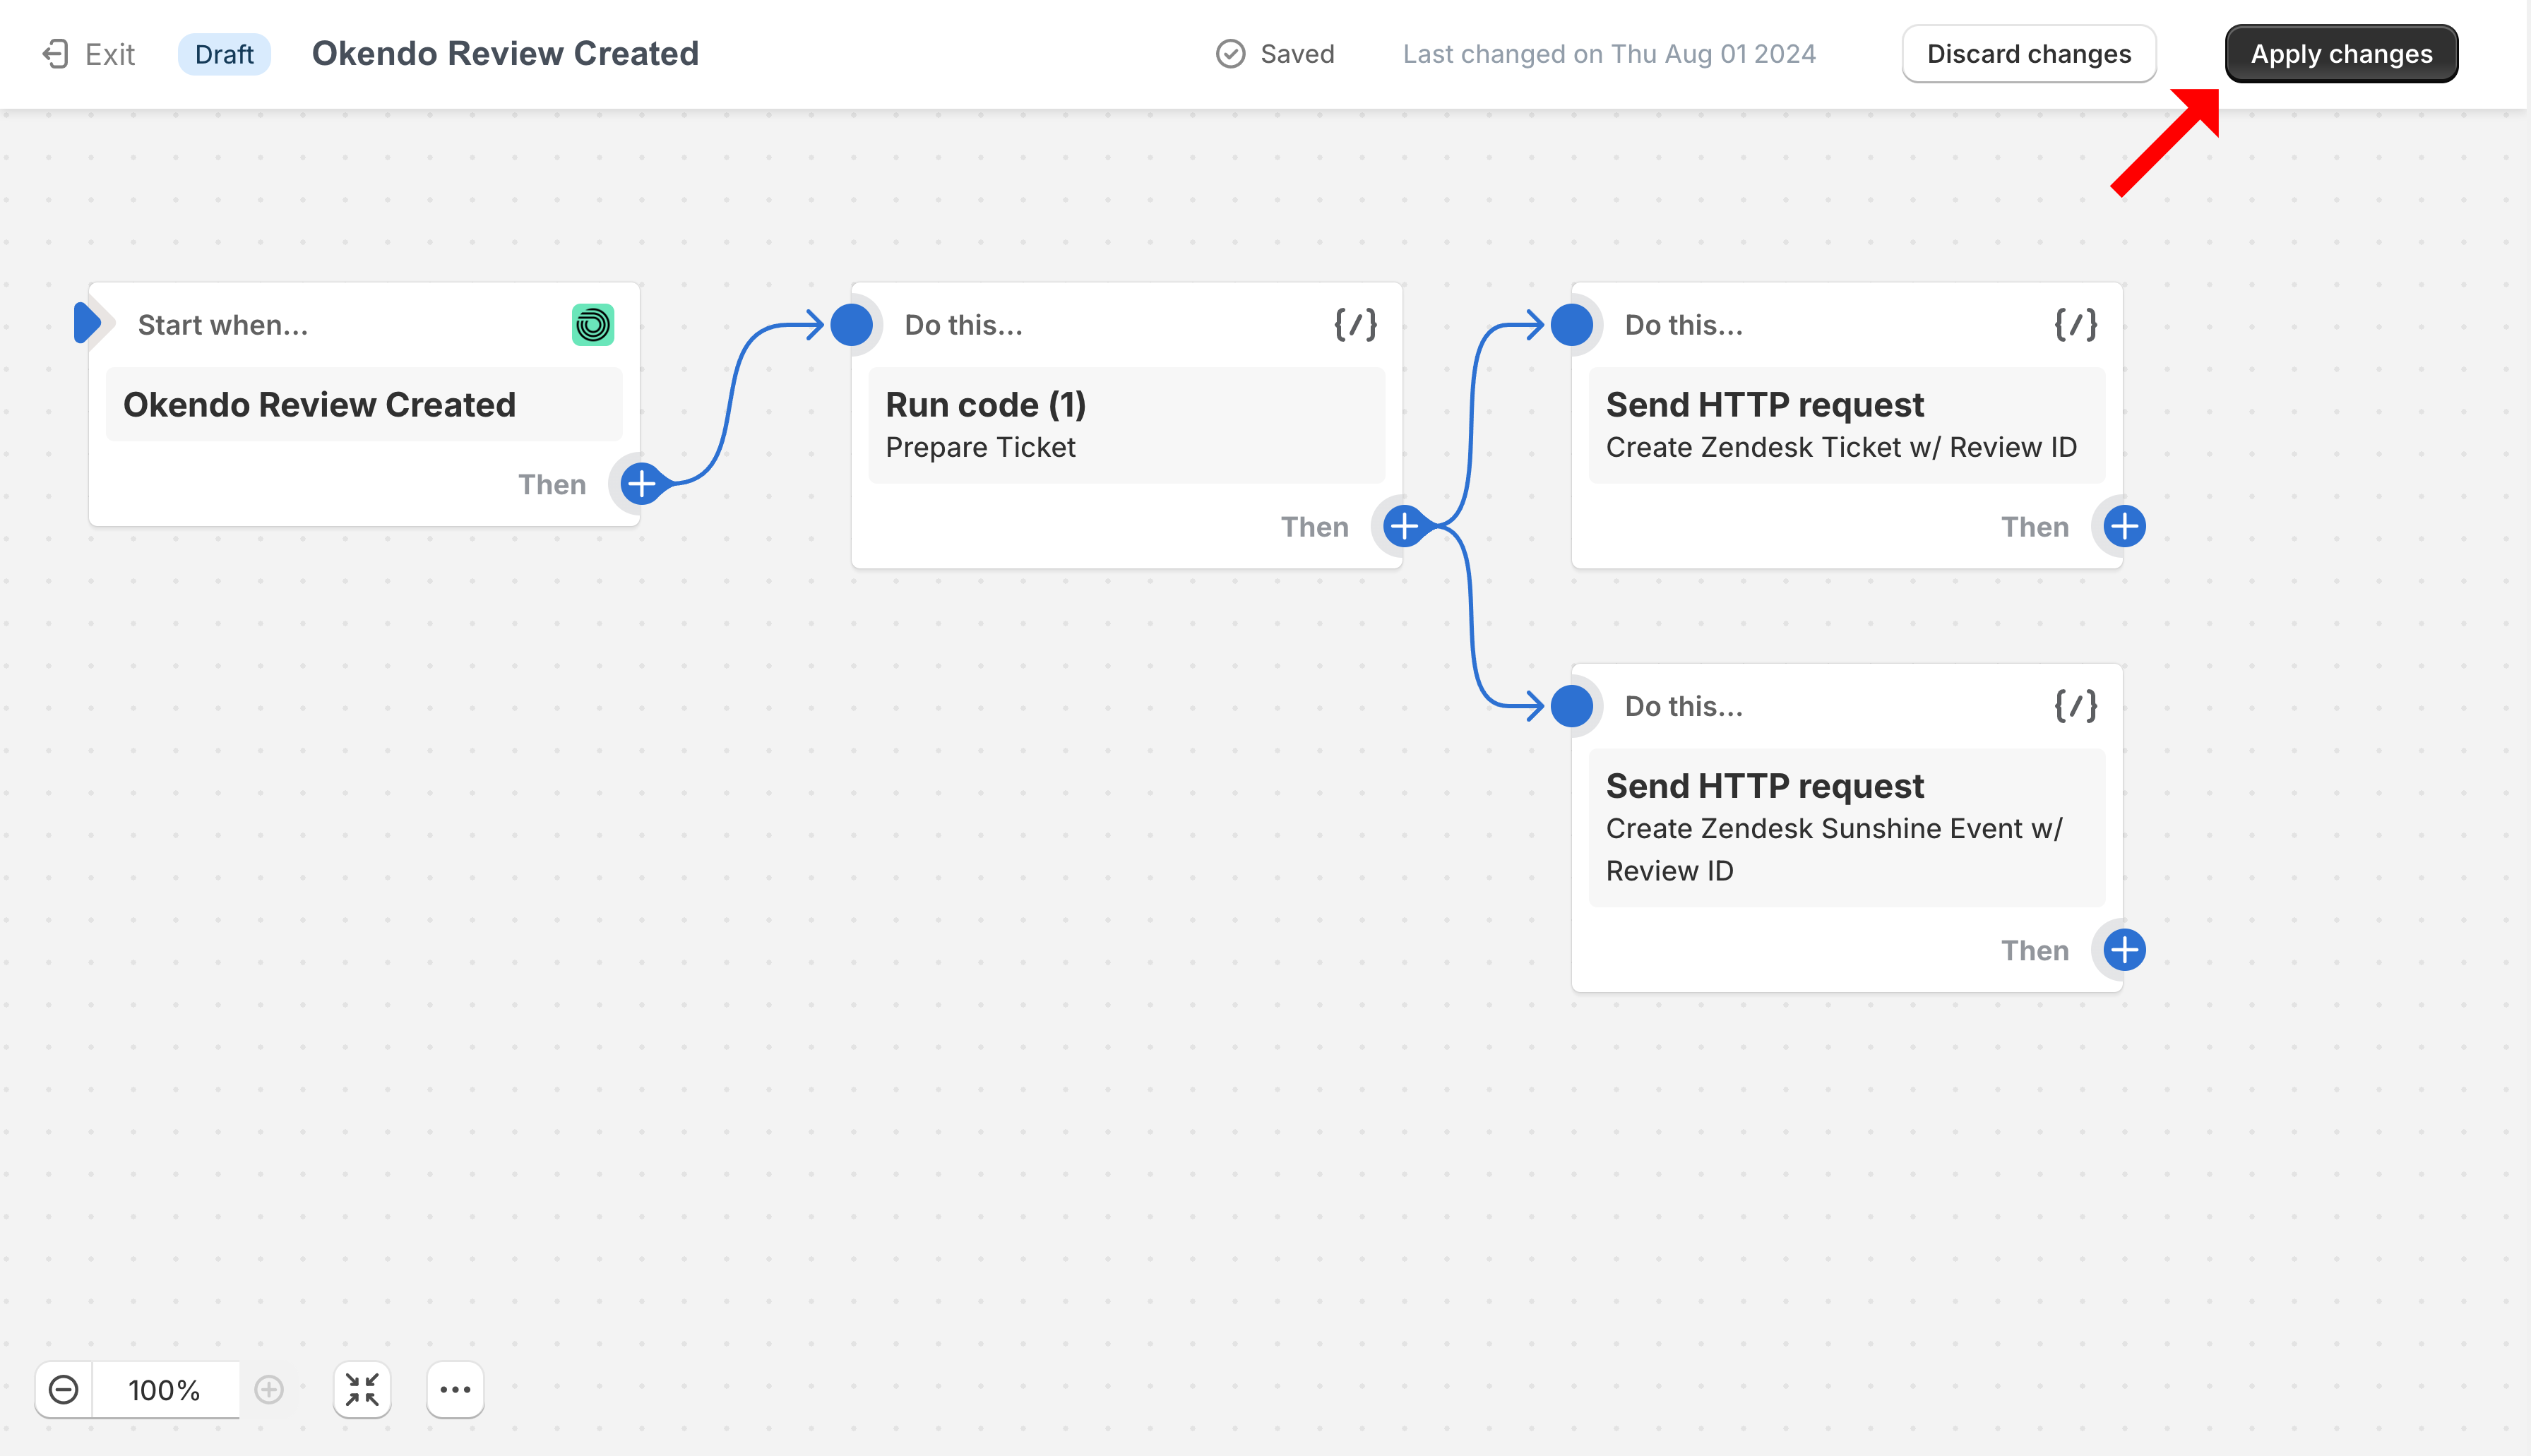
Configure Zendesk Macros
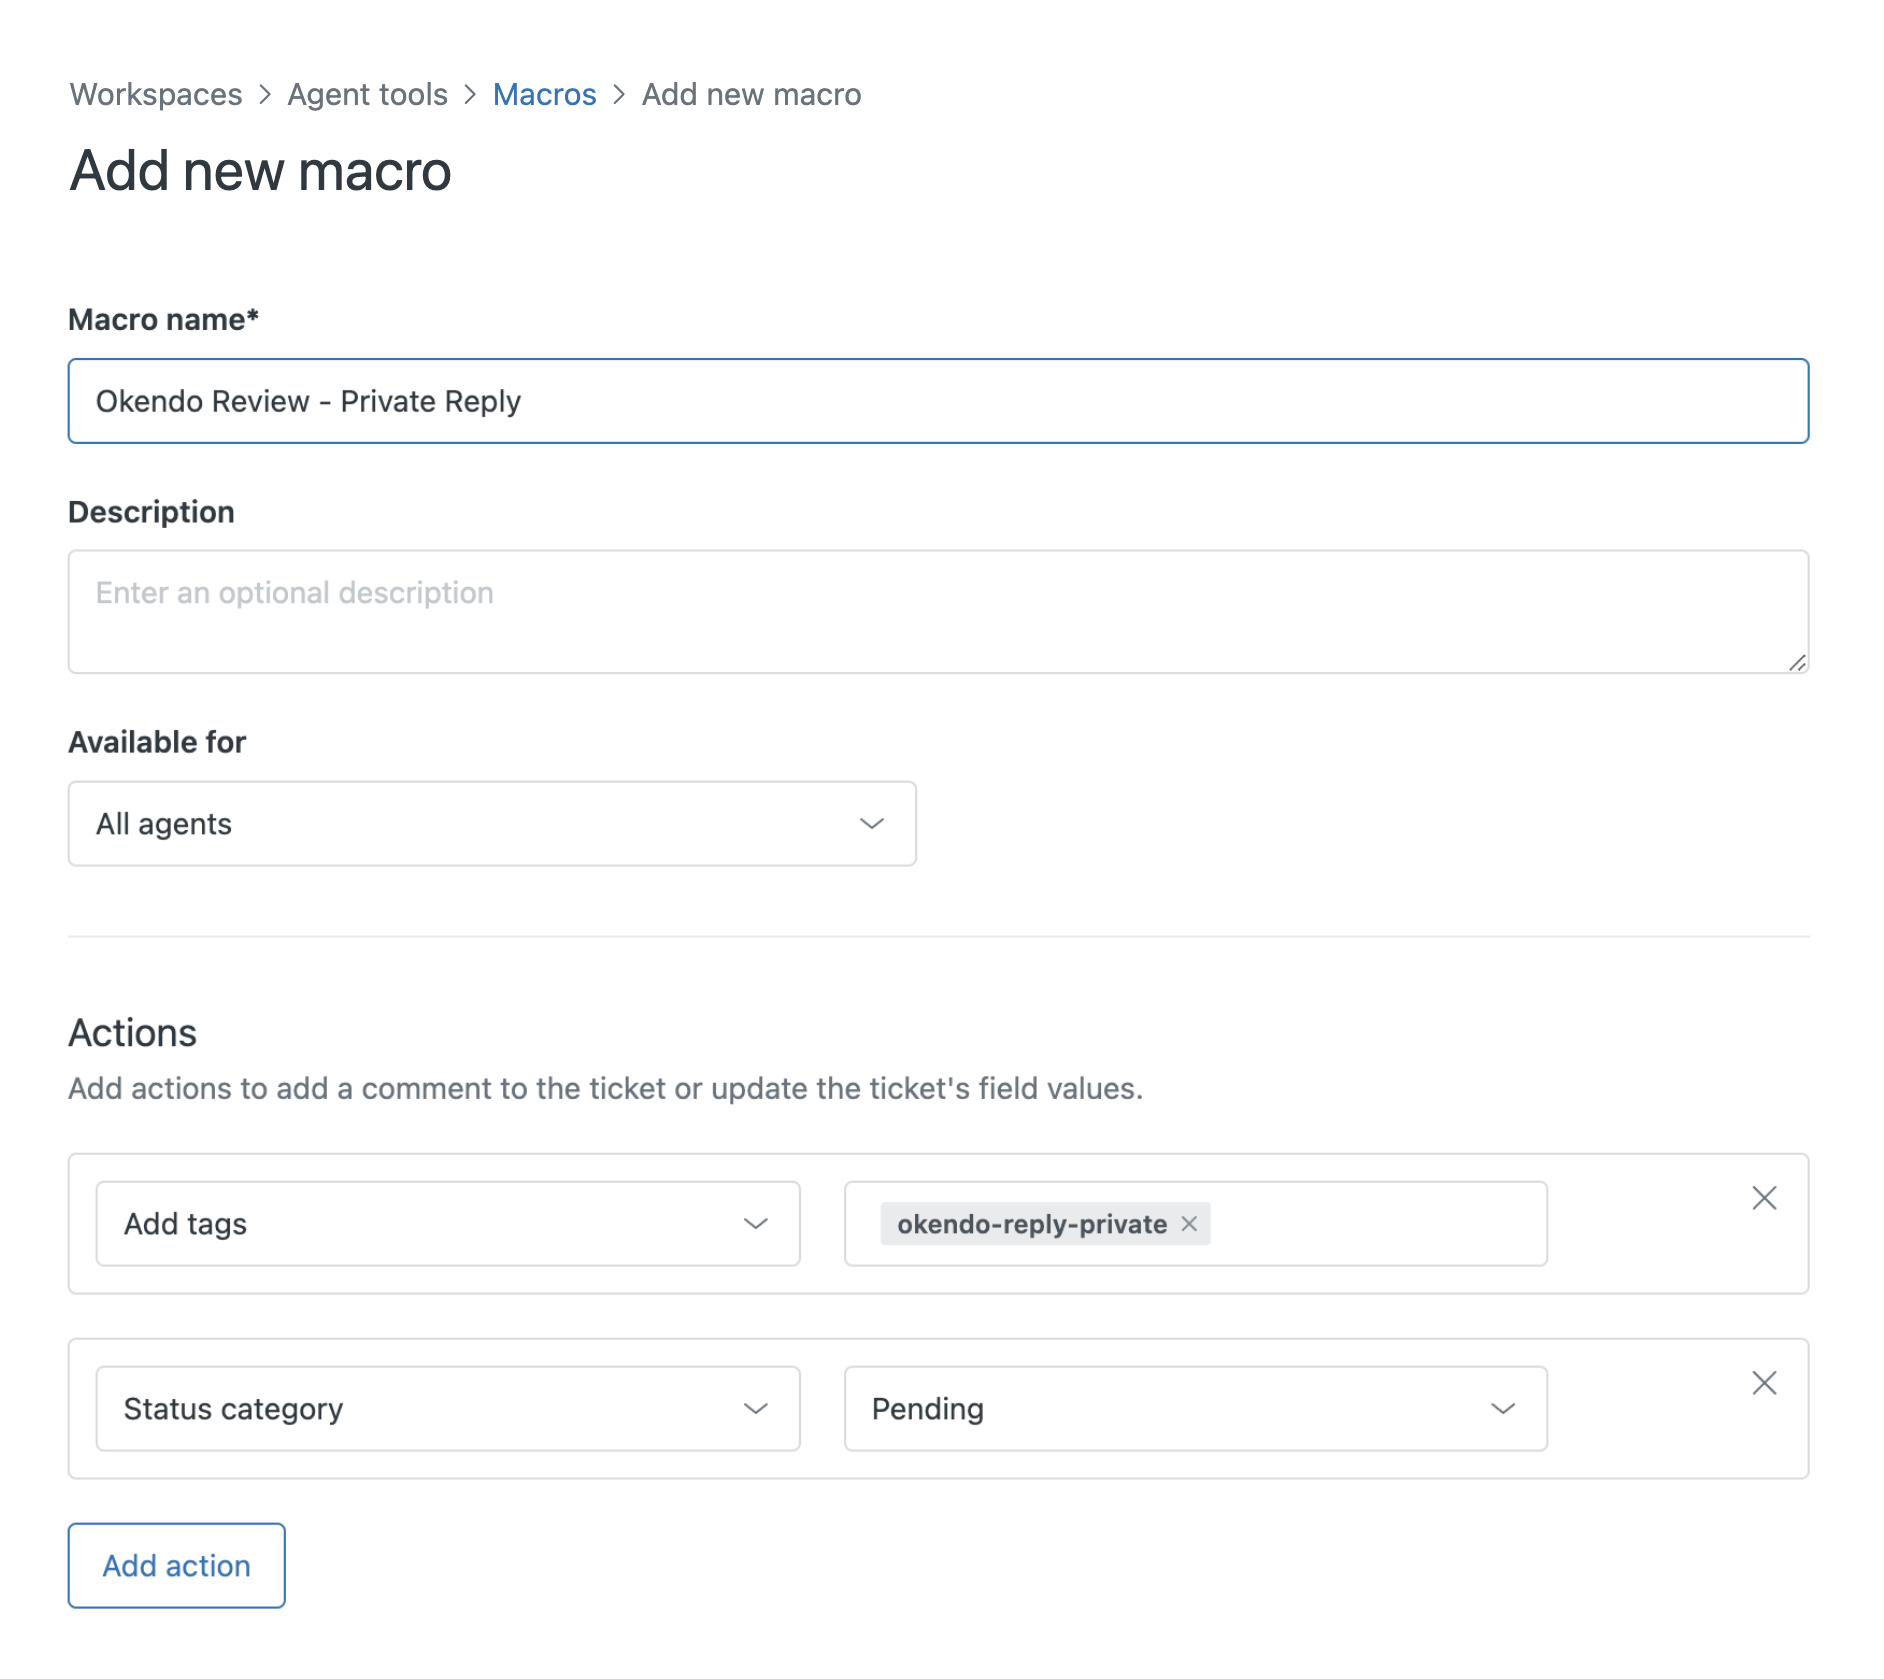
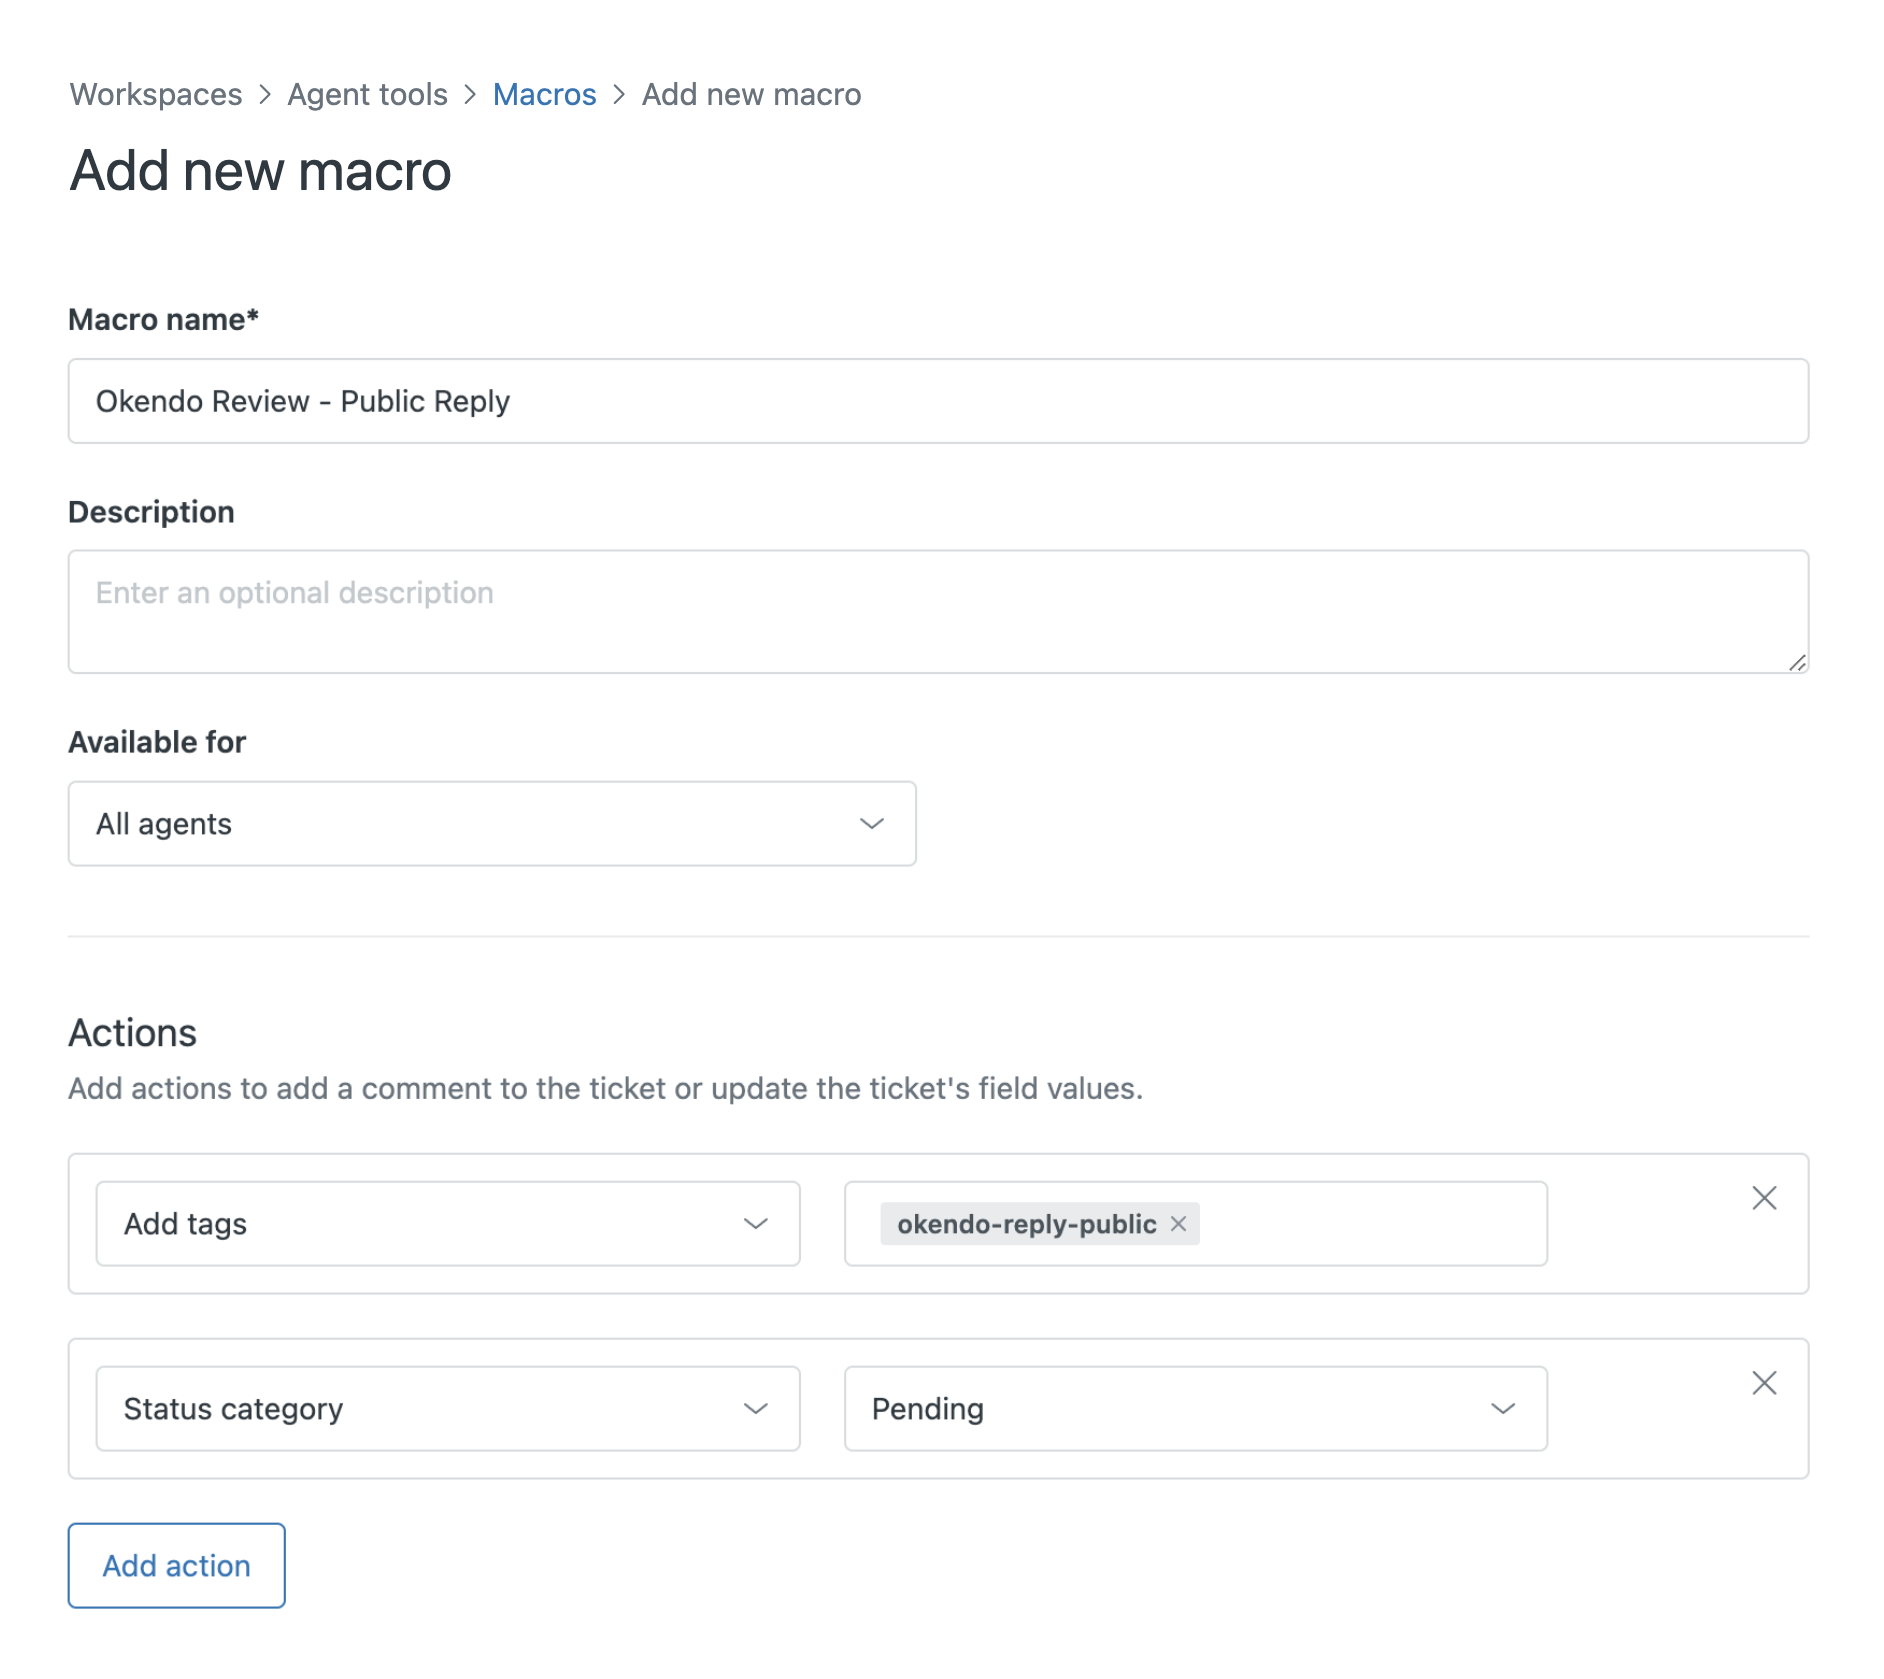
Once the Shopify Flow has been created, you are ready to move into Zendesk to complete the rest of the setup. You will first need to create two new Macros. In the Zendesk Admin Center, navigation to "Workspaces > Agent Tools > Macros".
Create two new Macros, called "Okendo Review - Private Reply" and "Okendo Review - Public Reply" and fill in the appropriate information as displayed below.
Configure Zendesk Webhook
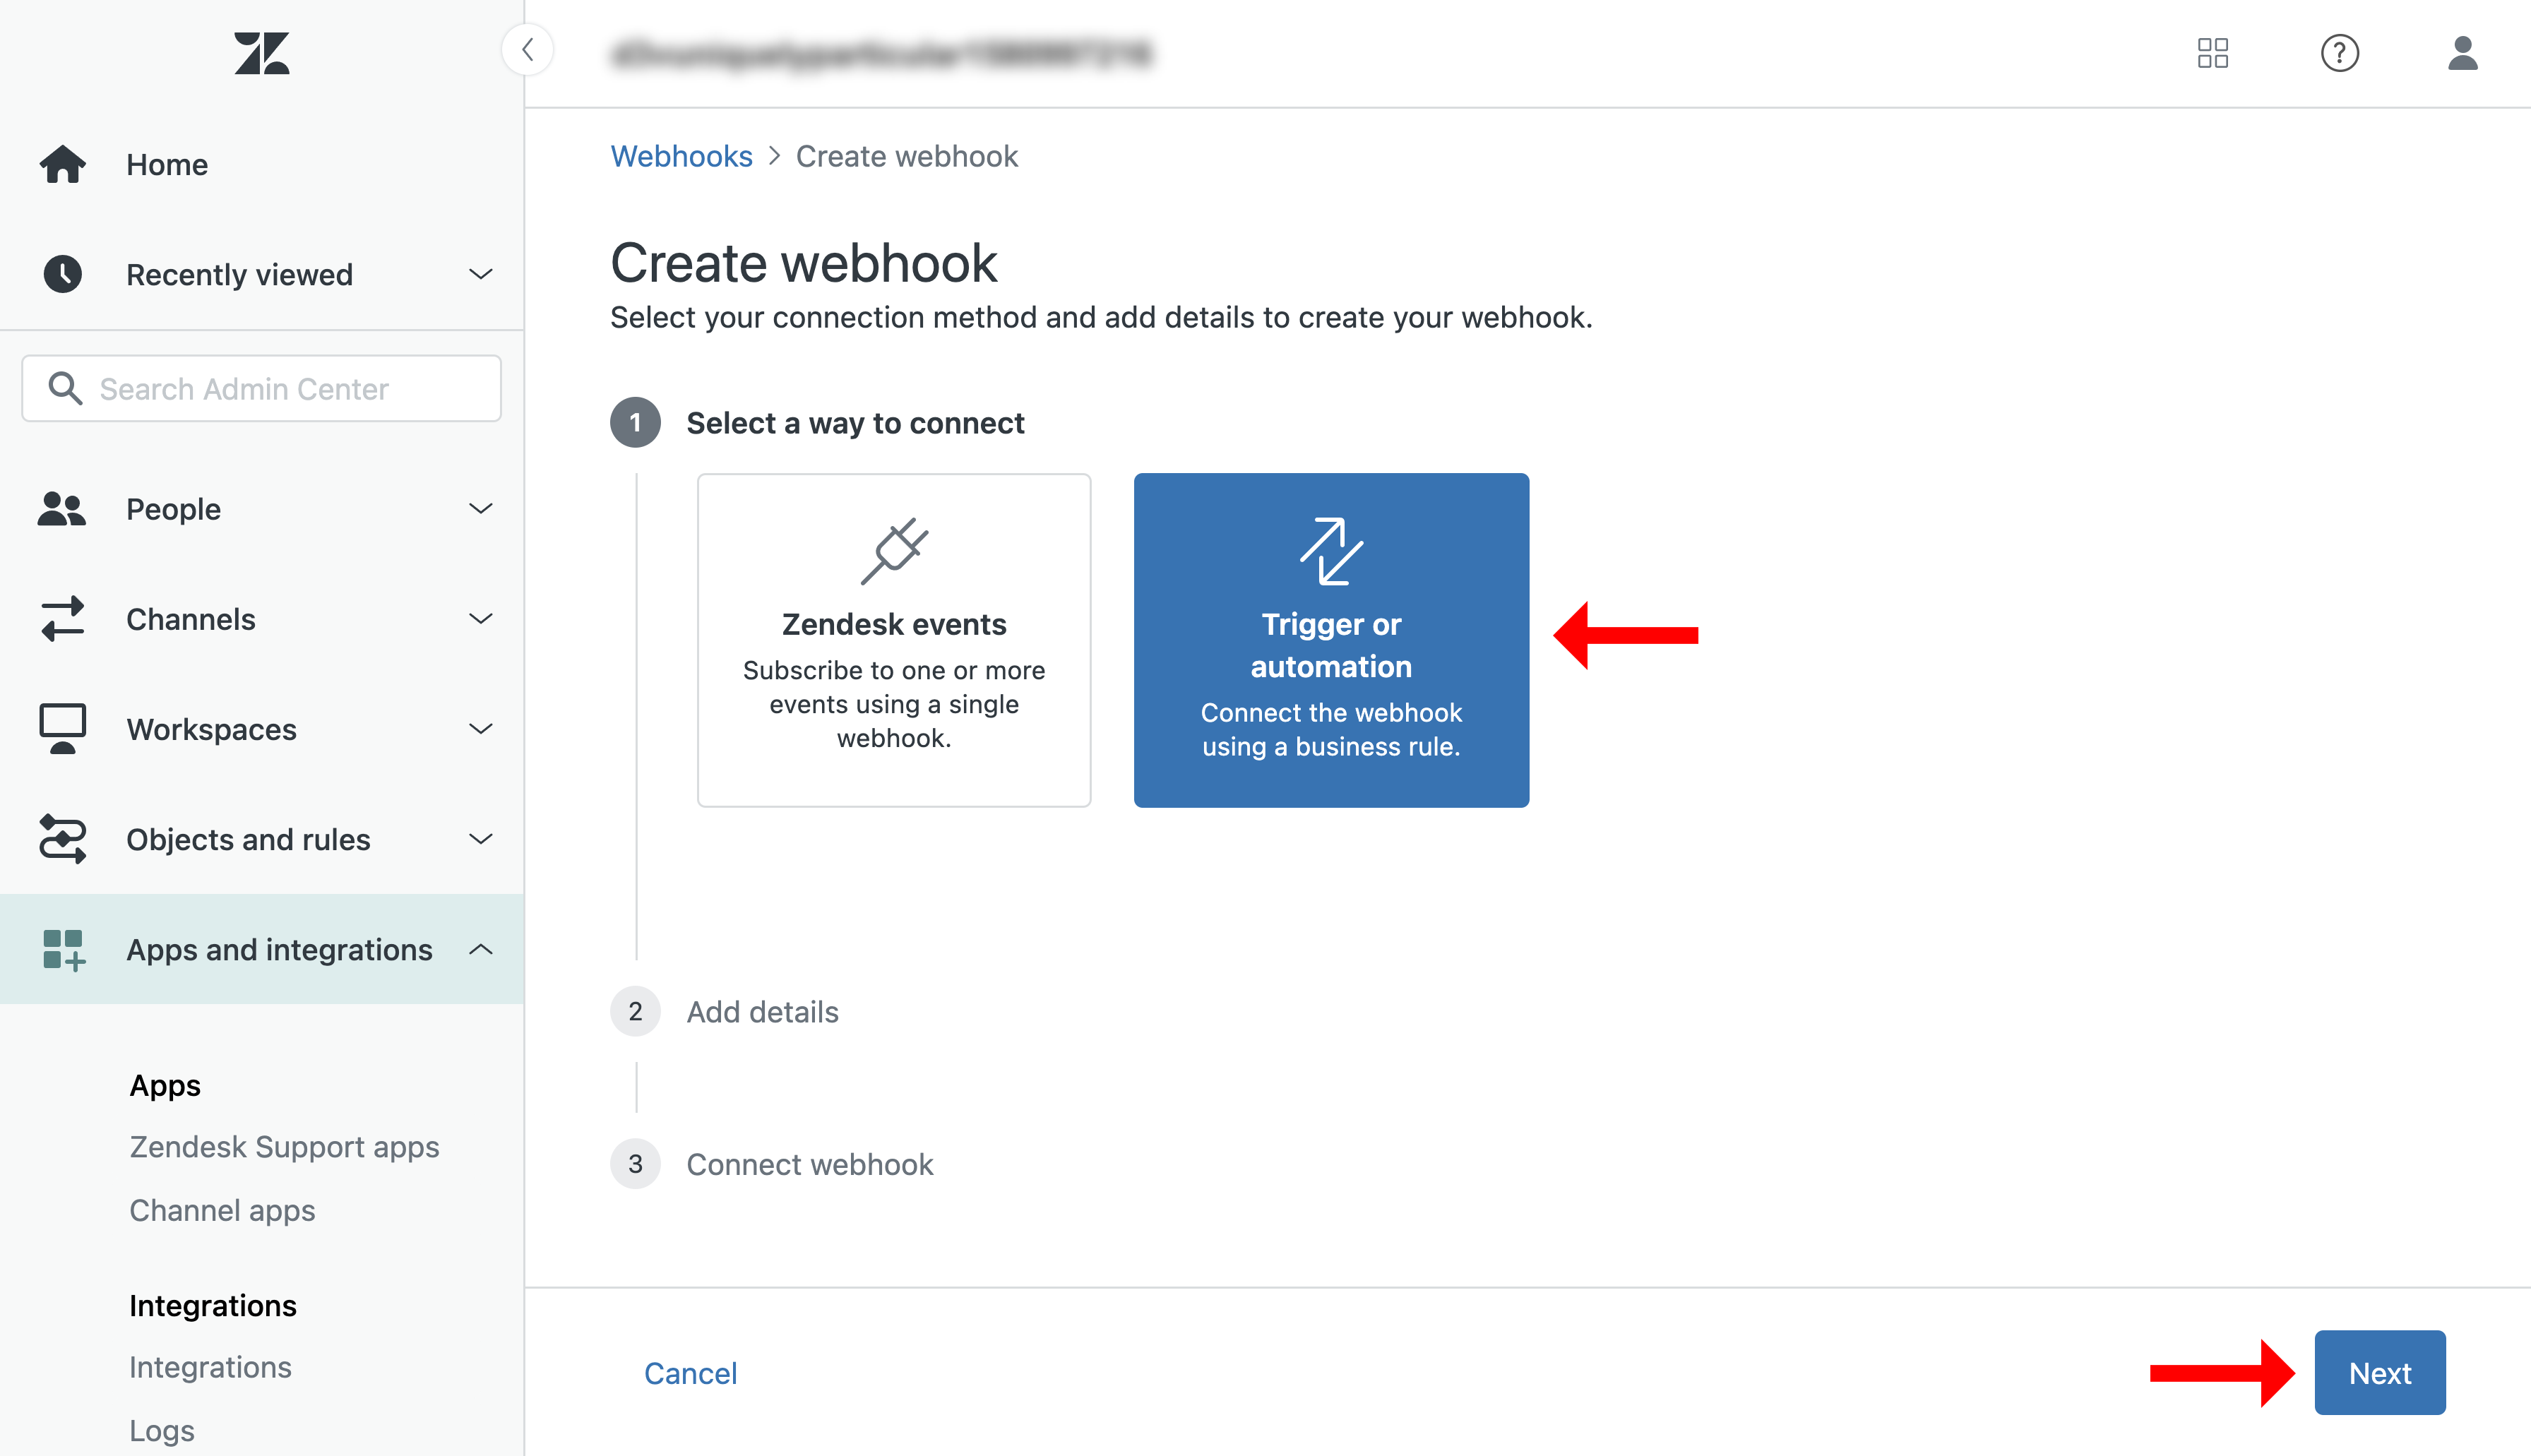
The next step creating a webhook for communicating with your Okendo platform. From the Zendesk Admin Center, navigate to "Apps and Integrations > Webhooks" Click "Create Webhook" and select the option for "Trigger or Automation" and click "Next".
Fill in the appropriate information as displayed below.
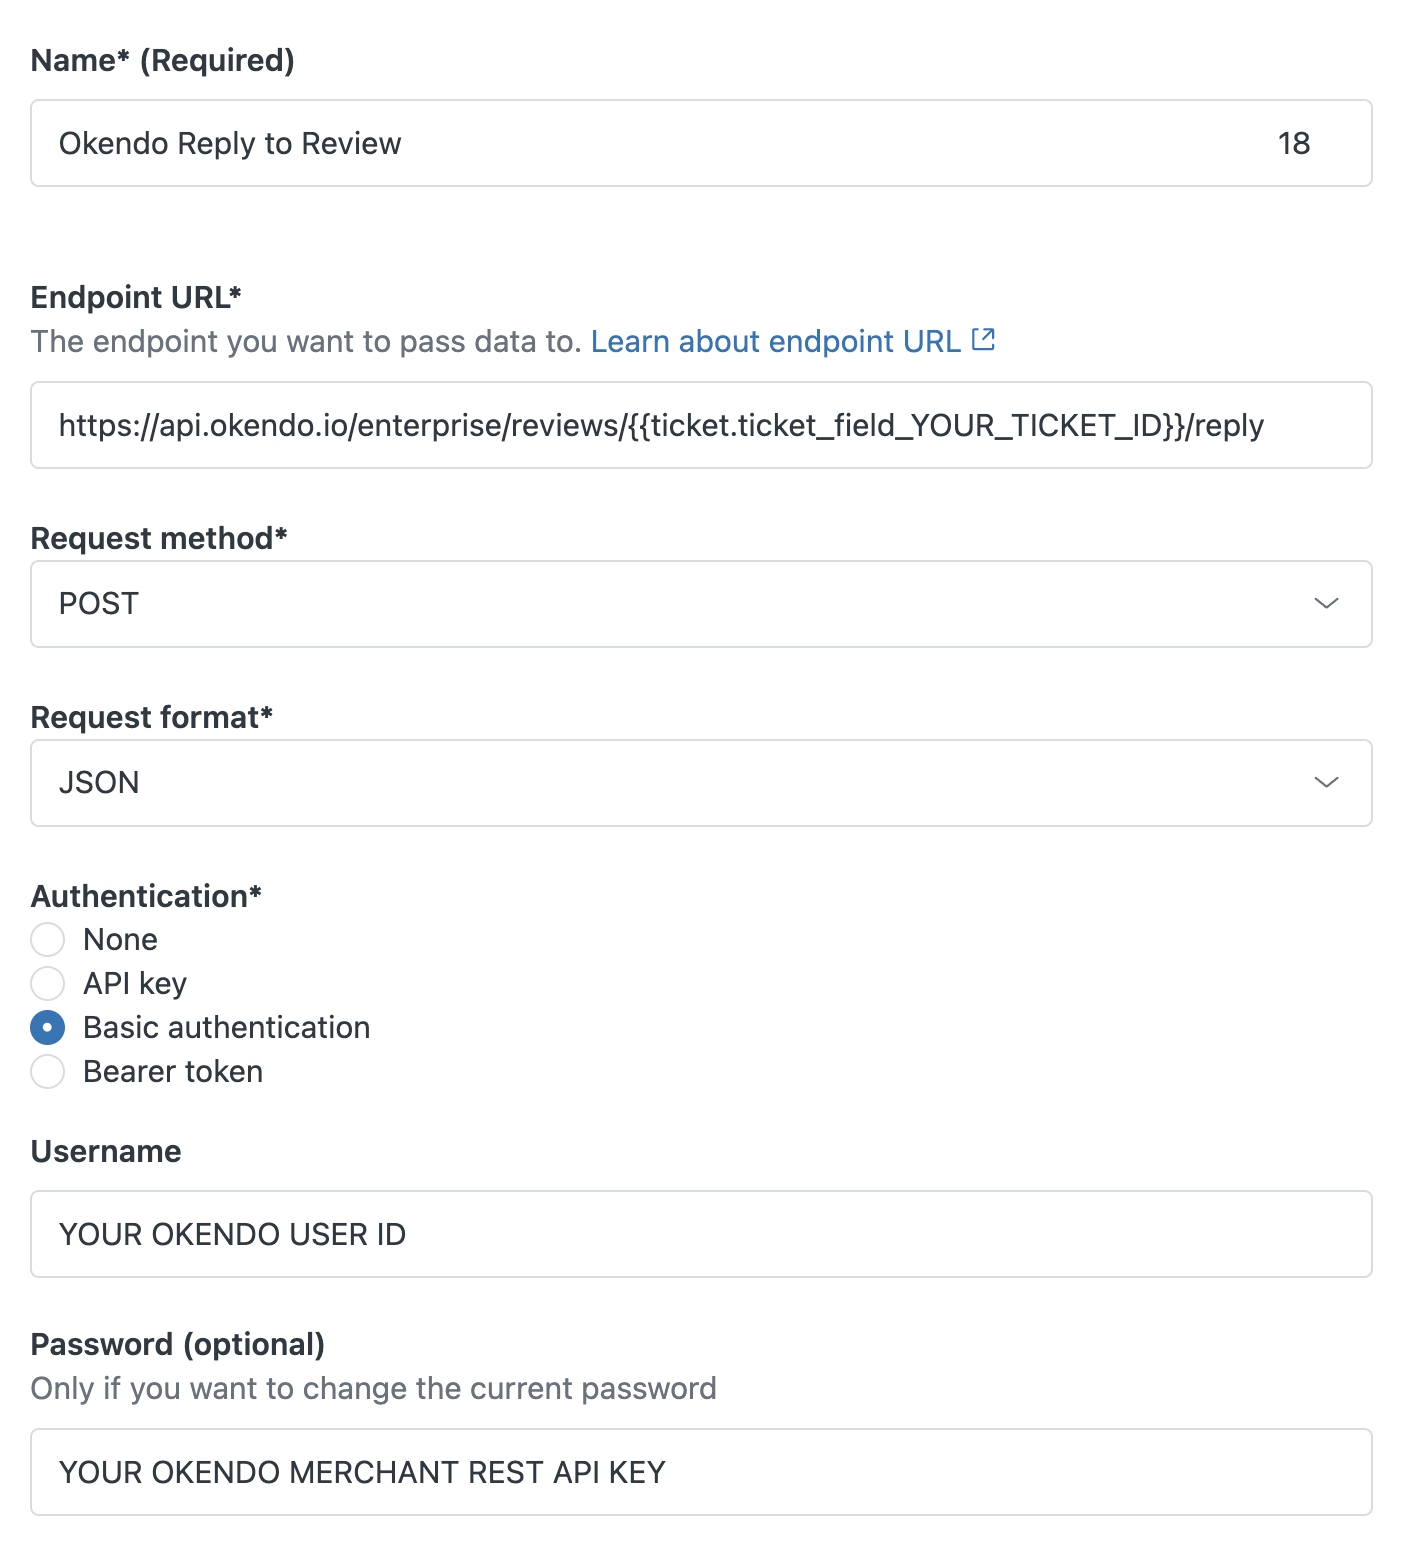
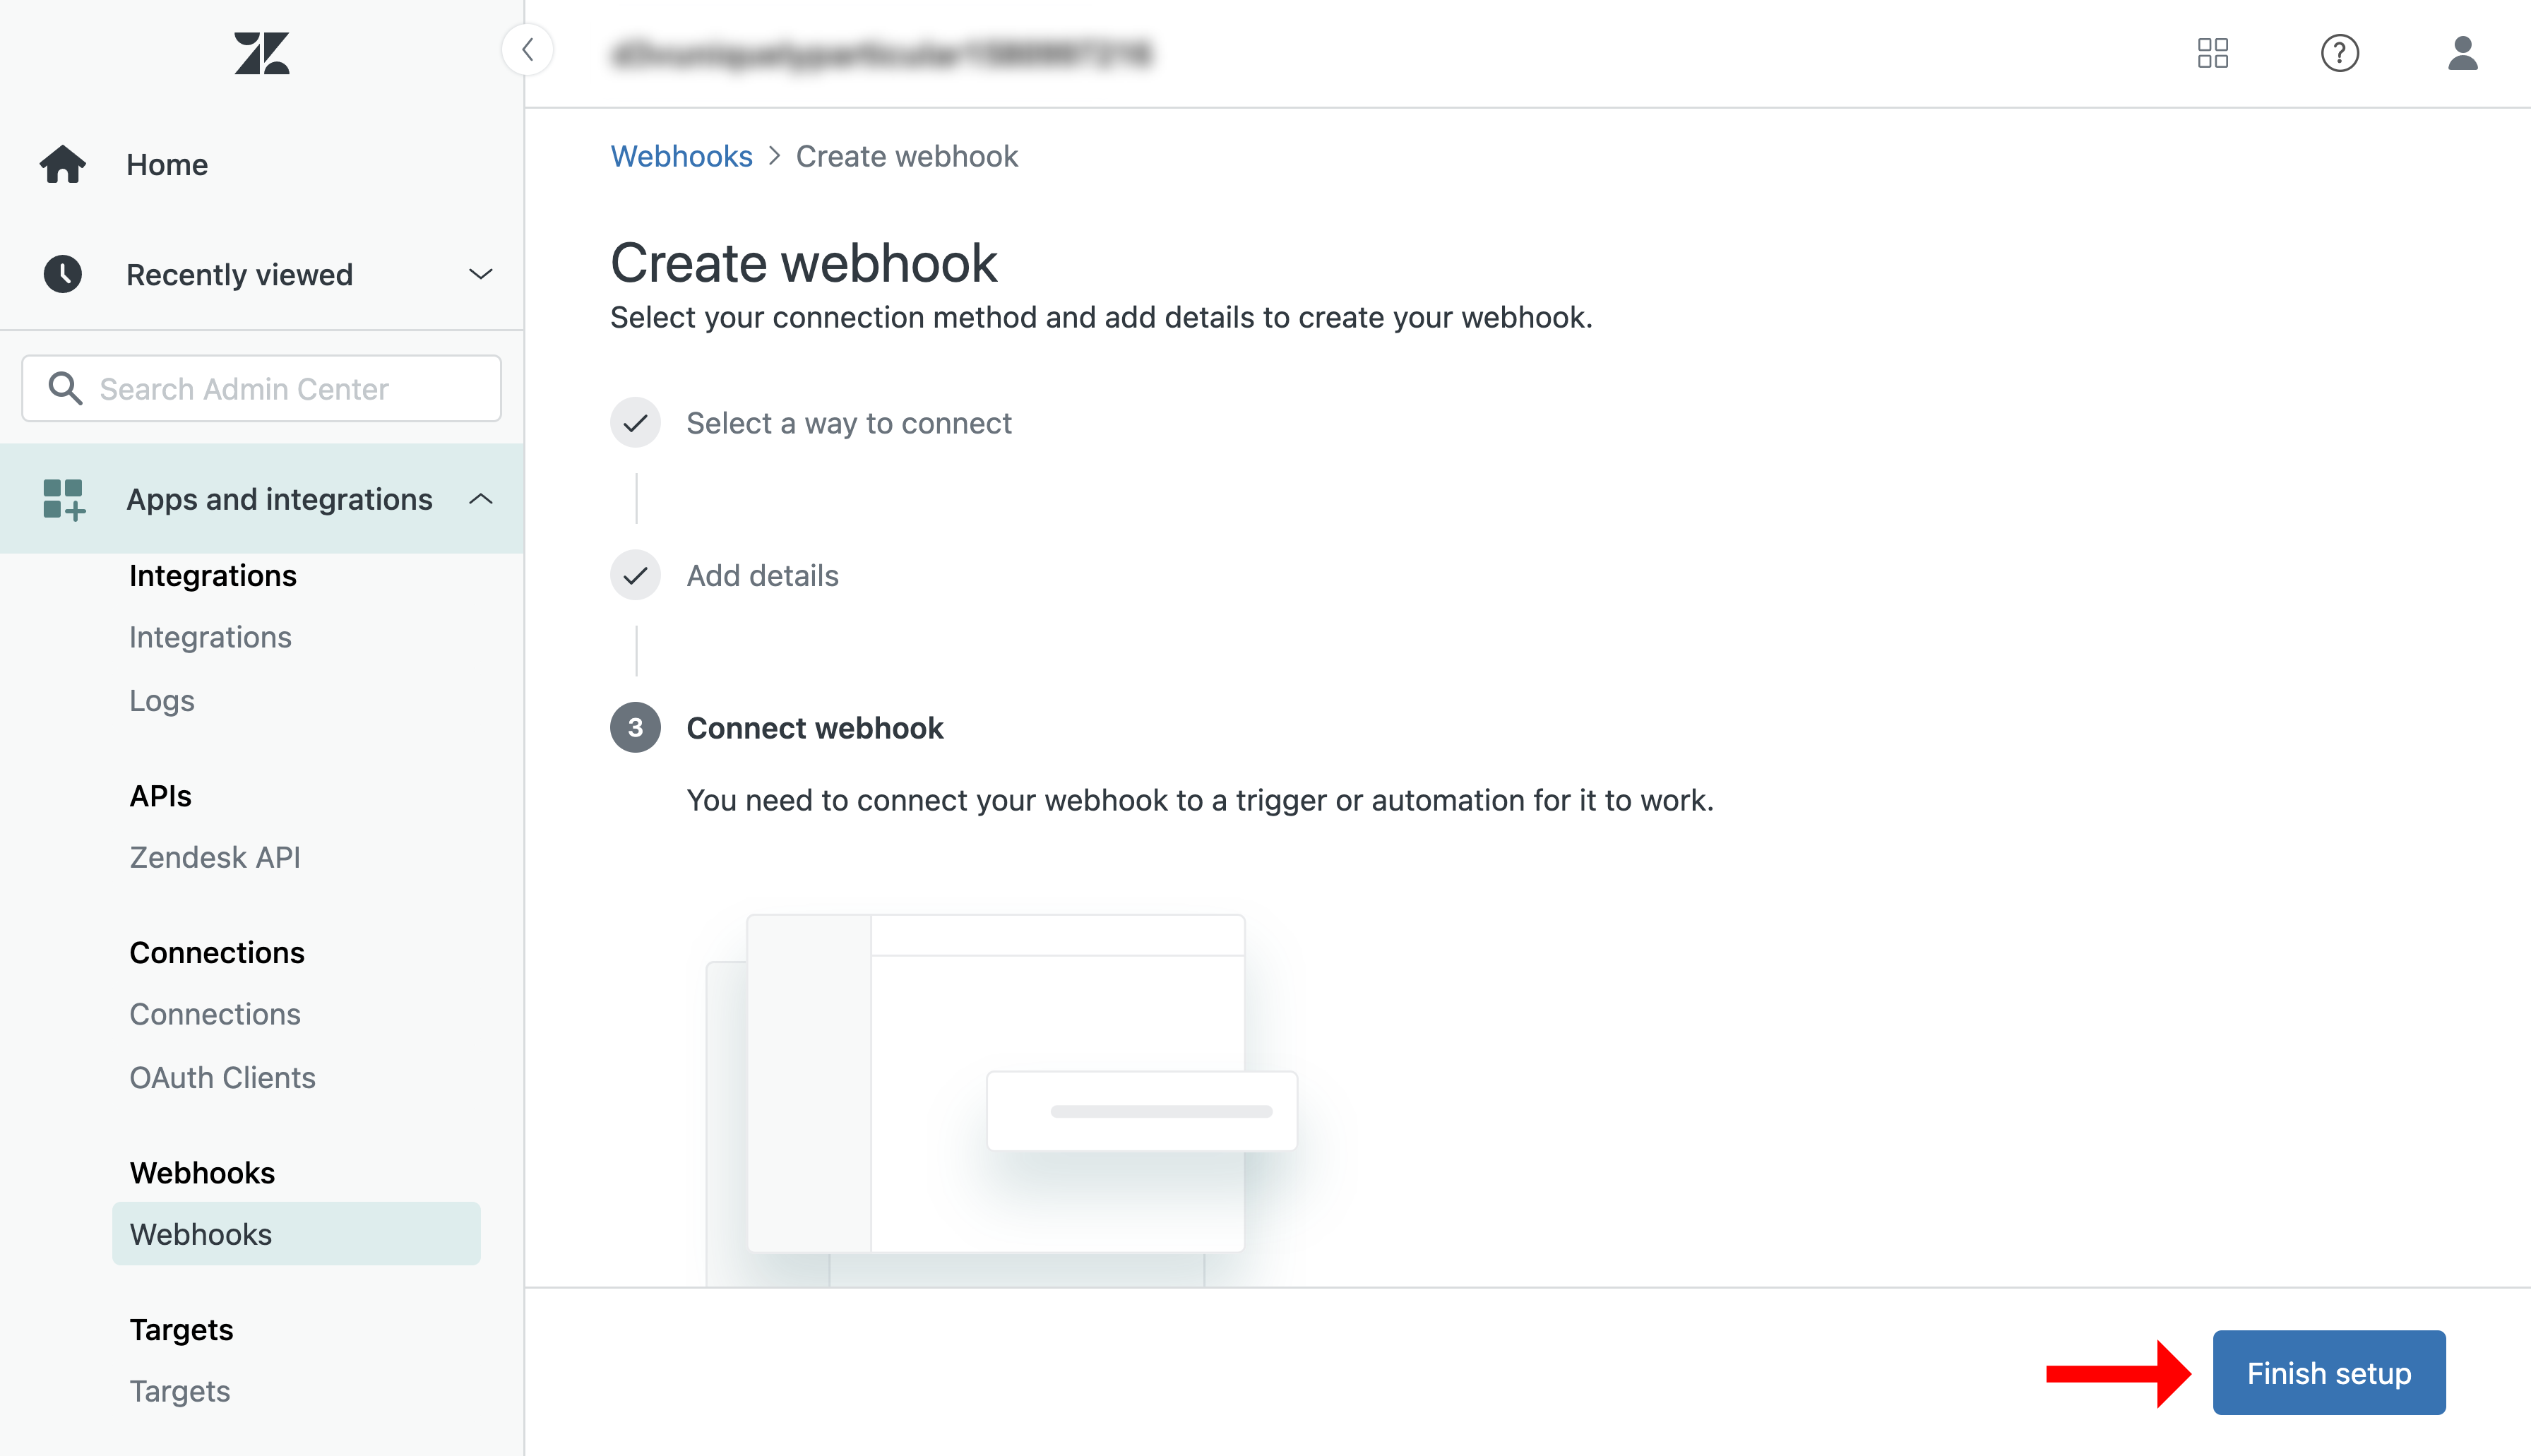
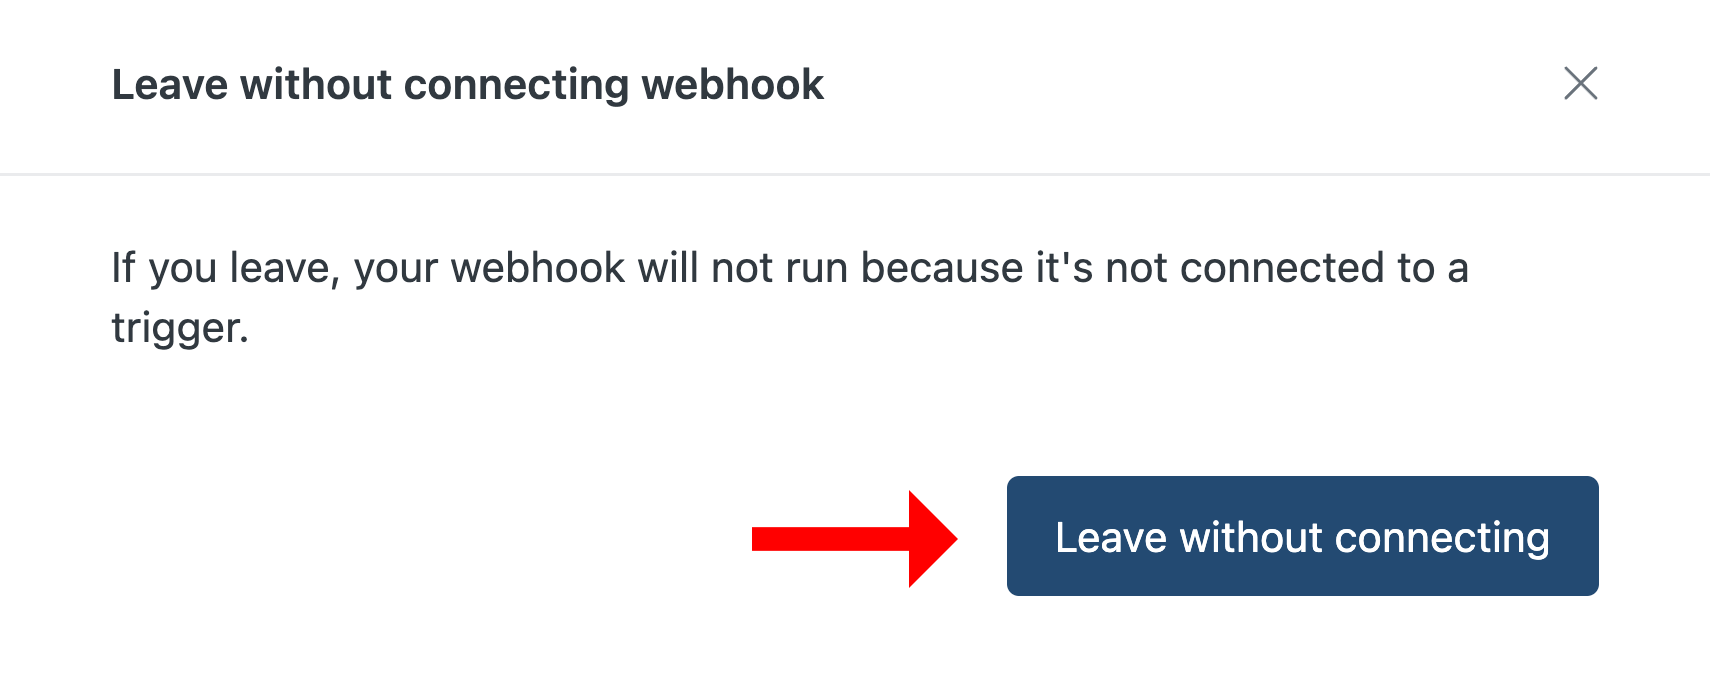
Click "Create webhook", followed by "Finish Setup" and then "Leave without Connecting" to complete the webhook setup.
Configure Zendesk Automations
The next step in the workflow setup is to create Zendesk Automations to facilitate sending the Agent replies to the Okendo Platform.
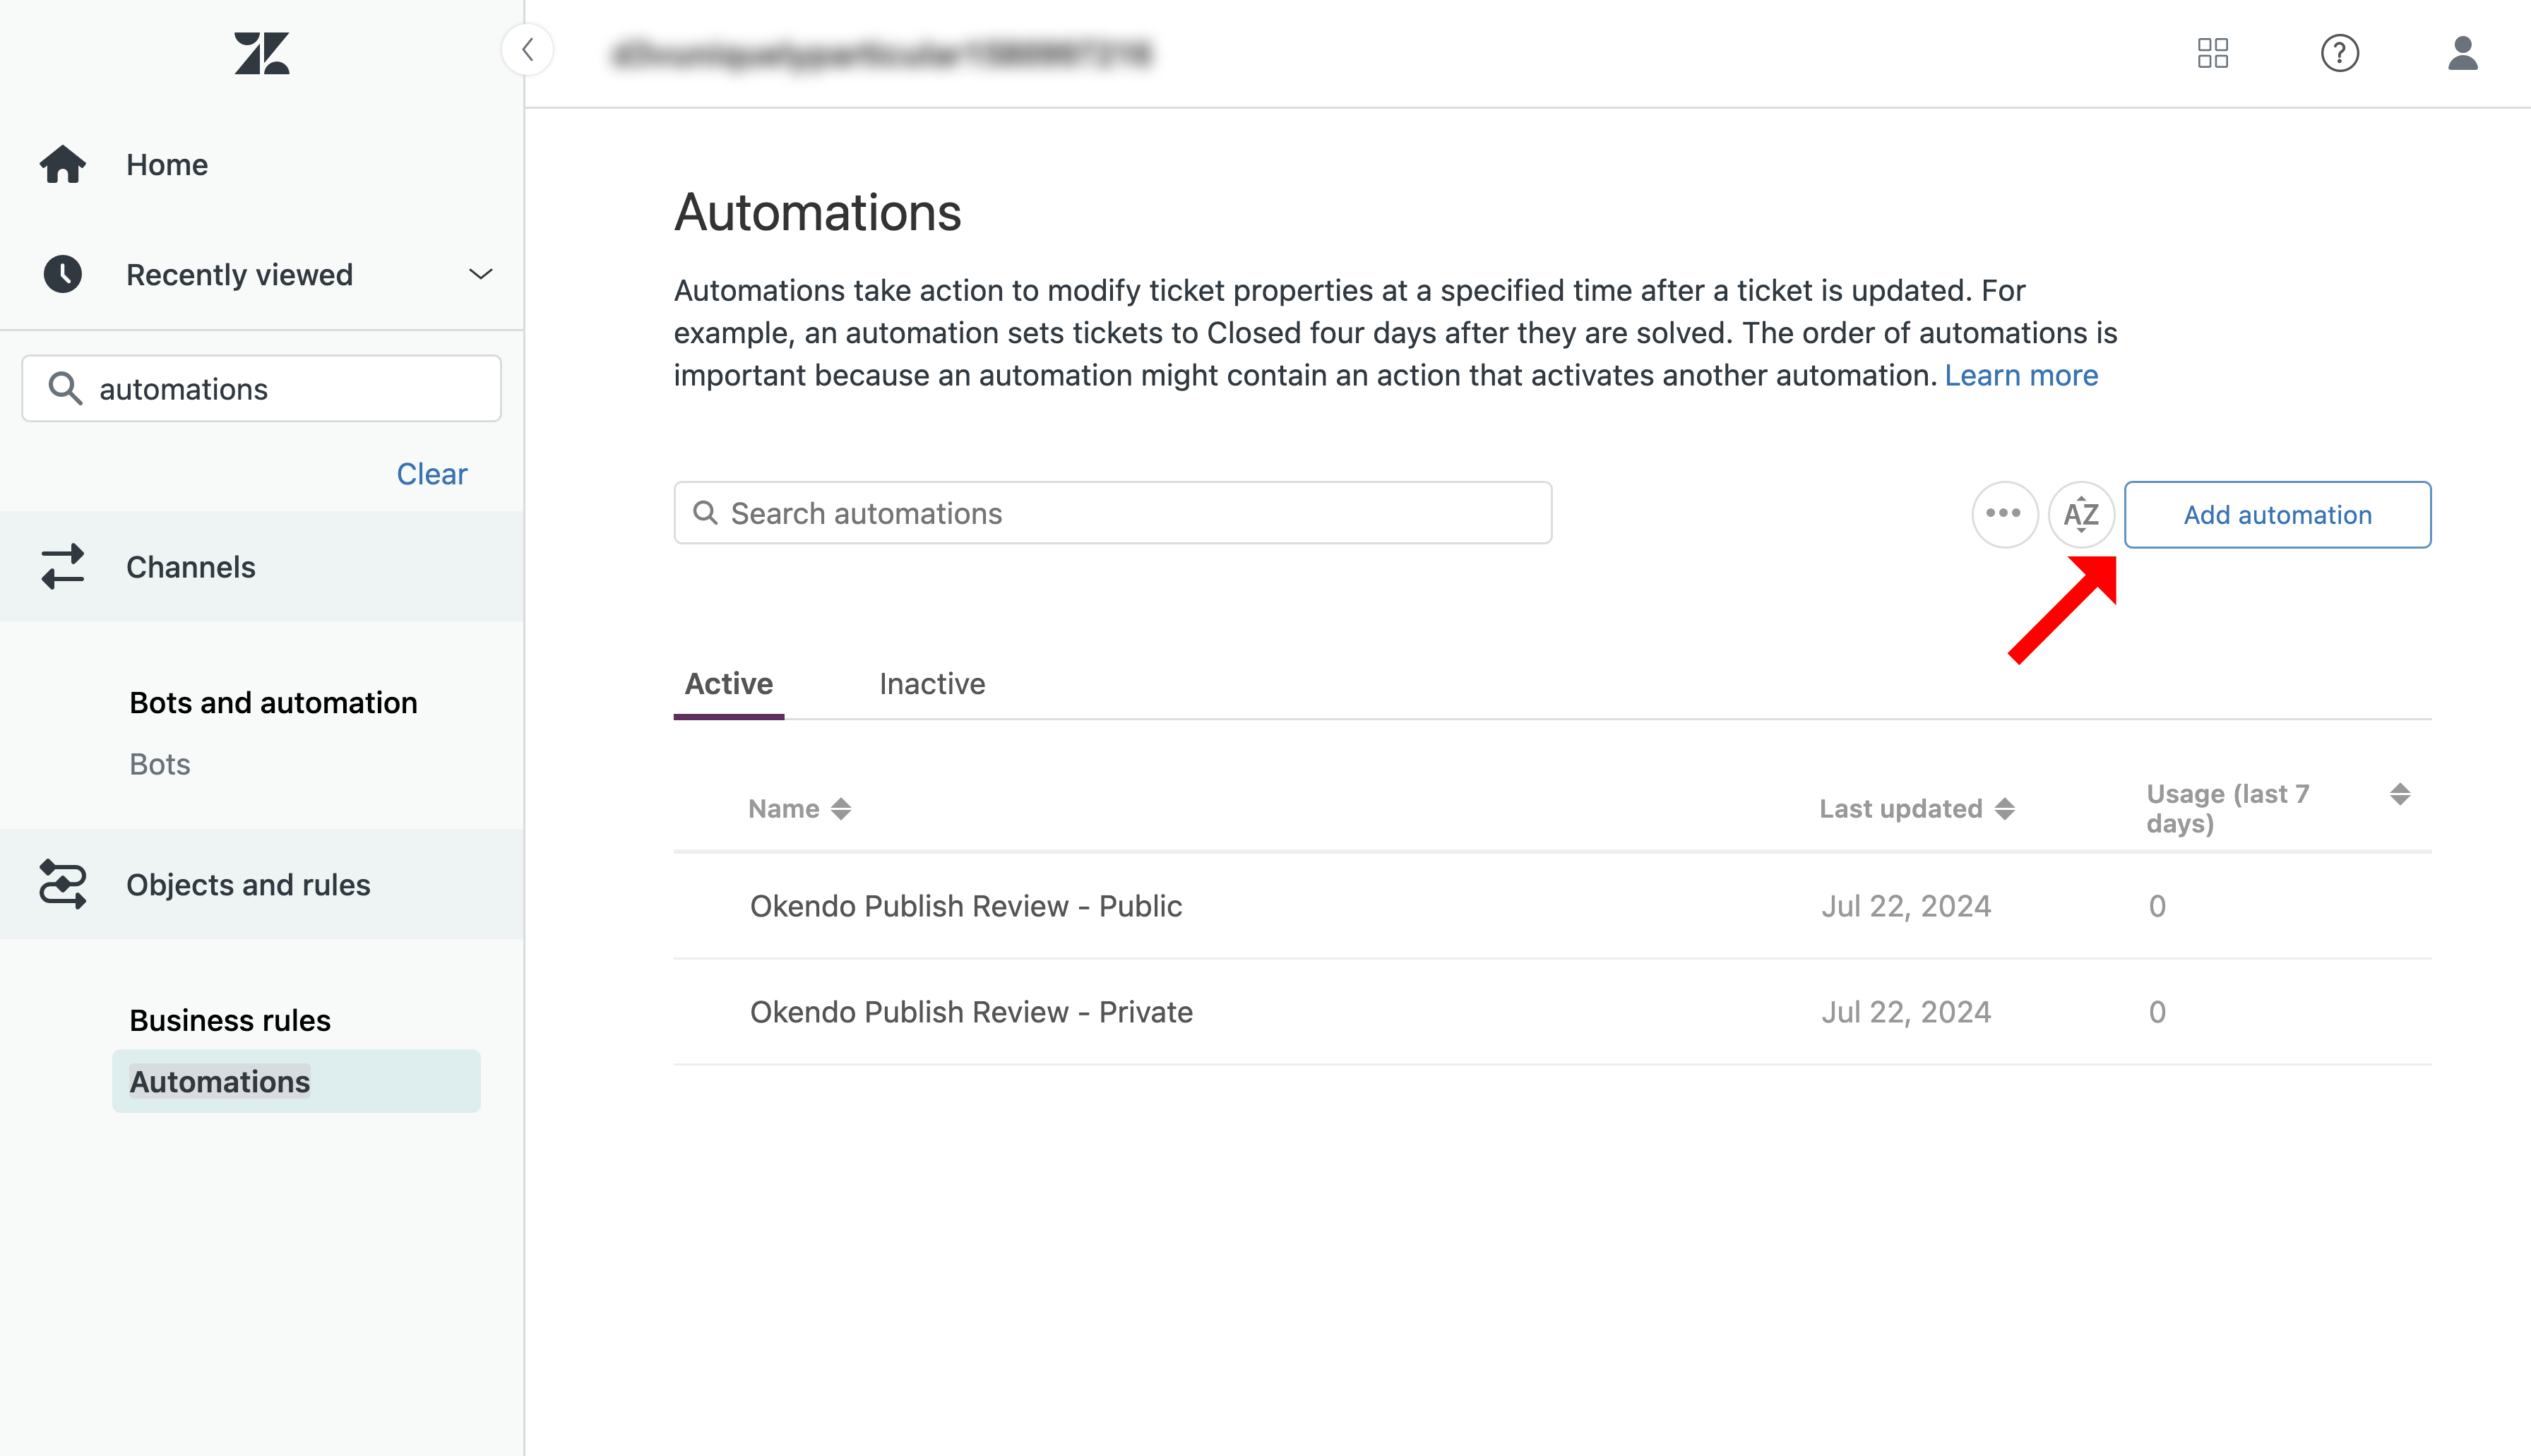
In the Zendesk Admin Center, navigate to "Objects and rules > Business Rules > Automations". Click "Add Automation" and create two new automations.
Create an automation called "Okendo Publish Review - Private", fill in the details according to the display below and click "Create".
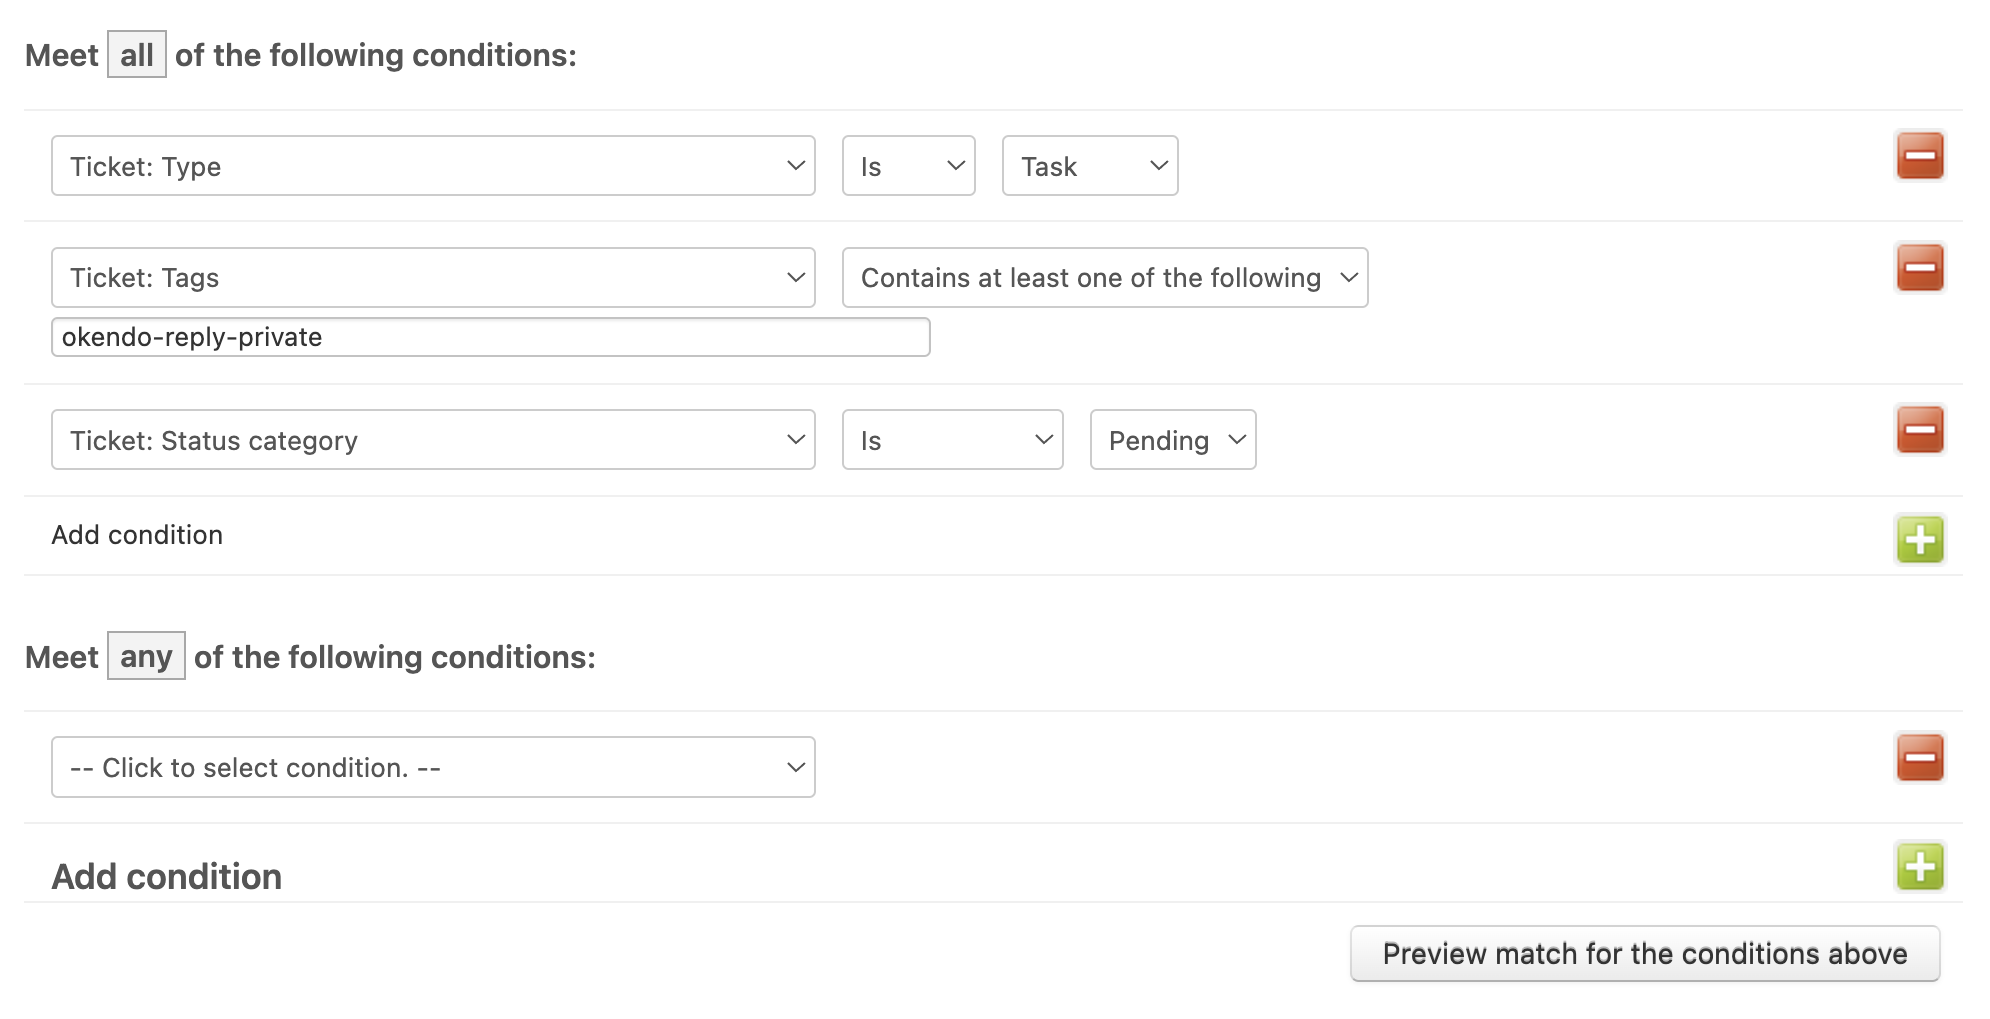
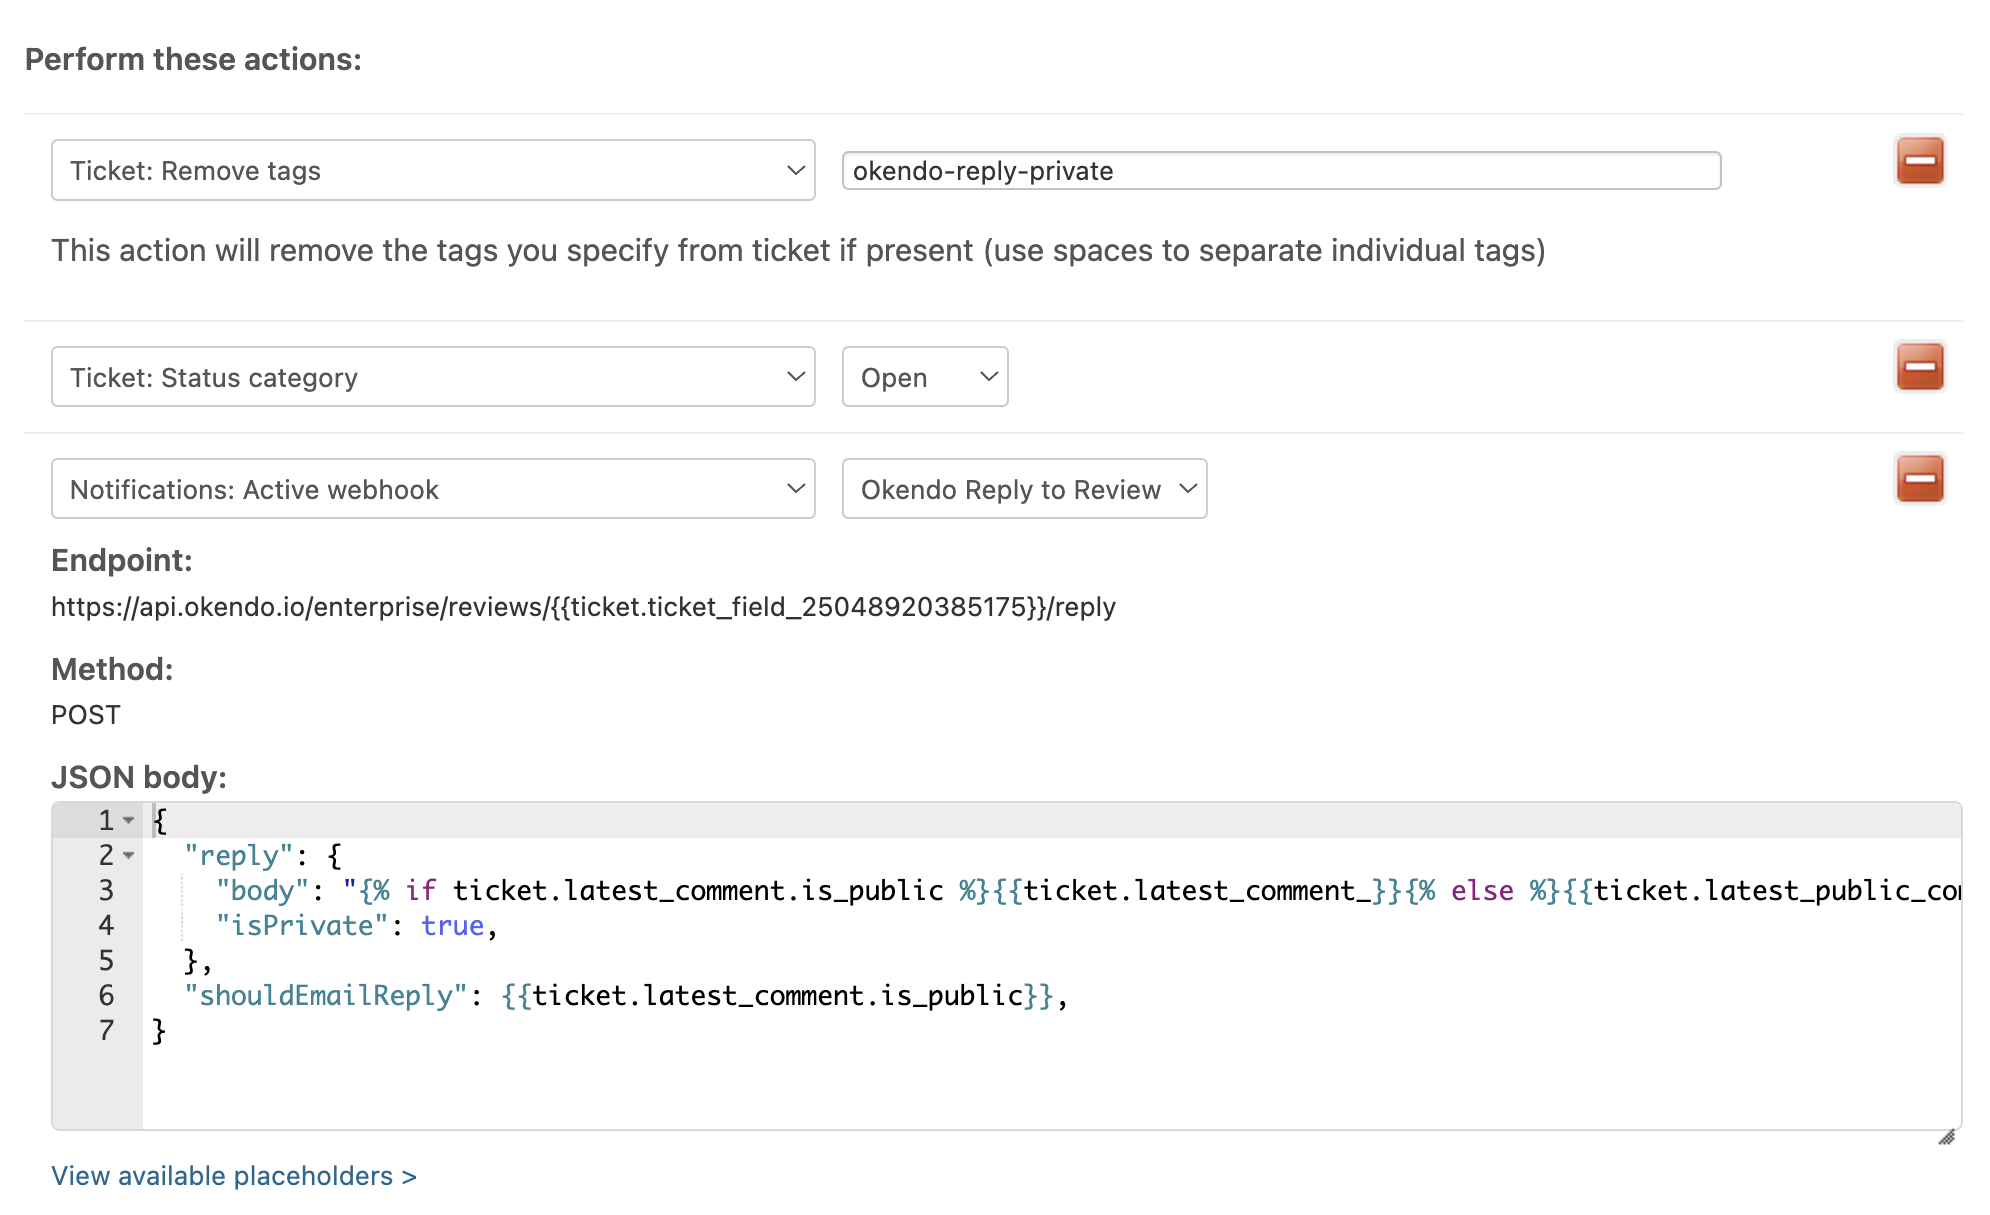
NOTE: To obtain the example/sample code for all sections of this workflow, please reach out to support@agnostack.com for assistance.
Create another automation called "Okendo Publish Review - Public", fill in the details according to the display below and click "Create".

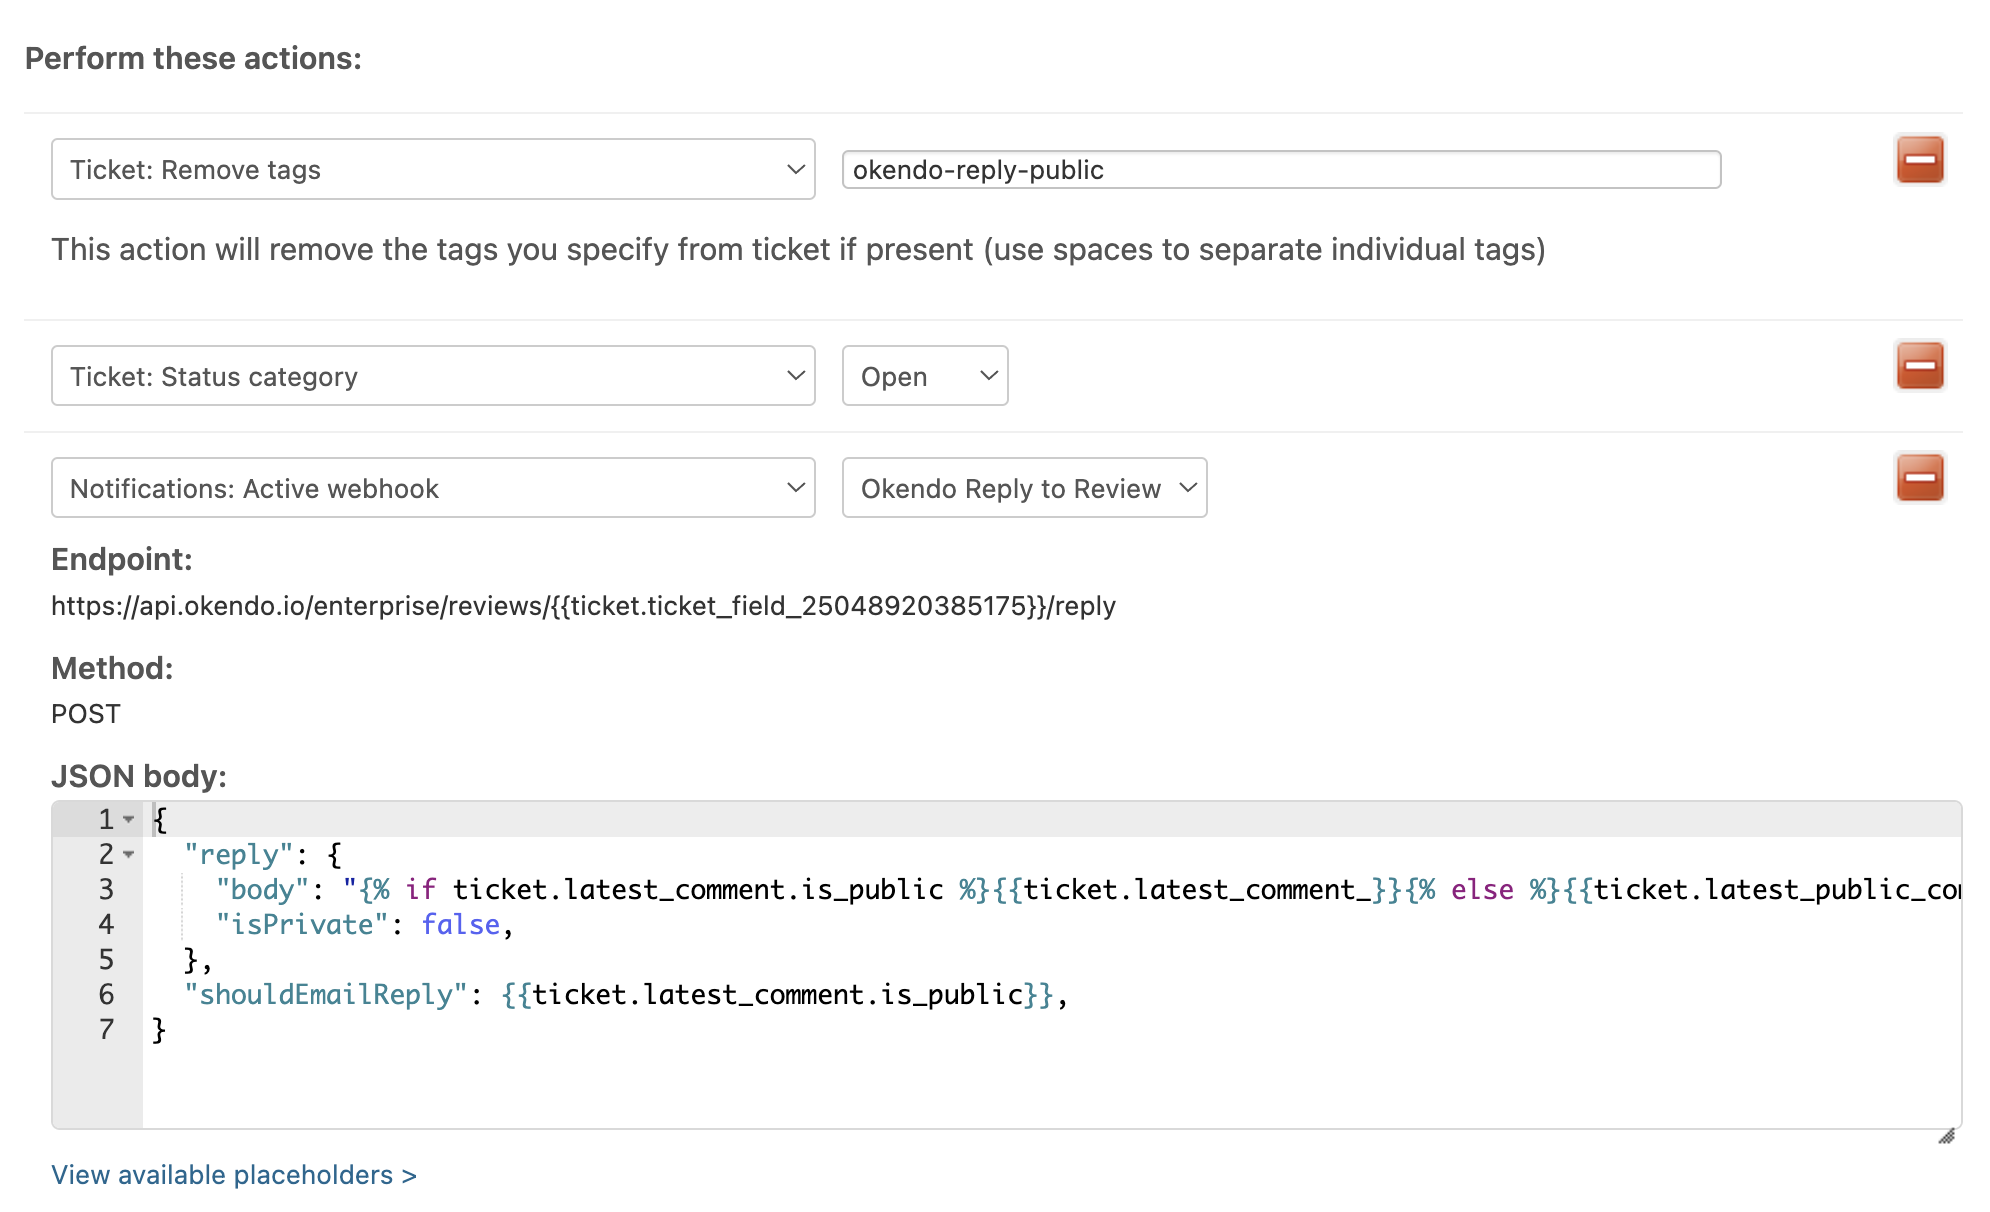
NOTE: To obtain the example/sample code for all sections of this workflow, please reach out to support@agnostack.com for assistance.
Support / Troubleshooting
If you have questions or are having issues with the Okendo review workflow setup, please contact us at support@agnostack.com any time!
We're always happy to help walk through and troubleshoot together with you! We try to make ourselves available across time zones, but if you don't see a timeslot available that works for you please contact us via email and we'll do our best to accommodate.