Frequentlyasked questions.
Limit Access To Specific Agents
Zendesk provides built-in capability to manage which agents have access to any particular plugin through their built in Group functionality. Groups are used to create collections of agents based on criteria those agents have in common. All agents must belong to at least one group, and they can belong to multiple groups.
If you would like to limit access to our plugin to a subset of agents, follow the instructions below. This can be helpful if you want to keep your monthly billing down to a subset of agents (NOTE: minimum number of agents billed each month is determined by your configured agnoStack Pricing Tier and installed application).
Creating groups
How you set up your groups depends on how you want to define your workflow and organize your agents. You might create groups by skill (software vs hardware) or to reflect the organizations they serve (for example, a group might serve only customers in a certain region or time zone or a group for agents who specifically support eCommerce). You may also want to create a specific gr
To create a group:
- Go to the Zendesk Admin Center for your subdomain (https://«YOUR SUBDOMAIN».zendesk.com/admin/home). NOTE: You can also click the Admin icon (
 ) in the sidebar, then select 'Support settings are in Admin Center. Go to Admin Center'.
 - Click on People, and then within the Team section, click on Groups.
- Click the Create group button at the top of the screen.
- Enter a group Name (ie.
agnoStackorCommerce) - and an optional Group description if desired. - Select the agents you want to add to the group.
- If you want this group to be the default group that all new agents are added to, select Make default group.
- Click the Create group at the bottom of the screen to confirm.

Adding Agents to Groups
After you have an agent user created, you can add them to either pre-existing groups or assign them to new groups. For information on how to create a new agent, see Adding end-users, agents, and administrators.
Agents are added or removed from groups via the groups editor, accessed from their profile page.
Adding specific agents to a group:
- On an agent's profile page, click the Groups field.
- Select the group you want to add the agent to. A default group will automatically be assigned. See Changing the default group for information on how to change an agent's default group.
- Click Close.
Adding agents to a new group:
- On an agent's profile page, click the Groups field.
- Hover over Create a new group.
- Type your new group name.
- Click the add icon next to the new group name.
- Your new group will be created with the agent added.
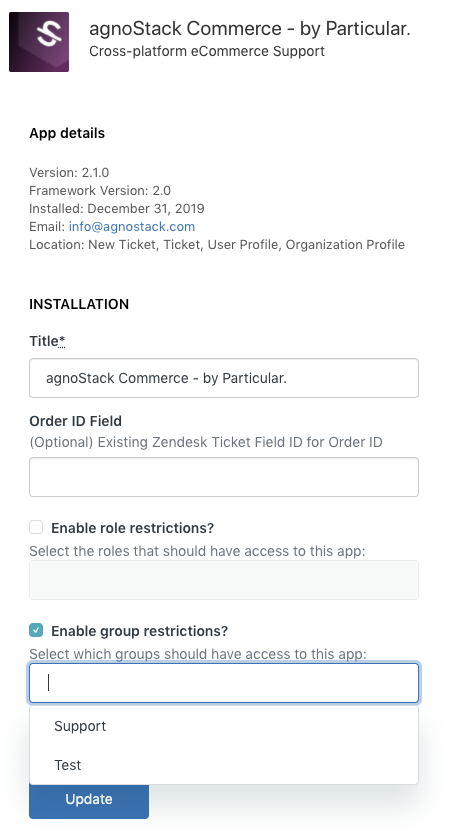
Restricting agnoStack to a specific group
After you have added the specific agents you want to a particular group, you can then go into your agnoStack plugin settings and limit access to that particular Group.
To configure enabled group:
- Click the Admin icon () in the sidebar, then select Apps > Manage.
- Click on the agnoStack plugin to go to the built-in configuration page.
- Enable the checkbox next to Enable group restrictions?.
- Select the group that you configured above from the list of available groups.
- Click Update to save your new group restrictions for the plugin.
Once you've enabled restrictions for a specific Group(s)/Role(s) for the plugin, please be sure to log in as a user with that specific group access and ensure the plugin is available in the Apps sidebar (as well as login with an account that is not part of the restricted group and ensure the app is not showing up).
If you run into any trouble or need additional assistance, please contact us any time at support@agnostack.com.